Base Products Corporation www.basepump.com 800 554 1426 page
Models: RB750, HB1000, CB1500 Copyright by Base Products Corporation 2015 Rev. May/2015
Installation Instructions (Outdoor Discharge)
Step 1. Mount Ejector on Joist
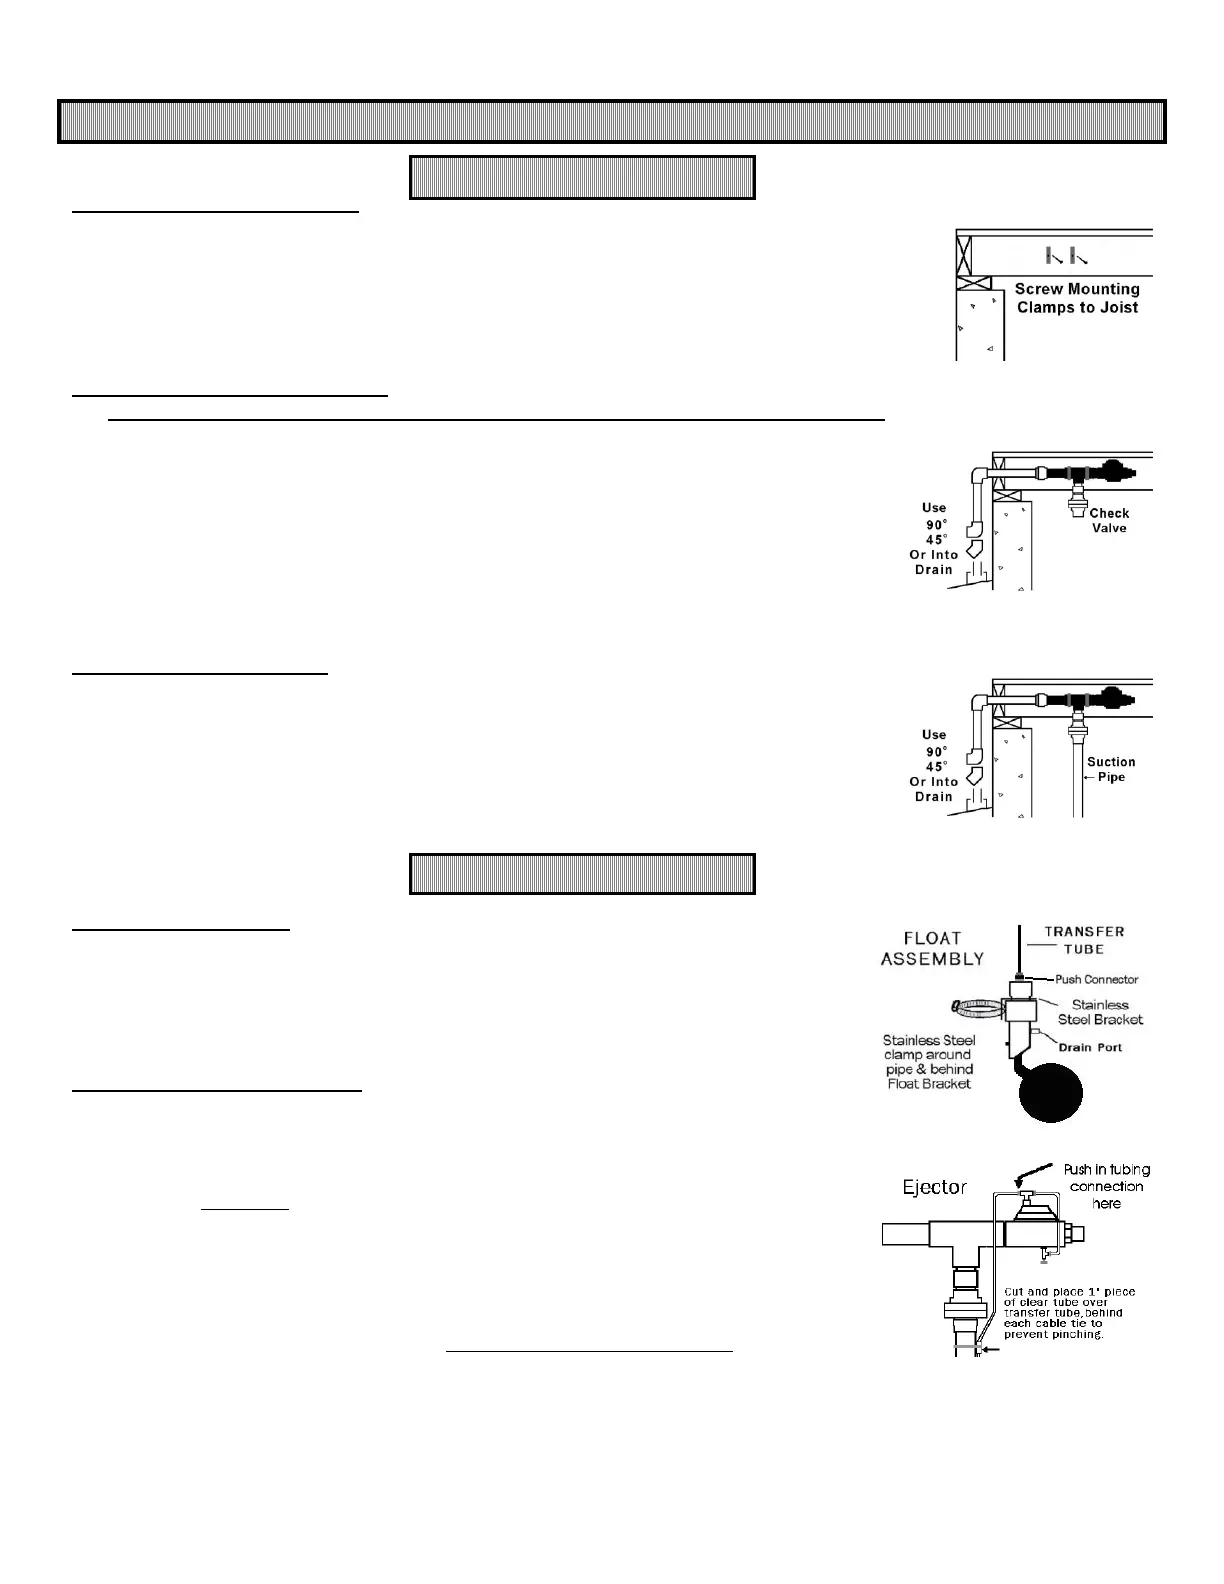
Mount the Ejector above the sump against the side or bottom of one of the ceiling joists
(See page 4). For Outdoor Discharge, check the building exterior to make sure the
discharge will clear any obstacles. Pump may be offset to clear obstacles (See page 4).
The suction pipe can be fitted in various ways to accommodate this location (See page 4).
Attach the mounting clamps to the ceiling joist using 1" wood screws and snap the pump
unit into the Clip-on Hangers.
Step 2. Install Outdoor Discharge
**(For Indoor Discharge: Refer to pages 3 & 4 for Installation Notice and details.)**
Drill a 1-1/2” hole through the building exterior wall for the discharge to exit the building. Vertical rises of more than 2
feet on the discharge will reduce pumping rates and the vacuum breaker will drain
excess water after shutoff.
Cement a 90° elbow (in most cases) onto the included discharge hose outside the
building, as shown. See page 4 for various installation options.
Cement a short length of PVC pipe into the bottom of the Elbow to direct the water down
toward the ground. Use a 90º or 45º elbow to divert the flow away from the foundation,
onto the ground, a splash block, or into a larger drain pipe. Remember, this is a back-up
sump pump and will only run during a sump pump failure.
Step 3. Install Suction Pipe
Locate the suction pipe in the sump to clear the primary pump and all obstructions (See
page 4). Cement the pipe into the PVC female fitting on the Suction Screen.
Cut pipe to the proper length, cement the upper end into the Ejector check valve,
making sure that the lower end of the Suction Screen is approx. 2-4 inches above the
bottom of the sump. Either 45 or 90 degree elbows maybe used to offset the suction
pipe, if necessary (See page 4). Suction pipe may be fastened to the side of the sump, if
necessary, using the gray clamp included in the parts kit.
_________________________________________________________________
Step 4. Install the Float
Clamp the Float Assembly to the suction pipe so the float ball hangs just above the
“normal high water level”; tighten clamp securely around the pipe.
Make sure the Float Assembly clears your sump cover and that the float ball moves
freely; you may rotate or adjust the angle of the float ball to clear any obstruction.
You may need to cut the cover to help it clear.
Step 5. Connect Transfer Tube
Push one end of the thin transfer tube firmly into the push connector of the small Tee
on top of the Pump Ejector.
Hang the tube down along the suction pipe to the float. Make sure the ends of the
tube are fully open and are cut clean and square.
Cut the 6” clear tube into 5 pieces and slide them onto the transfer tube.
Push the lower end of transfer tube into the connector on the top of the float
assembly. Fittings are self-sealing when fully inserted.
Note: To remove the tube from a fitting, PUSH in the retainer ring while you PULL
out the tube. Reinsert by pushing it in firmly till it hits bottom.
Use cable ties to strap the transfer tube along the suction pipe; slide one piece of the
clear tube up behind each cable tie to prevent pinching of transfer tube (see sketch
to the right). You may leave the excess transfer tube coiled at the top by the pump or
at the bottom by the float, or you may cut it off. It’s best to leave at least a foot extra in case of later adjustments.
 Loading...