EasyManua.ls Logo

Bassini Harmony Series User Manual

Bassini Harmony Series
12 pages
To Next Page IconTo Next Page
Page #1 background imageLoading...
Page #1 background image
INSTALLATION INSTRUCTIONS
FOR BASSINI TOILET SUITES
Before installation, a visual check of the suite should
be undertaken. The pan, seat, pan fixings and trap
connector come in one box and the cistern and valves
are in a separate box. Ensure that nothing is damaged
or missing.
The drawings on the back of this installation document
show the “set-out’ for the Bassini pan. If it is to be
installed as an S-trap, the standard set-out can be
anywhere from 90-190mm (Back To Wall models) &
90-110mm (Wall Faced with Concealed Cistern Models)
from the finished wall to the centre of the waste outlet.
The two-piece plastic trap connector allows additional
flexibility in the set-out if needed.
Bassini toilet suites can be installed
with back-entry or bottom-entry
water connections. The Bassini
pans, both standard height and easy
height, can be installed as P-trap, or
S-trap using the universal plastic trap
connector supplied with the pan.
1. Establish the rough in positions for the water inlet
to the cistern, the waste outlet and the holes for
the pan fixing brackets (see drawing overleaf).
For back-inlet connections, ensure the water
inlet connection is extending 40mm from the
finished wall.
2. Prepare the waste outlet according to the required
set-out.
For S-Trap installations, cut the plastic trap
connector to suit the set-out. (The grooves on the
trap connector are 10mm apart.)
For P-Trap installations, set the centre of the
waste outlet 185mm from the finished floor level.
NB. A pan collar to connect the P-trap to the
waste outlet is not supplied with the pan.
3. Drill the holes in the floor for the fixing brackets,
ensuring that they are 40mm inside the traced
outline of the pan (see separate instructions
accompanying the bracket).
The installation of this toilet suite should be undertaken by a qualified and licensed plumber and in accordance with the
National Plumbing Code AS/NZS 3500.2 Harmony sanitaryware products are designed to meet the appropriate Australian standards.
BASSINI
Setup:
For further information, visit www.harmonybathroomware.com.au
Harmony Installation Instructions - Bassini_V4.indd 3 22/02/2017 12:31 PM
Question and Answer IconNeed help?

Do you have a question about the Bassini Harmony Series and is the answer not in the manual?

Bassini Harmony Series Specifications

General IconGeneral
BrandBassini
ModelHarmony Series
CategoryToilets
LanguageEnglish

Summary

Setup Instructions

Prepare Waste Outlet

Prepare waste outlet for P-trap or S-trap installation, noting specific set-out requirements.

Drill Fixing Bracket Holes

Drill holes for pan fixing brackets 40mm inside the traced outline of the pan.

S-Trap Installation: Back To Wall Back-Entry

Install Trap Connector and Pan

Lubricate and fix trap connector, align pan with connector, and ensure firm connection.

Install Cistern and Water Line

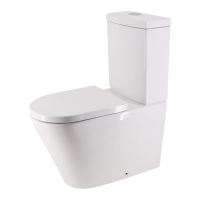
Bolt cistern to pan, flush, and connect water inlet valve to the correct level.

Final Installation Steps

Ensure levelness, attach cistern, seat, fix pan to floor, silicone, and test flush.

S-Trap Installation: Back To Wall Bottom-Entry

Install Trap Connector and Pan

Lubricate and fix trap connector, align pan, and ensure firm connection.

Connect Cistern and Water Supply

Bolt cistern to pan, connect flexible connector to water inlet and point.

Final Installation Steps

Ensure levelness, attach cistern, seat, fix pan to floor, silicone, and test flush.

S-Trap Installation: Wall-Faced Pans with Concealed Cistern

Install Cistern and Flush Pipe

Install cistern in wall, adhere to height/pressure, set flush pipe height.

Connect Trap Connector and Pan

Lubricate trap connector, fix to wall, align pan with connector and flush pipe.

Final Steps for Concealed Cistern

Attach seat, fix pan to floor, silicone, and test flush.

Care and Maintenance

Cleaning Instructions

Clean toilet suite with liquid detergent and a damp cloth.

Cistern Usage

Do not use water additives or place them in the cistern.

Concealed Cistern Installation Manual

List of Main Installation Accessories

Details the main accessories required for concealed cistern installation with their quantities and functions.

General Dimensions and Water Supply

Water Supply Options

Illustrates water supply to cistern from back (Option 1) or top (Option 2).

Switching Water Supply

Back vs. Top Water Supply

Guides on switching to top water supply if back water supply is not feasible during installation.

Concealed Cistern Mounting

Drill Holes for Expansion Bolts

Instructions for drilling holes precisely for the concealed cistern expansion bolts.

Install Concealed Cistern

Steps for securely mounting the concealed cistern unit to the wall.

Connecting Tube and Accessories

Install Connecting Tube

Procedure for installing the connecting tube between the cistern and the ceramic bowl.

Mount Installation Accessories

Attaching essential accessories like plastic holders for actuator and piping stopper.

Ceramic Bowl Mounting

Wall Thickness Consideration

Details on wall thickness range (20-60mm) for cistern foam cover to decorated surface.

Mount Ceramic Bowl

Step-by-step guide for mounting the ceramic bowl onto the installed cistern and trap.

Internal Flushing Mechanism

Flush Mechanism Assembly

Diagram and reference for the internal flushing mechanism assembly of the cistern.