Do you have a question about the BAUKER PGA125G2 and is the answer not in the manual?
Keep work area clean and well lit, avoid explosive atmospheres, and keep children away.
Ensure plugs match outlets, avoid contact with grounded surfaces, keep away from rain/wet conditions.
Tool is for grinding/cutting; avoid sanding, wire brushing, polishing as they are not recommended.
Use only accessories specifically designed and recommended by the manufacturer.
Accessory rated speed must match or exceed the tool's maximum speed rating.
Accessory diameter and thickness must be within the power tool's capacity rating.
Ensure threaded mounting, bore hole, and flange fit correctly for balance and control.
Inspect accessories for chips, cracks, or loose wires before each use.
Wear appropriate PPE like face shield, safety goggles, dust mask, and hearing protection.
Keep bystanders at a safe distance and ensure they wear PPE if entering the work area.
Hold by insulated grips when near wiring. Contact with live wire can cause electric shock.
Keep the power cord clear of the spinning accessory to prevent cutting or snagging.
Never lay down the tool until the accessory has completely stopped to maintain control.
Do not run the tool while carrying it at your side to avoid accidental contact.
Regularly clean air vents to prevent dust accumulation and electrical hazards.
Do not operate the power tool near flammable materials as sparks can ignite them.
Do not use accessories requiring liquid coolants to prevent electrocution or shock.
Always hold the tool firmly with both hands using auxiliary handles for control.
Understand kickback causes and how to avoid it by maintaining a firm grip and proper body positioning.
Maintain a firm grip and position body to resist kickback forces, use auxiliary handle.
Never place hands near the rotating accessory to avoid injury from kickback.
Avoid positioning body in the tool's potential kickback path.
Use special care on corners and sharp edges to avoid snagging and loss of control.
Do not attach saw chain or toothed saw blades as they cause frequent kickback.
Use only recommended wheel types and guards designed for your power tool and wheel.
Mount centre depressed wheels so grinding surface is below guard lip for protection.
Securely attach and position the guard for maximum safety, exposing minimum wheel.
Use wheels only for their recommended applications, e.g., don't grind with cut-off wheel side.
Use undamaged, correctly sized flanges to support the wheel and prevent breakage.
Do not use wheels from larger tools as they may not suit the speed of smaller tools.
Specific safety guidelines for cutting-off operations.
Avoid jamming the cut-off wheel or applying excessive pressure to prevent binding.
Do not position body in line with the rotating wheel to avoid kickback injury.
Switch off and wait for wheel to stop if binding; never remove a moving wheel.
Do not restart a cut in the workpiece; let the wheel reach full speed before re-entering.
Support large workpieces to minimize pinching and kickback risks.
Use caution when making pocket cuts in walls or blind areas to avoid hidden hazards.
Prolonged vibration exposure can cause health defects if not managed properly.
Injuries can occur from broken tools or sudden impact with hidden objects.
Flying objects from operations can cause injury or property damage.
Product produces an electromagnetic field that may interfere with medical implants.
Specifies that the machine is for cutting, roughing, and brushing metal/stone materials.
Instructions for mounting and adjusting the grinding or cutting wheel guard.
Guidance on installing and positioning the auxiliary handle for safe operation.
Steps for mounting the inner flange, disc, and outer flange onto the spindle.
Instructions on using the spindle lock button for securing tools.
Emphasizes the importance of holding the grinder firmly with both hands.
How to activate and use the safety lock-off switch to prevent accidental starts.
Guidance on operational techniques, angles, and spark management during grinding.
Specific instructions for cutting metal, including guard use, feed, and direction of cut.
Advice on avoiding motor overload and what to do if the tool becomes too hot.
Procedure for replacing worn carbon brushes, including safety precautions.
Avoid forcing the disc; work with proper angles for better finish and longer life.
Maintain a 15-30 degree angle between the disc and workpiece for best results.
Maintain a consistent cutting angle; changing it can stall the disc or motor.
Diamond discs are recommended for cutting very hard materials for best results.
Diamond discs can get very hot; stop and cool if sparks appear around the disc.
Always firmly hold or clamp the workpiece to prevent movement during operation.
Check main plug power if the grinder fails to operate.
Check outer flange tightness and wheel location if wobbling or vibration occurs.
Do not use damaged wheels; remove, replace, and dispose of them properly.
Soft alloy dust can clog wheels; consider alternative methods or cleaning.
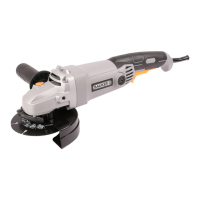
The Bauker PGA125G2 is a 1200W 125mm angle grinder designed for grinding and cut-off operations on metal and stone materials without the use of water. It is also capable of peripheral and lateral grinding.
This power tool is intended to function as a grinder or cut-off tool. Users must read all safety warnings, instructions, illustrations, and specifications provided with the power tool. Failure to follow these instructions may result in electric shock, fire, and/or serious injury. Operations such as sanding, wire brushing, and polishing are not recommended with this power tool, as it was not designed for these tasks and may create hazards or personal injury.
Only use accessories specifically designed and recommended by the tool manufacturer. The rated speed of the accessory must be at least equal to the maximum speed marked on the power tool; accessories running faster than their rated speed can break and fly apart. The outside diameter and thickness of the accessory must be within the capacity rating of the power tool. Incorrectly sized accessories cannot be adequately guarded or controlled. Threaded mounting of accessories must match the grinder spindle thread. For accessories mounted by flanges, the arbor hole of the accessory must fit the locating diameter of the flange. Accessories that do not match the mounting hardware will run out of balance, vibrate excessively, and may cause loss of control.
Do not use damaged accessories. Before each use, inspect accessories such as abrasive wheels for chips and cracks, and wire brushes for loose or cracked wires. If the power tool or accessory is dropped, inspect it for damage or install an undamaged accessory. After inspecting and installing an accessory, position yourself and bystanders away from the plane of the rotating accessory and run the power tool at maximum no-load speed for one minute. Damaged accessories will normally break apart during this test time.
Wear personal protective equipment appropriate for the application, including a face shield, safety goggles or safety glasses, dust mask, hearing protectors, gloves, and a workshop apron capable of stopping small abrasive or workpiece fragments. Eye protection must be capable of stopping flying debris. The dust mask or respirator must filter particles generated by the operation. Prolonged exposure to high-intensity noise may cause hearing loss. Keep bystanders a safe distance away from the work area, and ensure anyone entering the work area wears personal protective equipment. Fragments of the workpiece or a broken accessory may fly away and cause injury beyond the immediate area of operation.
Hold the power tool by insulated gripping surfaces only when performing an operation where the cutting accessory may contact hidden wiring or its own cord. Contact with a "live" wire may make exposed metal parts of the power tool "live" and could cause electric shock. Position the cord clear of the spinning accessory to prevent it from being cut or snagged, which could pull your hand or arm into the accessory. Never lay the power tool down until the accessory has come to a complete stop, as it may grab the surface and pull the tool out of control. Do not run the power tool while carrying it at your side, as accidental contact could snag clothing and pull the accessory into your body. Regularly clean the power tool's air vents, as the motor's fan will draw dust inside the housing, and excessive accumulation of powdered metal may cause electrical hazards. Do not operate the power tool near flammable materials, as sparks could ignite them. Do not use accessories that require liquid coolants, as this may result in electrocution or shock. Always hold the handle firmly and use the auxiliary handles supplied with the tool to maintain control and prevent personal injury.
Use only wheel types recommended for your power tool and the specific guard designed for the selected wheel. Wheels not designed for the power tool cannot be adequately guarded and are unsafe. The grinding surface of center depressed wheels must be mounted below the plane of the guard lip; an improperly mounted wheel that projects through the guard lip cannot be adequately protected. The guard must be securely attached to the power tool and positioned for maximum safety, exposing the least amount of wheel towards the operator. The guard protects against broken wheel fragments and accidental contact with the wheel and sparks that could ignite clothing.
Wheels must be used only for recommended applications. For example, do not grind with the side of a cut-off wheel. Abrasive cut-off wheels are intended for peripheral grinding; side forces applied to these wheels may cause them to shatter. Always use undamaged wheel flanges that are of the correct size and shape for your selected wheel. Proper wheel flanges support the wheel, reducing the possibility of wheel breakage. Flanges for cut-off wheels may differ from grinding wheel flanges. Do not use worn-down wheels from larger power tools, as wheels intended for larger tools are not suitable for the higher speed of a smaller tool and may burst.
Do not "jam" the cut-off wheel or apply excessive pressure, and do not attempt to make an excessive depth of cut. Overstressing the wheel increases loading and susceptibility to twisting or binding, leading to kickback or wheel breakage. Do not position your body in line with and behind the rotating wheel. If the wheel moves away from your body at the point of operation, kickback may propel the spinning wheel and power tool directly at you.
If the wheel is binding or if you interrupt a cut for any reason, switch off the power tool and hold it motionless until the wheel comes to a complete stop. Never attempt to remove the cut-off wheel from the cut while it is in motion, as kickback may occur. Investigate and take corrective action to eliminate the cause of wheel binding. Do not restart the cutting operation in the workpiece. Let the wheel reach full speed and carefully reenter the cut. The wheel may bind, walk up, or kickback if the power tool is restarted in the workpiece.
Support panels or any oversized workpiece to minimize the risk of wheel pinching and kickback. Large workpieces tend to sag under their own weight; supports must be placed under the workpiece near the line of cut and near the edge of the workpiece on both sides of the wheel. Use extra caution when making a "pocket cut" into existing walls or other blind areas. The protruding wheel may cut gas or water pipes, electrical wiring, or objects that can cause kickback.
Even with all safety requirements followed, potential risks of injury and damage remain. These dangers include health defects from vibration emission if the product is used for long periods or not properly managed and maintained, injuries and property damage from broken application tools or sudden impact with hidden objects, and injury and property damage from flying objects. This product produces an electromagnetic field during operation, which may interfere with active or passive medical implants. Persons with medical implants should consult their doctor and the implant manufacturer before operating this product.
The PGA125G2 features a hand grip area (1), on/off switch (2), safety lock-off switch (3), cap of carbon brush (4), wheel guard for grinding (5), wheel guard for cutting (6), grinding wheel (not supplied) (7), guard clamping lever (8), spindle locking button (9), outer flange (10), inner flange (11), and clamping adjustment nut (12).
Before any work on the machine, disconnect the mains plug. For grinding or cutting discs, the wheel guard must be mounted.
The angle grinder offers two working positions for safe and comfortable control. The handle is screwed clockwise into either hole on the sides of the gear case. This handle should always be used to maintain complete control of the tool.
Place the inner flange (11) onto the tool spindle, ensuring it is located on the two flats of the spindle (Fig. C1). Place the disc (7) on the tool spindle and inner flange, ensuring it is correctly located. Fit the threaded outer flange (10), making sure it faces the correct direction for the disc type. For grinding discs, the flange is fitted with the raised portion facing towards the disc. For cutting discs, the flange is fitted with the raised portion facing away from the disc (Fig. C2). Press the spindle lock button (9) and rotate the spindle by hand until it is locked. Keep the lock button pressed in and tighten the outer flange with the spanner provided (Fig. C3). After mounting, check that the grinding tool is correctly mounted and can turn freely without grazing against the protecting guard or other parts.
Clean the grinder spindle and all parts to be mounted. For clamping and loosening grinding tools, lock the grinder spindle with the spindle lock button. Only actuate the spindle lock button when the grinder spindle is at a standstill.
Always hold the angle grinder firmly with both hands when operating.
The switch is locked off to prevent accidental starting. To turn on, push the lock-off switch (3) forward with your finger and then depress the on/off switch (2). Release the lock-off switch. To turn off, release the on/off switch.
Do not switch the grinder on while the disc is in contact with the workpiece. Allow the disc to reach full speed before starting to grind. Hold the angle grinder with one hand on the main handle and the other hand firmly around the auxiliary handle. Position the guard so that as much of the exposed disc as possible points away from you. Be prepared for a stream of sparks. For best tool control, material removal, and minimum overloading, maintain an angle between the disc and work surface of approximately 15°-30° when grinding. Use caution when working into corners, as contact with an intersecting surface may cause the grinder to jump or twist. When grinding is complete, allow the workpiece to cool. Do not touch the hot surface.
Always work with the wheel guard for cutting metal. Do not press, tilt, or oscillate the machine. Work with moderate feed adapted to the material. Do not reduce the speed of running down cutting discs by applying sideward pressure. The machine must always work in an up-grinding motion; never move the machine in the other direction, as it may be pushed uncontrolled out of the cut.
Overloading can damage the motor. Do not exert too much pressure to speed up work. If the angle grinder becomes too hot, run it under no load for 2-3 minutes until it cools to normal operating temperature.
Remove the plug from the socket before carrying out any adjustment, servicing, or maintenance. There are no user-serviceable parts in this power tool. Never use water or chemical cleaners; wipe clean with a dry cloth. Store the power tool in a dry place. Keep motor ventilation slots clean and all working controls free of dust. Occasional sparks through ventilation slots are normal and will not damage the tool. If the supply cord needs replacement, it must be done by the manufacturer or an authorized agent to avoid safety hazards.
Before any work on the machine, ensure the mains plug is disconnected from the wall socket. Unscrew the carbon brush cap (4) with a screwdriver. Remove the carbon brush. Check the length of the brush and replace if under 6mm. Always renew both brushes, even if one is still more than 6mm long. Carbon brushes are a wearing component and are not covered under warranty. Continuing to use the angle grinder when carbon brushes need replacement may cause permanent damage.
Always start at no load to achieve maximum speed before starting work. Do not force the disc to work faster, as reducing the disc's moving speed means longer working time. Always work with a 15-30 degree angle between the disc and workpiece. Larger angles will cut ridges and affect the surface finish. Move the angle grinder across and back and forth over the workpiece. When using a cutting disc, never change the cutting angle, as this will stall or break the disc. Only cut in the opposite direction to the disc rotation. When cutting very hard material, best results can be achieved with a diamond disc. If a diamond disc becomes very hot (full ring of sparks), stop cutting and allow it to cool at no-load speed for 2-3 minutes. Always ensure the workpiece is firmly held or clamped to prevent movement.