BEFORE FIRST USE
To power up your
Klöck for the first time, insert a
small tool or pin in the slot of the Reset button
F
.
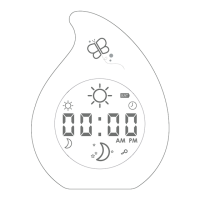
The control panel will then be displayed on the
LCD screen
A
.
Before first use, we also recommend charging your
Klöck overnight.
NOTE: Depending on your lighting settings, the battery can last up to 7 nights. After the first charge, the
device will take approximately 4 hours to recharge.
ADJUST BRIGHTNESS
Create the ideal reassuring glow in your child’s bedroom by adjusting the blue or
orange backlight using the + and - control buttons
C
.
SET DAYTIME
The daytime setting will determine when the clock’s backlight turns yellow.
1. Press and hold the Display Mode button
B
until the clock icon is displayed .
2. Press and hold the Set button
D
for 2 seconds.
3. The digits representing the hour will flash. Use the + and - Control buttons
C
to
configure the hour, then press the Set button
D
once to confirm.
4. The digits representing the minute will flash. Use the + and - Control buttons
C
to configure the minute, then press the Set button
D
once to confirm.
NOTE: You may set the start of daytime for anytime between 04:00 AM and 02:59 PM.
SET NIGHTTIME
The nighttime setting will determine when the clock’s backlight turns blue.
1. Press and hold the Display Mode button
B
until the clock icon is displayed .
2. Press and hold the Set button
D
for 2 seconds.
3. The digits representing the hour will flash. Use the + and - Control buttons
C
to
configure the hour, then press the Set button
D
once to confirm.
4. The digits representing the minute will flash. Use the + and - Control buttons
C
to configure the minute, then press the Set button
D
once to confirm.
NOTE: You may set the start of nighttime for anytime between 3:00 PM and 03:59 AM.
SET CURRENT TIME
1. Press and hold the Display Mode button
B
until the clock icon is displayed .
2. Press and hold the Set button
D
for 2 seconds.
3. The digits representing the hour will flash. Use the + and - Control buttons
C
to
configure the hour, then press the Set button
D
once to confirm.
4. The digits representing the minute will flash. Use the + and - Control buttons
C
to configure the minute, then press the Set button
D
once to confirm.
NOTE: Please refer to the AM and PM icons when setting the time. The device displays the time in a
kid-friendly 12-hour format - ideal for learning to tell the time.
7
Klöck
EN