5
10
15
20
25
30
35
40
45
50
55
½
1
oz
2
oz
60
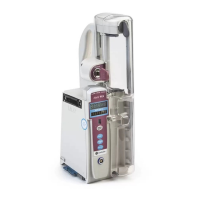
Loading the syringe:
1. Pull syringe barrel clamp out, rotate
it to the left and gently release it.
2. Twist gripper control clockwise to raise
the drive head (gray) to its fully extended position.
3. Insert the syringe by sliding the flat edges between
the barrel flange grippers (see drawing).
4. Lock syringe in place by closing the barrel clamp.
To close the barrel clamp, pull out and rotate it to right.
5. Twist gripper control clockwise, gently lower drive head
and release gripper to lock the plunger in place.
Priming the syringe using the Alaris
TM
PCA module:
Note: Do not prime the syringe while it is attached to
the patient.
1. PRIME softkey is available only after syringe type and
medication selection (prior to infusion mode selection).
2. At the Infusion Mode screen, press OPTIONS, then press
PRIME SET WITH SYRINGE.
3. Press and hold PRIME key to prime tubing.
Programming guide initial setup:
1. Load the syringe with the administration set attached.
2. Press the SYSTEM ON key.
3. Select Yes or No to New Patient?
4. Select appropriate profile.
5. If required, enter patient identifier or press EXIT.
6. Press the CHANNEL SELECT key.
7. Set key to PROGRAM position.
8. Confirm time of day or change time if necessary.
9. Select the correct syringe type and size. Press CONFIRM.
Note: Applies to all syringes.
Programming the Alaris PCA module with PCA Pause
Protocol enabled:
1. Perform steps 1–10 of initial setup and then continue with
the following steps.
2. Review the Clinical Advisory: Attach an Alaris SpO
2
or Alaris
EtCO
2
module now.
3. Press CONFIRM.
Note: If a monitoring module is not attached and started,
PCA Pause Protocol will not activate.
4. Press the NEXT key to verify medication parameters.
5. Review Advisory.
6. Press PAUSE LIMITS to review the settings or
press CONFIRM.
7. Select desired infusion mode and follow on-screen
programming prompts.
Alaris
TM
PCA module pocket guide
bd.com
© 2017 BD. BD, the BD Logo and Alaris are trademarks of Becton,
Dickinson and Company. IF7879 (0917/2500) CF/201/17/0043
4. Set key to the Program position and close door.
5. Press the CHANNEL SELECT key.
6. Select and confirm correct syringe type and size.
7. If using the same drug, dosing units and concentration,
then press RESTORE.
8. Verify that the drug, concentration and dosing parameters
are correct.
9. Lock door and open tubing clamp.
0. Review settings and press START.
Change program/mode:
1. Press CHANNEL SELECT key.
2. Press PROGRAM.
3. Set key to Program position or enter authorization
code (if enabled).
4. Press CHANGE MODE. Select desired infusion mode
and follow on-screen prompts.
Give a clinician bolus dose:
1. Press CHANNEL SELECT key.
2. Press BOLUS DOSE.
3. Set key to Program position or enter authorization
code (if enabled).
4. Enter the bolus dose amount and lock the door.
5. Press CONFIRM.
6. Review settings and press START.
Beginning of shift/Summary review:
1. Press CHANNEL SELECT key and verify settings.
2. Press START key.
Access drug event history:
1. Press CHANNEL SELECT key.
2. Press OPTIONS; then press DRUG EVENT HISTORY.
3. Press EXIT and then press START.
Warning: Before loading or
unloading the syringe, always turn
off fluid flow to the patient using a
tubing clamp. Uncontrolled fluid flow
can occur when the administration
set is not clamped or turned off and
may cause serious injury or death.
1. Press PAUSE on PCA module.
Note: Always clamp administration
set before changing syringe.
2. Use the PCA key to unlock
the door; remove the syringe
and press SILENCE.
3. Attach the new syringe to the
tubing and load the new
syringe into the PCA module.
Change syringe and use Restore feature
Operator precautions: For proper operation of the Alaris
System, the user must be familiar with the features, disposables,
administration sets, setup and programming.
This guide includes selected information and suggestions and is not intended to be comprehensive instructions for the setup
and operation of the Alaris System. For complete instructions along with warnings and cautions, refer to the User Manual.
10. Select correct medication and concentration.
11. At Infusion Mode screen, press OPTIONS, then press
PRIME SET WITH SYRINGE.
12. Press and hold the PRIME key to prime tubing.
Note: Do not prime the tubing while it is attached to the patient.
13. Press EXIT when priming is complete.
14. Select desired infusion mode and follow on-screen prompts to
enter dosing parameters.
15. Close and lock the door.
16. Attach administration set tubing to the patient.
17. Review and verify settings.
18. Open tubing clamp.
19. Press START.
1