EasyManua.ls Logo

BeachTek DXA-GO User Manual

Default Icon
2 pages
To Next Page IconTo Next Page
Page #1 background imageLoading...
Page #1 background image
DXA-GO
Custom Adapter / Bracket for the RODE GO Wireless
Quick Setup Guide
1) Mount the DXA-GO to the camera shoe and lock down the mounting foot.
2) Connect the supplied output cable from the OUT jack on the adapter to the MIC
input on the camera. If the camera has a MIC/LINE input selector, set it to MIC.
3) Set the M/S switch to M for mono when using one microphone, or to S for stereo
when using two microphones.
4) Initially set the LEFT and RIGHT trim controls fully clockwise for no attenuation.
5) Mount your GO receiver to the front shoe of the adapter to easily view display. You
can also mount a second GO or another wireless mic or shotgun to the top shoe of
the adapter.
6) Connect mono microphones to the LEFT and or RIGHT inputs on the adapter.
Connect stereo microphones to the STEREO input.
7) Set the output level of the GO receiver to the highest level. If you have a shotgun
mic attached with an adjustable output level, set that to the highest setting as well.
8) If your camera has a PHONE jack, plug your headphones into this to monitor the
audio. Be sure that you hear audio on both channels from the connected devices.
9) Set the camera to manual audio mode and dial the gain down to the lowest setting
to eliminate any noise from the camera preamplifiers - you want an average
reading of -12dB on the VU meter.
10) Use the trim controls on the DXA-GO to fine tune the audio levels on each channel.
You are now ready to begin recording.
Question and Answer IconNeed help?

Do you have a question about the BeachTek DXA-GO and is the answer not in the manual?

BeachTek DXA-GO Specifications

General IconGeneral
TypeAudio Adapter
Channels2
Phantom PowerYes
InputsXLR
Outputs3.5mm
CompatibilityDSLR, Camcorders

Summary

Quick Setup Guide

Mounting and Connections

Mount the adapter to the camera shoe and connect the output cable to the camera's MIC input.

Microphone and Level Settings

Set M/S switch, trim controls, and output level of GO receiver for mono or stereo operation.

Audio Monitoring and Camera Gain

Connect headphones to monitor audio and set camera to manual mode with low gain.

Compatible Devices

Microphones Requirements

Connected microphones must be self-powered; plug-in-power mics will not work.

Camera Compatibility

Supports camcorders, mirrorless, or DSLR cameras with a mic jack; avoid Sony models without standard hot shoe.

DXA-GO Features

Inputs and Outputs

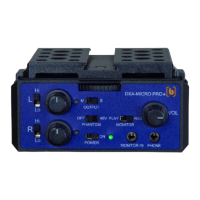
Features two mono 3.5mm jacks, one stereo 3.5mm jack, and a stereo 3.5mm TRS output cable.

Controls and Construction

Includes adjustable level controls, mono/stereo output selector, and an aluminum chassis with mounting shoes.

Specifications and Warranty

Details size (2.25" x 1.5" x 2.38"), weight (4 oz), and a two-year parts and labor warranty.

Contact Information

Related product manuals