EasyManua.ls Logo

Bedkingdom JASPER User Manual

Bedkingdom JASPER
20 pages
To Next Page IconTo Next Page
Page #1 background imageLoading...
Page #1 background image
PRODUCT SIZE : 920mm x 1930mm (Int Base Size)
Thank you for purchasing this product. Before starting assembly we suggest you spend a short time reading
through this leaflet, then follow the simple step by step guide.
Two persons are needed to assemble this product.
ASSEMBLY INSTRUCTIONS
MODEL : JASPER (#:FJASPBW)
1
20
* Approximately 2 Hours
* 2 People Required
IMPORTANT - READ CAREFULLY - RETAIN FOR FUTURE REFERENCE
Tools Required For Assembly
Philips Screw Driver
DO NOT USE POWER TOOLS
TO ASSEMBLE THIS PRODUCT.
USE OF POWER TOOLS WILL
INVALIDATE ANY CLAIM AND
MAY DAMAGE THIS PRODUCT
MAKING IT UNSAFE.
DO NOT USE HAMMER
Tools Not Use
a) WARNING “High beds and the upper bed of bunk beds are not suitable for children under six years due
to the risk of injuryfrom falls”;
b) WARNING “Bunk beds and high beds can present a serious risk of injury from strangulation if not used correctly. Never attach or
hang items to any part of the bunk bed that are not designed to be used with the bed,for example, but not limited to ropes, strings,
cords, hooks, belts and bags”
c) WARNING “Children can become trapped between the bed and the wall, a roof pitch, the ceiling, adjoining pieces of furniture
(e.g. cupboards) and the like. To avoid risk of serious injury the distance between the top safety barrier and the adjoining structure
shall not exceed 75 mm or shall be more than 230 mm”;
d) WARNING “Do not use the bunk bed/high bed if any structural part is broken or missing;
e) always follow the manufacturer’s instructions;
f)
g) Ventilation of the room is necessary in order to keep the humidity low and to prevent mauld in and around the bed;
h) all bunk beds and high beds intended to be assembled by other than the manufacturer or his/her representative shall include
assembly instructions including a list of the parts supplied and details of any tools required to assemble the bed;
i)
j)
k) This bunk bed conforms to BS EN 747-1 : 2012 + A1 : 2015
This bunk bed is suitable for a single mattress or foam bed 920mm x 1870mm.Thickness of mattress should not exceed 200mm.
Use ladder for entering and leaving upper bunk.
The bunk bed should be checked periodically by the owner to ensure that the guardrail, ladder and other components are
maintained in the correct position and state of repair and that all connectors are tight.
CK 6285
Question and Answer IconNeed help?

Do you have a question about the Bedkingdom JASPER and is the answer not in the manual?

Bedkingdom JASPER Specifications

General IconGeneral
BrandBedkingdom
ModelJASPER
CategoryIndoor Furnishing
LanguageEnglish

Summary

Important Safety and Preparation Information

Safety Warnings and Precautions

Critical safety guidelines and warnings regarding the use and assembly of bunk beds.

Tools and Assembly Guidance

Lists necessary tools for assembly and specifies tools to avoid for product safety.

Product Parts Identification

Component Breakdown

A detailed list of all parts included in the product, organized by carton.

Hardware and Assembly Fittings

Fittings and Fasteners

Comprehensive list of all hardware, screws, and connectors required for assembly.

Assembly Cautions and Tips

Important cautions regarding small components and useful tips for successful assembly.

Initial Assembly Steps

Step 1 & 2: Panel Preparation

Preparation of main panels by installing cam studs and dowels as per initial assembly stages.

Hardware Installation Detail

Visual guide showing correct installation of cam studs, cams, and dowels for secure connections.

Ladder Step Assembly

Step 3: Cam Fitting Instructions

Correct method for fitting cams, ensuring proper engagement for structural integrity.

Ladder Construction Stages

Steps 4-6: Ladder Component Assembly

Assembling various ladder steps and panels using pre-fitted hardware.

Main Frame Assembly

Steps 7-12: Frame Construction

Assembly of the main bed frame structure using various panels and fittings.

Ladder Steps Integration

Steps 13-16: Ladder Step Attachment

Attaching multiple ladder steps to the main structure.

Further Ladder Assembly

Steps 17-19: Ladder Panel Connections

Connecting additional panels and components to the ladder structure.

Bed Structure Assembly

Steps 20-21: Side Panel and Support Attachment

Attaching side panels and supports to build the primary bunk bed structure.

Base and Side Rail Fitting

Steps 22-23: Base and Rail Installation

Installing base supports and side rails for the bunk bed frame.

Guardrail and Support Assembly

Steps 24-25: Guardrail & Support Fixing

Attaching guardrails and additional support structures to the bed frame.

Slat System Installation

Steps 26-27: Slats Attachment

Securing the wooden slats that form the mattress base.

Trundle Unit Assembly

Steps 28-30: Trundle Component Assembly

Assembling the trundle unit components.

Final Structure Assembly

Steps 31-33: Trundle & Base Fixing

Finalizing the trundle unit and base assembly.

Door and Trundle Integration

Steps 34-35: Door Hinge & Trundle Fix

Attaching doors with hinges and completing trundle unit connections.

Advanced Frame Assembly

Steps 36-39: Frame Reinforcement

Steps involving reinforcement and connection of main frame parts.

Final Structure Connections

Steps 40-43: Final Component Fixing

Finalizing the structure by attaching remaining components and supports.

Completion of Assembly

Step 44: Final Product Assembly

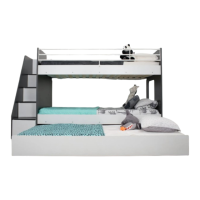
The final step showing the complete assembled bunk bed and trundle unit.