Do you have a question about the Behlen Country Hitch'N Plow and is the answer not in the manual?
Install winch to frame using provided bolts and wire to vehicle battery.
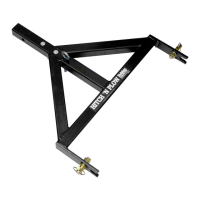
Insert Hitch N Plow into 2" receiver and secure with hitch receiver pin.
Attach implement using top link pin, washers, cotter pin, and eyebolt.
Route winch cable through pulley and hook to eyebolt for operation.
Cycle winch to ensure proper clearance between implement and vehicle.
The Hitch 'N Plow (model 80119995) is a robust implement designed to attach to a vehicle's 2-inch receiver hitch, enabling the operation of various implements. It is primarily intended for landowners and is not suitable for highway use. The device facilitates the lifting and lowering of implements via a winch system, providing versatility for tasks such as plowing, tilling, or other ground-engaging activities.
The core function of the Hitch 'N Plow is to provide a three-point hitch-like attachment system for implements on vehicles equipped with a 2-inch receiver hitch. It uses an external winch (not included with the Hitch 'N Plow itself, but bolts for attachment are provided) to control the vertical position of the attached implement. The winch cable routes through a pulley system, allowing for mechanical advantage in lifting. This setup effectively transforms a standard vehicle into a utility machine capable of handling various agricultural or landscaping tasks that require precise implement depth control. The design emphasizes ease of attachment and operation, making it accessible for a wide range of users.
The manual emphasizes the importance of proper maintenance for long service life. While specific maintenance steps are not detailed in the provided excerpts, the general advice is to maintain the equipment according to the operator's manual and use it within its specified capabilities. This implies regular inspection of bolts, pins, and the winch system for wear, damage, or loose connections. The robust construction, featuring components like plated pins and zinc-plated washers, suggests a design intended to withstand outdoor conditions, but periodic cleaning and lubrication of moving parts would likely contribute to its longevity. The availability of a detailed parts list facilitates easy identification and replacement of components if needed.
| Brand | Behlen Country |
|---|---|
| Model | Hitch'N Plow |
| Category | Farm Equipment |
| Language | English |