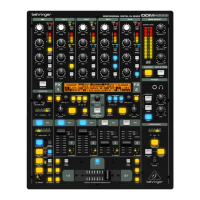
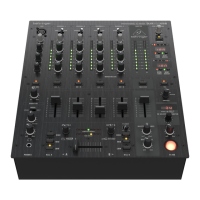
14. The 7-segment LED meter indicates the level of the microphone channel.
15. The microphone channel strip features a 3-band equalizer (HIGH, MID and LOW). The range is ±12 dB.
16. The ON/OFF push button turns the microphone channel on and off.
17. The MIC SETUP push button opens the Mic Setup menu on the display. This allows you to adjust the settings of
the equalizer, the Ultramic processor and the MIC FX (effects processor).
18. The XMC ON push button activates the ULTRAMIC processor, which includes a 2-band compressor and
expander. Ultramic settings can be adjusted in Mic Setup.
19. The MIC FX ON push button activates the microphone effects processor. Select the effect in Mic Setup.
20. The TALK ON push button activates the Talkover function. This attenuates the volume level of the music as
soon as you speak into the microphone. This is a very useful function to make yourself heard over the music
being played. You can adjust all the relevant settings in Talk Setup.
21. The replaceable crossfader is used to fade between the signals that are assigned to its two sides A and B. You
can assign the stereo channels and sampler using the CF Assign push buttons (10) and (65).
22. The CF ON push button activates the crossfader. When the push button is not pressed, the signals of the
individual channels are routed straight to the Main outputs.
23. There are 3 Kill push buttons (HIGH, MID and LOW) on each side of the crossfader which let you mute the
given frequency range. In Crossfader Setup, it is possible to activate a special X-OVER mode that enhances
the crossfader’s functionality in combination with the Kill push buttons.
24. Press the FULL FREQ push button to remove any frequency cuts of the KILL EQ (22).
25. The CURVE knob lets you seamlessly adjust the response of the crossfader. The REVERSE function allows
you to reverse the configuration of the crossfader. This way you can toggle between Channel A and B at the
flick of a switch.
26. REVERSE HOLD activates a permanent Reverse function. The crossfader fades between sides A and B in the
reverse direction. This means that A is now on the right and B on the left side.
27. REVERSE TAP activates a momentary Reverse function. This means that A and B are interchanged as long as
the TAP push button is held down.
28. Press the BOUNCE TO MIDI CLK push button to activate the bouncing. Once the push button is pressed, the
signal repeatedly jumps from A to B and back again corresponding to the interval pre-selected by using the
BEAT push buttons (28).
29. The BEAT push buttons let you determine the Bounce rate, which can range between one and 16 beats.
30. These LEDs indicate the number of beats you have chosen.
31. The OUTPUT A knob controls the volume of output A ((73)).
32. The BALANCE knob adjusts the stereo panning of output A.
33. The OUTPUT B knob controls the volume of output B ((74)).
34. The high-resolution, 22-segment OUTPUT LEVEL meter indicates the level of the output signal on OUTPUT A.
35. ULTRAMIZE ON/OFF push button:The Ultramizer is an effect that enhances the loudness and assertiveness by
dynamic compression. In Ultramizer Setup, you can configure the Ultramizer.
36. The LOAD push button lets you load the user settings of the entire mixer. The settings that are active when the
device is turned off are loaded when the device is switched back on again.
37. Connect the headphones to the PHONES jack (1/4″ TRS connector).
38. The OUTPUT knob controls the volume of the head-phones.
39. The MIX knob adjusts the balance between PFL signal and PGM signal (PFL = Pre Fader Listening, fader
independent pre-listening of individual channels; PGM = Program, Master signal). When the knob is turned
completely to the left, you only hear the PFL signal, whereas when turned completely to the right the Master
signal is heard. Between these two positions, you can adjust the mix of both signals.
40. The PUNCH EQ function helps synchronize two tracks. You can orient yourself to the snare or the bass drum or
both. Press the SNARE or BASS push button to emphasize the selected sound in the headphones.
41. When the SPLIT push button is pressed, the PFL signal is heard in the left headphone and the PGM signal is
only heard in the right headphone.
42. The graphic display shows BPM values, effect names and effect parameters as well as channel assignments. It
also leads you through Console Setup.
43. The FX ON push button activates the effects unit.
44. Press the FX ASSIGN push button to assign an effects unit to a signal source (push button flashes). The
possible input sources are listed on the display. Select the preferred source by turning and pressing the
PARAMETER knob (45).
45. The DEPTH knob adjusts the effect intensity (depth). For some effects, it also lets you adjust the mix between
the original signal (dry) and the effect signal (wet).
46. Press the PARAM (eter) knob to select the effect parameters. By turning the knob, you can change the
parameter shown on the display.