10 11EUROPORT EPA150 Quick Start Guide
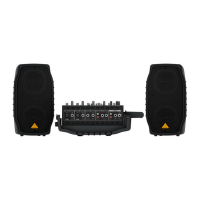
EUROPORT EPA150 Hook-up
(EN) Step 2: Hook-Up
(ES) Paso 2: Conexión
(FR) Etape 2 : Connexions
(DE)
Schritt 2:
Verkabelung
(PT) Passo 2: Conexões
(EN) Make sure the POWER SWITCH is OFF
and the STEREO MASTER FADERS are all the
way down.
(ES) Asegúrese de que el interruptor POWER esté en OFF y
que los FADERS MASTER STEREO estén almínimo.
(FR) Placez l’interrupteur POWER sur OFF et les Faders de
sortie MAIN LEVEL CONTROL au minimum.
(DE) Der POWER-SCHALTER muss auf OFF/AUS stehen
und die STEREO MASTER FADER müssen ganz nach unten
geschobensein.
(PT) Certique-se de que o POWERSWITCH está OFF
e que os STEREO MASTER FADERS estejam totalmente
para baixo.
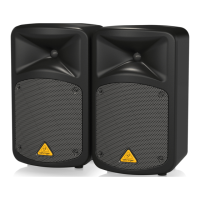
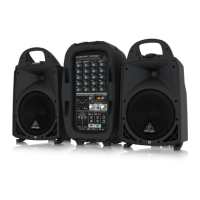
(EN) Plug a speaker cable from the LEFT
SPEAKER OUTPUT into the left speaker, and
from the RIGHT SPEAKER OUTPUT into the
right speaker. NOTE: Use only the included speaker cables
or similar to connect speakers. Do not use instrument
cables. Do not connect any other speakers to this system.
(ES) Conecte un cable de altavoz desde la toma LEFT
SPEAKER OUTPUT al altavoz izquierdo y otro desde la
salida RIGHT SPEAKER OUTPUT al altavoz derecho. NOTA:
Use solo los cables de altavoz incluidos u otros de idénticas
características para la conexión de los altavoces. No utilice
cables de instrumento. Noconecte ningún otro tipo de
altavoces a estesistema.
(FR) Reliez un câble d’enceinte entre la sortie SPEAKER
OUTPUT L et l’enceinte gauche, et un câble d’enceinte
entre la sortie SPEAKER OUTPUT R et l’enceinte droite.
REMARQUE : utilisez uniquement les câbles d’enceintes
fournis ou d’autres similaires. N’utilisezjamais de câbles
instruments. Ne connectez aucune autre enceinte à
cette sonorisation.
(PT) Se estiver usando o EPA150 para discurso ou
canto, conecte o microfone incluso no CHANNEL 1 ou
2. O m do cabo macho do microfone (3 pinos)
conecta na entrada do microfone, e o m fêmea
conecta no parte inferior do microfone. При
использовании системы EPA150 для речи или
пения, подключите поставляемый микрофон к
КАНАЛУ 1 или 2.
(EN) An acoustic/electric guitar may be
plugged into the CHANNEL 3 MIC/INST
input, or a keyboard can be plugged
into any LINE IN input. NOTE: Donot plug multiple
sources into onechannel.
(ES) Puede conectar una guitarra acústica/eléctrica
a la entrada MIC/INST del CANAL3, o un teclado a
cualquier entrada LINE IN. NOTA:Noconecte varias
fuentes a un mismocanal.
(FR) Vous pouvez connecter une guitare acoustique/
électrique à l’entrée du CANAL 3 MIC/INST, et vous
pouvez connecter un clavier dans les entrées LINE IN.
REMARQUE : Veillez à ne connecter qu’une source à la fois
par voie.
(DE) Sie können eine akustische/elektrische Gitarre an
den MIC/INST-Eingang von KANAL 3 oder ein Keyboard an
einen beliebigen LINE IN-Eingang anschließen. HINWEIS:
Schließen Sie nicht mehrere Signalquellen an einen
Kanal an.
(PT) Uma guitarra acústica/elétrica pode ser conectada
na entrada CHANNEL 3 MIC/INST, ou um teclado
pode ser conectado em qualquer entrada LINE IN.
NOTA:Nãoconecte fontes múltiplas em um mesmocanal.
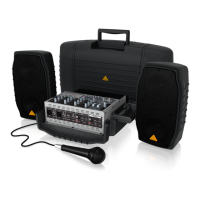
(EN) If playing a CD, tape, MP3player,
orother audio source, plug the device into
CHANNEL 4/5 using the stereo RCA inputs.
A /" mini-plug-to-stereo RCA adapter is included.
(ES) Si quiere usar un reproductor de CD, cinta, MP3, u otra
fuente audio, conecte dicho dispositivo al CANAL 4/5
usando las entradas RCA stereo. Con esta unidad se incluye
un adaptador de conector mini 3,5 mm a RCAstereo.
(FR) Si vous utilisez un lecteur de CD, de cassette, deMP3,
ou toute autre source audio, connectez-la aux CANAUX 4/5
par les embases stéréo en RCA. Nousvous fournissons un
adaptateur mini-Jack/RCA.
(DE) CD/MP3 Player, Cassettendecks oder andere
Audio quellen schließen Sie an die Stereo Cinch-Eingänge
von KANAL 4/5 an. Ein 3,2 mm Miniklinken-auf-
Stereocinch Adapter ist im Lieferumfang enthalten.
(DE) Verbinden Sie SPEAKER OUTPUT L über ein
Boxenkabel mit der linken Box und SPEAKER OUTPUT
R über ein wei teres Boxenkabel mit der rechten Box.
ANMERKUNG: Schließen Sie die Boxen nur über die
mitgelieferten Kabel oder gleichwertige Kabel an.
Benutzen Sie keine Instru men ten kabel. SchließenSie
keine anderen Boxen an dieses Systeman.
(PT) Conecte um cabo de alto-falante do LEFT SPEAKER
OUTPUT no alto-falante esquerdo, e do RIGHT SPEAKER
OUTPUT no alto-falante direito. NOTA: Use apenas os
cabos de alto-falante inclusos ou semelhantes para
contectar os mesmos. Não use cabos para instrumentos.
Nãoconecte qualquer outro alto-falante a estesistema.
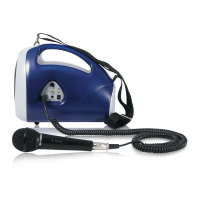
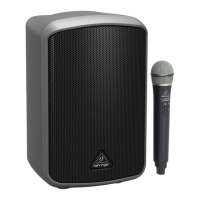
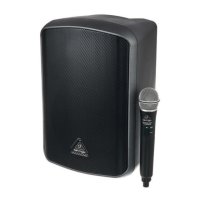
(EN) If using the EPA150 for speech or
singing, plug the included mic into CHANNEL
1 or 2. The male end of the mic cable
(3 pins) plugs into the mic input, and the female end plugs
into the bottom of the microphone.
(ES) Si está usando el EPA150 para voz hablada o
cantada, conecte el micrófono incluido al CANAL 1 ó 2.
Elextremo macho del cable (3 puntas) debe ser conectado
a la entrada de micro y el hembra a la parte inferior
del micrófono.
(FR) Si vous utilisez l’EPA150 pour les discours ou le chant,
connectez le micro fourni aux entrées CHANNEL 1 ou
2. La che mâle du cordon micro (3broches) se relie à
l’entrée micro, et la che femelle se connecte au micro
lui-même.
(DE) Wenn Sie das EPA150 für Sprache oder Gesang
verwenden, schließen Sie das mitgelieferte Mikrofon
an KANAL 1 oder 2 an. Der Stecker des Mikrofonkabels
(3 Pole) wird an den Mikrofoneingang und die Buchse des
Kabels an die Unterseite des Mikrofons angeschlossen.
(PT) Se estiver tocando um CD, ta, MP3, ououtra fonte de
áudio, conecte o dispositivo no canal CHANNEL 4/5 usando
as entradas estéreas RCA. Um adaptador RCA de /"
mini-plug-to-stereo está incluso.
(EN) Raise the STEREO MASTER FADERS up
about half-way to start.
(ES) Para empezar, suba los FADERSMASTER
STEREO sobre la mitad de surecorrido.
(FR) Réglez les Fadest de sorties STEREO en position
intermédiaire pour commencer.
(DE) Schieben Sie die STEREO MASTER FADER zu Beginn
halb nach oben.
(PT) Aumente os STEREO MASTER FADERS até a metade
como início.
(EN) Raise the individual channel fader(s)
for your mic, instrument, and/or CD
player to desired level. Point the mic
away from the speakers as much as possible to
avoidfeedback.
(ES) Suba los faders de canal individuales de su micro,
instrumento y/o reproductor al nivel que quiera.
Siempre que le sea posible, coloque el micro de
forma que no apunte hacia los altavoces para evitar
larealimentación.
(FR) Montez progressivement le niveau des voies
individuelles (micro, instrument, et/ou lecteur de CD
ou autre) jusqu’à obtenir le niveau souhaité. Veillezà
ne jamais pointer le micro vers les enceintes pour
éviter tout Larsen.
(DE) Schieben Sie die einzelnen Kanalfader für Ihr
Mikrofon, Instrument und/oder Ihren CD-Player
auf den gewünschten Pegel hoch. Richten Sie das
Mikrofon nicht auf die Boxen, sondern möglichst
exakt in die andere Richtung aus, um Feedback
zuvermeiden.
(PT) Aumente o(s) fader(s) individualmente para seu
mic, instrumento, e/ouCDplayer até o nível desejado.
Afaste o mic dos alto-falantes o máximo possível para
evitarfeedback.
 Loading...