MICROPHONO PP400
Welcome to BEHRINGER
Thank you for showing your condence in us by purchasing the BEHRINGER MICROPHONO
PP400, a compact phono preamplier.
Turntables have low-level signals. However, most audio units can only process line-level
signals. Between a turntable and another audio unit (a mixer, an amplier, or a recording
unit), the PP400 acts as an intermediary, as follows:
1. The PP400 equalizes a turntable signal according to RIAA specications.
2. The PP400 amplies the RIAA equalized signal.
3. The PP400 outputs a line-level signal.
◊ Please read the safety instructions that appear at the end of this document.
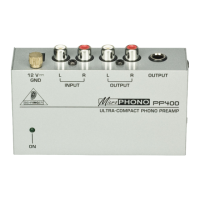
Connectors and Control Elements
This section illustrates and describes each PP400 connector and control element.
(2)
(1)
(5)(3) (4)
Fig. 1: PP400 connectors and control elements
(1) 12 V𝌂 connector:
To connect the power supply unit to the PP400, use the 12 V connector. Connecting the
power supply unit to the mains automatically switches the PP400 on. To disconnect
the unit from the mains, pull out the main cord plug.
(2) ON LED:
As soon as the unit is connected to the mains, the ON LED is illuminated.
(3) INPUT (L and R) connectors:
To send a turntable signal to the PP400, you need an RCA audio cable (stereo). Use this
cable to connect:
• the left output on the turntable to the L (left) INPUT on the PP400
• the right output on the turntable to the R (right) INPUT on the PP400
The PP400 can output a line-level signal via one of the following connectors:
• RCA ((4) OUTPUT L and R)
• ¼” TRS ((5) OUTPUT)
◊ Do not simultaneously use both PP400 OUTPUTs.
(4) OUTPUT (L and R) connectors:
To use these RCA connectors, you need an RCA audio cable (stereo). Use this audio
cable to connect:
• the L (left) OUTPUT on the PP400 to the left input on the amplier,
recordingunit, or mixer. (On a mixer, use a CD or TAPE input.)
• the R (right) OUTPUT on the PP400 to the right input on the amplier,
recordingunit, or mixer
(5) OUTPUT connector:
To use this ¼”, TRS (stereo) connector, you need an audio cable. Use the audio cable
to connect the PP400 OUTPUT to an input on the mixer, amplier, or recording unit.
Oneend of this audio cable must include a ¼”, TRS connector. If the input on the mixer,
amplier, or recording unit is:
• stereo, the other end of the audio cable must include a ¼”, TRS connector
• mono, the other end of the audio cable must include 2 TS connectors
(one for each mono input)
SERIAL NUMBER: To register your unit, use the serial number that is located on the bottom
of the PP400.
Setup Example
The following is an example of how to set up the PP400:
OUTPUT
TAPE IN/STREREO
CHANNEL IN
TURNTABLE UB1204-PRO
MICROPHONO PP400
INPUT
Fig 2: PP400 setup example