12 13Quick Start GuideUL 1000G2-R
(4) (5)
(3) (10)
(8)
(9)
(7)
(6)
(1) (2)
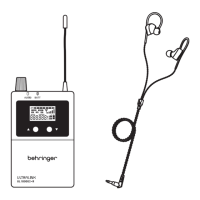
1. LEDS - indicate audio received, and receiver battery status
2. LCD - displays the receiver details and menu
3. ANTENNA - receive antenna
4. PHONES - connect supplied earphones to this 3.5 mm
stereo output
5. VOLUME - adjust the earphones volume, and turn the
receiver OFF
6. BELT CLIP - attach receiver to belt
7. MENU UP/DOWN - use to navigate the display menu
8. SET - use to select receiver menu items. Open the battery
compartment to access this button
9. BATTERY COMPARTMENT - ip open to access the
battery compartment (2x AA)
10. EARPHONES - connect to receiver’s PHONES output. Make
sure the volume is turned down before putting them on
Features
• Package of one UL 1000G2-R wireless belt-pack receiver and
monitoring earphones, for the Behringer UL 1000G2 in-ear
monitoring system
• Multiple UL 1000G2-R wireless belt-pack receivers can be used
with the UL 1000G2 at the same time
• UL 1000G2-R belt-pack receiver supports stereo / mono in-ear
monitoring exibility
• Integrated display for channel frequency, squelch, and
gaincontrol
• Working distance of up to 60 m (200 ft)
• AA x 2 batteries included
This receiver is designed to work with the UL 1000G2 in-ear
monitoring system only. For information regarding the
installation and operation of the UL 1000G2-R, please read the
quick start guide that comes with the UL-1000G2 transmitter/
receiver package.
UL 1000G2-R Controls
(EN)
Step 2: Controls
(EN)
Step 3: Getting started
RECEIVER SETUP
Main Menu
1. The main menu displays the AF level, mono/stereo mode,
RFsignal strength, EQ, LIM, MIX, lock, frequency, squelch, and
battery level.
Selecting a Frequency Group
2. Open the battery cover to access the SET button.
3. Press the SET button until GROUP ashes in the receiver
display. Press up/down to select the same frequency group as
the transmitter.
Selecting a Channel
4. Press the SET button repeatedly until CHANNEL ashes in the
receiver display. Press up/down to select the same channel as
the transmitter.
Equalizer (EQ)
5. The treble at 10 kHz is enhanced by 6 dB while the EQ
isenabled.
6. Press the SET button repeatedly until “EQ” ashes in the
receiver display. Use the up/down buttons to enable (EQ ON)
ordisable (EQ OFF) the Equalizer.
Limiter (LIM)
7. To protect ears from injury, the Limiter function limits the
level of audio signal to earphones at 400mV. It is advised to
turn LIM ON if the receiver display indicates audio level is
atmaximum.
8. Press the SET button repeatedly until “LIM” ashes in the
receiver display. Use the up/down buttons to enable (LIM ON)
or disable (LIM OFF) the Limiter.
Mixer (MIX)
9. Enable the Mixer function to listen to the mix of two mono
signals, balance and regulate their volume.
For example: If the LEFT INPUT contains mono audio signal
from instruments and the RIGHT INPUT contains mono audio
signal vocals. The singer can monitor and adjust the volume
balance between the instruments and his own voice and the
overall volume level using the belt-pack receiver with MIX
ON setting.
10. Press the SET button repeatedly until “MIX” ashes in the
receiver display. Use the up/down buttons to enable (MIX ON)
or disable (MIX OFF) the Mixer.
Squelch (SQ)
11. The Squelch function enables you to set a minimum threshold
of signal received by the receiver. The setting consists of 3 bar
levels - Low, Medium, and High. The receiver rejects signals
below the set threshold and helps eradicate any unwanted
audio signal transmitted by the transmitter.
12. Press the SET button repeatedly until “SQ” ashes in the
receiver display. Use the up/down buttons to set Squelch at
Low, Medium, or High.
Balance
13. Adjust volume balance between left and right channels of a
Stereo signal using the up/down buttons.
The audio is centered at -0- level. There are 9 levels available
each for oset to the right channel and oset to the left
channel. Positive values (1-, 2-, 3-, 4-, 5-, 6-, 7-, 8-, 9-) oset
towards the Right, while negative values (-1-, -2-, -3-, -4-, -5-,
-6-, -7-, -8-, -9-) oset towards the Left channel.
14. NOTE: To ensure the transmission of a stereo audio signal, the
transmitter must be set in stereo mode and an audio signal
must be present at the LEFT INPUT and the RIGHT INPUT.
Locking the Receiver against changes
15. Press the SET button repeatedly until the LOCK icon ashes
in the receiver display. Press up/down to select LOCK ON or
LOCK OFF. LOCK ON function disables buttons, so no unwanted
changes can be made accidentally.
16. NOTE: LOCK ON is enabled automatically if no operation is
performed for 5 seconds. Under LOCK ON status, press and
hold SET button for 2 seconds to disable LOCK momentarily
and enables you to make changes.
Battery Power Status
17. Remaining battery power status is displayed via four bars.
Ifno bars are visible on the battery symbol, the BATT LED
will turn Red from Blue. The batteries should then be
replacedimmediately.
MONO
SQL
EQ
LIM
MIX
MONO
SQL
EQ
LIM
MIX
UL 1000G2-R Getting started
 Loading...