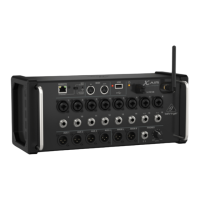
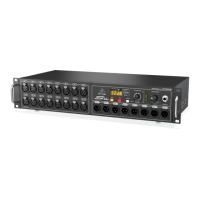
(1) ETHERNET port allows the
mixer to be controlled via LAN or
connected Wirouter.
(2) REMOTE switch selects
between Ethernet, Wiclient,
or Access Point. Seethe Network
Connection chapter for details.
(3) RESET button resets the console
to default network parameters
when held for 2seconds. When
held for 10 seconds, all console
functions are reset to factory
defaultstatus.
(4) MIDI IN/OUT jacks send and
receive MIDI signals to and from
external equipment. Seethe
MIDI Implementation chart
fordetails.
(5) USB port (type A) accepts a ash
drive for le storage, stereo
recordings andplayback. The
red LED next to it indicates le
access. Do not remove the USB
ash drive while it is lit!
(6) XLR COMBO jacks accept
balanced and unbalanced XLR
and ¼" plugs.
(7) ¼" inputs accept balanced or
unbalanced ¼"plugs. Channel 15
and 16 on the XR16 (channel 11
and 12 on the XR12) accept high
impedance sources for direct
connection of guitars andbasses.
(8) AUX SEND jacks send your
monitor mixes to stage monitors
or headphone mixers. TheXR16
uses XLR connectors while the
XR12uses balanced
¼" jacks.
(9) MAIN L/R jacks send the main
mix signal to PA or monitor
speakers via XLRcables.
(10) HEADPHONE jack accepts a ¼"
TRS plug for connecting a pair of
headphones.
(11) PHONES LEVEL knob
determines the output of the
headphones jack.
(12) POWER switch turns the mixer
on and o. The front panel
LED will light when the unit is
powered on.
(EN) Step 2: Controls
21
 Loading...