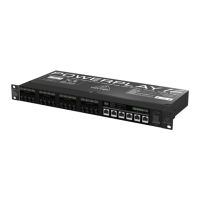
Step 2: Controls
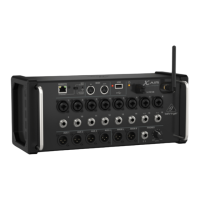
1. ETHERNET port allows the mixer to be controlled via LAN or connected Wifi router.
2. REMOTE switch selects between Ethernet, Wifi client, or Access Point. See the Network Connection chapter for
details.
3. RESET button resets the console to default network parameters when held for 2 seconds. When held for 10
seconds, all console functions are reset to factory default status.
4. MIDI IN/OUT jacks send and receive MIDI signals to and from external equipment. See the MIDI Implementation
chart for details.
5. USB port (type A) accepts a flash drive for file storage, stereo recordings and playback. The red LED next to it
indicates file access. Do not remove the USB flash drive while it is lit!
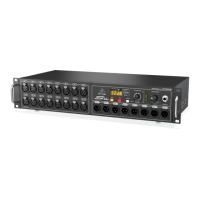
6. XLR COMBO jacks accept balanced and unbalanced XLR and 1/4″ plugs.
7. 1/4″ inputs accept balanced or unbalanced 1/4″ plugs. Channel 15 and 16 on the XR16 (channel 11 and 12 on the
XR12) accept high impedance sources for direct connection of guitars and basses.
8. AUX SEND jacks send your monitor mixes to stage monitors or headphone mixers. The XR16 uses XLR
connectors while the XR12 uses balanced 1/4″ jacks.
9. MAIN L/R jacks send the main mix signal to PA or monitor speakers via XLR cables.
10. HEADPHONE jack accepts a 1/4″ TRS plug for connecting a pair of headphones.
11. PHONES LEVEL knob determines the output of the headphones jack.
12. POWER switch turns the mixer on and off. The front panel LED will light when the unit is powered on.
X AIR XR16/XR12 Network Connection
Step 3: Network Connection
Network Connection
The X AIR mixers eliminate all hassles by incorporating a wireless network router that gives access to the mixer in
three different waysvia Ethernet LAN, or wirelessly as a Wifi Client or as an Access Point. Selection is made with the
REMOTE switch [2]. You may view or change the network preferences for these on any of the X AIR remote control
applications on the `Setup/Network’ page.
IP Address and DHCP
Depending on the connection scenario, the XR16/XR12 offers up to 3 options for connecting a tablet or PC for software
control DHCP Client, DHCP Server, and fixed IP operation. Connection is achieved differently depending on which
option you choose: DHCP Client mode is available in Ethernet LAN or Wifi Client operation. The mixer will
automatically request an IP lease from the DHCP server that owns the IP addresses in the network to which you are
trying to connect.
DHCP Server (DHCPS) is optionally available for Ethernet LAN connections and is standard in Access Point operation.
 Loading...