Do you have a question about the BEKA Train and is the answer not in the manual?
Warning about sharp points and small parts, hazards to children, and need for adult supervision during assembly.
Assemble legs and ends into U-shaped sections by aligning holes and fastening with screws.
Connect the two U-shaped leg sections using the center support bar and screws.
Attach one side piece to the legs using screws, ensuring dowel holes face inward.
Insert dowels into the holes on the side piece, resting them across the center support bar.
Attach the second side piece, fitting dowels into holes and securing with screws.
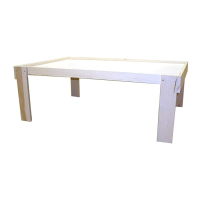
Carefully lower the table top into place, ensuring it fits snugly without pinch hazards.
This document provides assembly instructions for Beka Train and Activity Tables, which are designed to provide a secure play surface for trains and other toys. The tables are manufactured by Beka, Inc., located at 542 Selby Avenue, St. Paul, Minnesota 55102, USA. Contact information includes phone number 1-888-999-2352, website www.bekainc.com, and fax number 651-222-3965.
The Beka Train and Activity Tables serve as sturdy, elevated platforms for children's play, specifically designed to accommodate train sets and other toys. The assembly process results in a robust frame that supports a tabletop, creating a stable and safe play area. The design incorporates dowel rods and a center support bar to enhance structural integrity and provide a framework for the tabletop. The tables are available in two main configurations: a larger "Train Table" and a smaller "Activity Table," differing primarily in the number of dowel rods used (5 for the Train Table, 3 for the Activity Table) and implied dimensions.
The tables are assembled using a set of wooden components and screws, requiring a Phillips screwdriver for assembly. The contents for assembly include:
The hardware included contains sharp points and small parts, posing potential hazards to children prior to assembly. This necessitates adult supervision during assembly and careful handling of components.
The assembly process is broken down into six clear steps, designed to be followed by an adult.
Step 1: Assemble legs and ends into “U” shaped sections. This initial step involves connecting two legs to one end piece using four screws. Proper orientation of the end piece is crucial, ensuring the two holes drilled through its center are closer to the edge that will face downwards (closer to the floor) when the table is upright. This step is repeated to create two independent "U" shaped sections.
Step 2: Connect the two leg/end sections together with the center support bar. The two "U" shaped sections are positioned opposite each other. The center support bar is then attached using four screws, connecting the two sections. The center support bar should be fairly flush with the bottom edge of the table ends, with screws passing through holes in the center of each end piece and into the support bar ends.
Step 3: Attach a side. A side piece is positioned on the inside edge of two legs. The dowel holes across the lower edge of the side must face inwards (toward the center of the table) and be off-center towards the bottom (floor). Four screws are used to secure the side, passing through holes in a leg and then into the side.
Step 4: Position dowels. Dowel rods are inserted into the holes provided in the attached side. The other end of each dowel rests across the center support bar. The number of dowels depends on the table type (5 for Train Tables, 3 for Activity Tables).
Step 5: Attach remaining side. The final side piece is held with its dowel holes facing inwards (toward the center of the table) and oriented off-center toward the floor, mirroring the opposite side. Each dowel is carefully fitted into the holes in this side piece. The side is then slid into place on the inside of the legs and secured with four screws, similar to Step 3.
Step 6: Install a table top. Once the frame is assembled, a tabletop is carefully lowered into the space above the dowels. Beka offers a two-piece top, but tops from other manufacturers can also be used, provided they fit snugly. A critical safety warning is issued: "Do not use a top if it leaves more than 1/8" of space between the top and the pieces framing it, as doing so can create a pinch hazard!" Appropriate tops are essential for providing a secure play surface and ensuring the top remains in place during use.
The manual includes a "WARNING—ADULT ASSEMBLY REQUIRED!" section that highlights important maintenance and safety considerations:
The design emphasizes structural integrity through the use of multiple connection points and a center support bar, which contributes to the longevity and safety of the product when properly maintained. The clear, step-by-step instructions, coupled with visual aids (photos), aim to simplify the assembly process and ensure correct construction, which is foundational to the table's performance and durability.
| Brand | BEKA |
|---|---|
| Model | Train |
| Category | Indoor Furnishing |
| Language | English |