EasyManua.ls Logo

Belize Bicycle TRI-RIDER User Manual

Belize Bicycle TRI-RIDER
4 pages
To Next Page IconTo Next Page
Page #1 background imageLoading...
Page #1 background image
BELIZE BICYCLE
TRI-RIDER Fat Trike Assembly Guide
Page 1 of 4
PREPARATION
1. Read this assembly manual BEFORE commencing assembly.
2. Carefully remove all the components and packaged hardware from the shipping box.
3. Check the contents of the box and confirm that you have received a complete
package. The contents should include:
(1) A main frame assembly
(2) Handlebars and quill stem with brake levers and grips
(3) Rear frame assembly with final drive cog and band brake
(4) A sprung saddle
(5) Two 20-inch rear wheels, one 20-inch front wheel
(6) Rear basket assembly
(7) A plastic bag with assembly hardware
ASSEMBLY
1. Open the plastic bag containing mounting hardware. Group all similar nuts and bolts in
preparation for assembly.
To assemble the main components the included parts bag must have all the hardware and
items identified in the table below
ITEM
QUANTITY
INSTALLATION
36T square taper crank
1 (R)
Install on square taper bottom bracket
Grease threads and tighten to 30 foot-pounds (40Nm)
Square taper crank arm
1 (L)
5/8in pedals
Pair (L/R)
Install in crank arms
Grease threads and tighten to 30 foot-pounds (40Nm)
Plastic axle caps
2
Install over bottom bracket hardware (press fit)
Question and Answer IconNeed help?

Do you have a question about the Belize Bicycle TRI-RIDER and is the answer not in the manual?

Belize Bicycle TRI-RIDER Specifications

General IconGeneral
BrandBelize Bicycle
ModelTRI-RIDER
CategoryBicycle
LanguageEnglish

Summary

Preparation Steps

Read Manual Before Assembly

Instruction to read the assembly manual prior to starting the assembly process.

Unpack and Verify Components

Carefully remove all parts from the shipping box and confirm receipt of a complete package.

Assembly Instructions

Hardware Preparation

Open the hardware bag, group similar fasteners, and prepare for assembly.

Install Crankset

Install the 36T square taper crank and square taper crank arm with grease.

Install Pedals

Install the 5/8in pedals into the crank arms, greasing threads and tightening.

Install Axle Caps

Install plastic axle caps over the bottom bracket hardware via press fit.

Install Seat Post

Install the seat post into the seat tube after attaching the seat.

Install Drive Chain

Install the chain over the front crank and rear drive cog, tensioning it.

Install Brake Rotor

Install the 160mm brake rotor onto the front wheel.

Install Mechanical Brake Caliper

Install the mechanical brake caliper onto the front fork.

Install Brake Cables and Housing

Install front and rear brake cables and housing, adjust and trim.

Assemble Frame Sections

Align and connect front and rear frame assemblies, ensuring perpendicularity.

Install Rear Wheels

Install drive side and non-drive side rear wheels, ensuring correct tightening.

Install Front Wheel

Install the front wheel assembly, centering the rim and tightening axle nuts.

Install Handlebar Assembly

Install gooseneck and handlebar assembly, centering the stem and tightening.

Adjust Rear Band Brake

Complete rear band brake cable installation and adjust tension.

Adjust Front Disc Brake

Complete front disc brake adjustment, caliper positioning, and cable anchoring.

Install Seat and Seat Post

Install the seat onto the seat post, allowing for leveling adjustments.

Install Pedals Correctly

Install pedals, noting the left side uses a counter-clockwise thread.

Install Chain Guard

Install the chain guard using the provided washer head mounting screws.

Install Cable Crimps

Install cable crimps after adjusting and trimming all brake cables.

Inflate Tires and Adjust Fit

Inflate tires to recommended pressure and adjust handlebar angle and seat height.
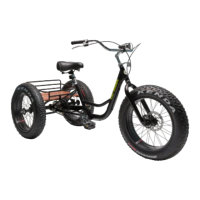
Related product manuals