8
Automatic Soap Dispenser Use instructions
SAFETY INSTRUCTIONS
1. Please read these operation instructions carefully when you are intending to bring the equipment .
Pay carefully attention to avoid damage from improper uses.
2. Keep these operation instructions as they can be used in situations.
3. If the equipment is passed on to a third party please include these operation instructions with the unit
4. Do not try to open the control housing under any circumstances and never attempt to repair the equipment
by yourself for more service , please consult with a specialist.
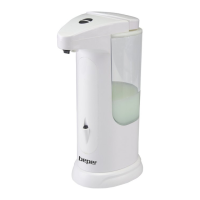
PRODUCT DESCRIPTION (FIG. 1)
1.Top cover
2.Liquid soap portal
3.Switch on/off
4.Liquid soap nozzle
5.Dispenser body
6.Power indicator light
7.Stand
8.Waterproof motherboard
FIXING PROCESS (FIG. 2)
OPERATION
1. Place batteries in the battery compartment (7) as described in the section “change batteries”.
2. Screw off the inner soap bottle(1), ll in the soap container with liquid soap be careful not to ll for more than
3/4. The liquid soap should not contain any solid particle.
3. Press the on/off switch (3) for a few seconds until the indicator’s light (6) turn red.
4. Put your hands under the soap nozzle (4), the indicator light (6) will turn red, then you can get soap. (The
dispenser will eject for a preset time which can be set for three types. If you need more soap, You can press
the on/off button again )
5. Under normal operation, press the on/off button (3) for few seconds until the indicator light turns extinct,and
the sensor dispenser is off.
CHANGE BATTERIES
1. Screw the head as (7) and take out the head.
2. Open the battery compartment and remove it.(7)
3. Insert 4 “AAA” batteries and make sure the polarity is correct(+/_). Never mix the batteries which have dif-
ferent specications or of different types.
! change all the batteries at the same time .
4. Close the battery compartment (7)again and x head back .
5. If you do not intend to use the equipment for a long time, please take all the batteries out from the battery
compartment (7).
6. Please dispose batteries environmentally.
TECHNICAL DATE
Use 4 „AAA“ batteries (non included)
For any improvement reasons, Beper reserves the right to modify or improve the product without any
notice.