F. While holding the hex nut (15) firmly in place, finish tightening
by slowly turning the spigot (12) clockwise to the upright position.
• Follow the printed instructions provided within element box.
• See also the “Black Berkey® Purification Elements Priming
Tips” on page 6 of this booklet.
Note: Save Priming Button (thick brown washer)
• Follow the printed instructions provided with the elements.
• See also the “PF-2 Fluoride and Arsenic Reduction Elements Priming
Tips” on page 11 of this booklet.
• If you have not purchased the optional PF-2 Fluoride and
Arsenic Reduction Elements, proceed to Step 5.
Note: Save blue caps, as they may be needed later.
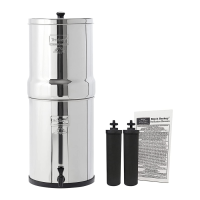
A. Place an element washer (7) onto the stem of a primed Black
Berkey® Element (6).
B. Insert the stem of the Black Berkey® Element (6) into a hole
within the upper chamber (5).
C. Thread the element wing nut (8) onto the stem of the Black
Berkey® Element (6) below the upper chamber and tighten
securely by hand.
D. Repeat steps A - C until all Black Berkey® Elements have been
installed.
E. Insert the hole plugs (9) into the remaining holes within the upper
chamber. :
Standard Spigot (included
with Stainless Steel
System)
Berkey® Light Spigot
Beveled Black - Beveled
side toward chamber wall
Beveled White - Beveled
side toward chamber wall
Flat Black
Beveled White - Beveled
side toward chamber wall
4
 Loading...