EasyManua.ls Logo

Berkley Jensen 280154 - User Manual

Berkley Jensen 280154
18 pages
Print Icon
To Next Page IconTo Next Page
Loading...
12’X10’
STEEL PERGOLA
ASSEMBLY INSTRUCTIONS
Note: The pergola needs to be installed in cooperation with five people.
The following tools are not included and needed for assembly:
If you have comments or questions, please contact BJ’s Wholesale Club at 1-800-934-1204.
Carefully check all packaging materials before discarding.
Make sure you have all the parts and hardware as identified on the parts list.
Do not assemble if there are missing pieces.
For any questions, replacement parts or issues about our product,
contact Sunjoy Customer Service at 1-866-578-6569 or email bj@sunjoygroup.com.
Drill Tape Measure Hammer Screwdriver Ladder 5 people
ARTICLE# 2 80154
Question and Answer IconNeed help?

Do you have a question about the Berkley Jensen 280154 and is the answer not in the manual?

Summary

Assembly Instructions

Safety Warnings and Preparation

Covers critical safety warnings, cautions, and preparation notes for assembly.

Part Identification List

Detailed list of all components and their specifications required for assembly.

Hardware Pack Contents

Catalog of all hardware, fasteners, and tools included for the assembly process.

Step 1: Install Post Base

Instructions for assembling the base of the pergola posts.

Step 2: Install Cross Beam

Procedure for connecting the horizontal cross beams.

Step 3: Connect Cross Beam to Post

Attaching the assembled cross beams to the main support posts.

Step 4: Install Top Arc Beam

Steps for assembling and installing the curved top beams.

Step 5: Connect Top Arc Beam to Post

Securing the top arc beams to the vertical posts.

Step 6: Install Braces

Attaching the structural braces for added stability.

Step 7: Install Top Beams

Installing the first set of horizontal top beams onto the frame.

Step 8: Install Top Beams

Installing the second set of horizontal top beams.

Step 9: Install Fabric Rods

Procedure for installing the rods that support the canopy fabric.

Step 10: Install Canopy

Attaching the main fabric canopy to the pergola.

Step 11: Install Rail Rods

Installing the rail rods along the pergola structure.

Step 12: Secure Pergola with Stakes

Final step to anchor the pergola to the ground using stakes for stability.

Cleaning and Maintenance

Warranty Information

Overview

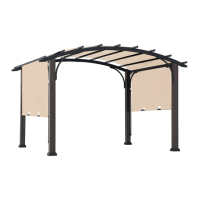
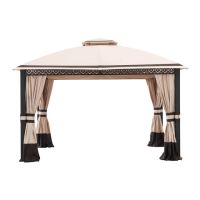
This document provides assembly instructions and important information for the Berkley Jensen 12'x10' Steel Pergola, Article #280154.

Function Description:

The Berkley Jensen 12'x10' Steel Pergola is designed for outdoor use, primarily for decorative purposes and to provide shade. It features a steel frame and a canopy. The pergola requires assembly and is intended to be anchored into the ground for stability.

Important Technical Specifications:

  • Dimensions: 12 feet by 10 feet.
  • Material: Steel frame.
  • Canopy: Included (Part S, P00640000101).
  • Assembly Requirement: Requires five people for installation.
  • Anchoring: Must be anchored with stakes into the ground (Stake Φ8*180, H070010001, Qty: 8).
  • Hardware: A variety of bolts (M612, M620, M655, M675) are included, along with an Allen Key M6 and a Wrench M6.

Usage Features:

  • Outdoor Use Only: This product is strictly for outdoor environments.
  • Shade and Decoration: Its primary purpose is to offer shade and enhance the aesthetic appeal of an outdoor space.
  • Canopy Removal: The canopy must be removed during rain, wind, or snowy conditions to prevent damage to the pergola.
  • Seasonal Storage: If not in use for extended periods, especially during winter, the pergola should be stored in a clean, dry environment. Retain the original packaging for protection during storage.
  • Safety Precautions:
    • Do not assemble on unstable surfaces.
    • Ensure adequate clearance around the pergola.
    • Do not permanently attach to concrete floors or platforms.
    • Keep children and pets away during setup.
    • Wear protective gloves and glasses during assembly due to potential sharp edges.
    • Do not climb on the pergola roof or place heavy objects on it.
    • Do not place a Liquid Propane or Wood Burning fire pit or fireplace inside the pergola.
    • Do not use or enter the pergola if there is visible movement of supports, roofing panels, or a sagging roof; unusual noise; deformed roof panels; or damaged/missing bolts/fasteners.
  • Local Regulations: Users are advised to check with their HOA, Local, and State Governments regarding permits and specific installation requirements before purchasing and assembling the pergola.

Maintenance Features:

  • Regular Tightness Checks: All screws and nuts should be checked periodically for tightness and re-fastened as required.
  • Cleaning: The pergola should be cleaned with mild soap and water, rinsed thoroughly, and allowed to dry completely before reassembly.
  • Avoid Harsh Cleaners: Do not use bleach, acid, or other abrasive cleaners on the canopies or frame parts.
  • Disassembly: When disassembling, follow the reverse order of the assembly steps. Always disassemble the pergola completely, as a partially disassembled pergola is unstable and prone to damage from wind and weather.
  • Instruction Manual: Retain the instruction manual for future reference.
  • Warranty: Keep the purchase receipt as proof of purchase for warranty claims.
  • Customer Support: For comments, questions, replacement parts, or issues, contact BJ's Wholesale Club at 1-800-934-1204 or Sunjoy Customer Service at 1-866-578-6569 or email bj@sunjoygroup.com. Sunjoy also offers an online portal at www.sunjoyonline.com for ordering parts and a fax option at 951-667-3447. Ensure all packaging materials are checked carefully before discarding to avoid missing pieces. Do not return the product to the store for technical assistance or replacement parts.

Berkley Jensen 280154 Specifications

General IconGeneral
BrandBerkley Jensen
Model280154
CategoryOutdoor Furnishing
LanguageEnglish

Related product manuals