Do you have a question about the Bernzomatic PH3250S and is the answer not in the manual?
Alerts to the possibility of serious bodily injury if instructions are not followed.
Indicates an imminently hazardous situation which, if not avoided, will result in death or serious injury.
Indicates a potentially hazardous situation which, if not avoided, may result in minor or moderate injury.
Essential safety precautions for operating the patio heater, covering unattended use, children and pets, and clearances.
Guidelines for maintaining the patio heater, including checking hoses and parts, and cleaning.
Precautions for safe installation, including gas type, codes, and outdoor use requirements.
Procedure to check the functionality of the igniter mechanism for proper spark generation.
Requirements for using a standard 20 lb refillable propane tank with the patio heater.
Step-by-step instructions for checking LP gas connections for leaks using a soap solution.
Instruction to inspect the gas hose for cuts or wear before each use.
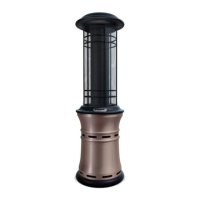
Dome design prevents water entry and reflects heat downwards for efficient operation.
Protective guard covers the entire height of the heat exchanger tube for user safety.
The heat exchange tube features a large surface area for efficient heat radiation.
Hinged metal door provides convenient and safe access to the LP gas cylinder compartment.
Centrally located gas control with electronic igniter for user-friendly operation and access.
The unit features a large base designed to provide excellent stability during use.
Conveniently integrated wheels facilitate easy transport and movement of the patio heater.
Safety system that extinguishes the flame if oxygen levels become low, ensuring safe operation.
Open gas chamber door and expose heat exchange tube by lifting the dome.
Rotate heat exchange tube clockwise to secure it once fully extended.
Close the gas chamber door and place the control knob onto the control stem.
Locate and insert screws to secure the heat exchange tube in place.
Place the AA battery in the compartment located below the control panel.
Identify and position the gas regulator correctly for connection.
Connect regulator to gas tank, check for leaks with soapy solution.
Fit the tank into the chamber carefully, avoiding damage to the hose or gas system.
Secure the tank with the restraining chain and ensure the control knob is off.
Ensure control knob is off, then turn tank valve to fully open position.
Close the gas chamber door after connecting the tank and regulator.
Turn knob to 'Ignite', hold down, press 'Igniter' until pilot lights.
Continue holding the control knob down for 30 seconds after pilot ignition.
Release knob. Adjust dial to desired setting between 'Low' and 'High'.
Place a match onto the wire match holder for manual ignition.
Light the match and place it near the pilot nozzle for ignition.
Press knob down, turn to 'Ignite', hold for 10s. Release. Adjust setting.
Turn the control knob clockwise to the 'Off' position.
Close the tank valve by turning the hand wheel clockwise.
Disconnect the gas regulator from the tank valve.
Turn off the tank valve and disconnect the regulator.
Unhook the safety chain that secures the gas tank.
Disconnect the regulator and carefully remove the LP gas tank.
Remove safety screws, then remove control knobs and store them in the door.
Keep the gas chamber door partially open and rotate the heat exchange tube clockwise.
Slowly descend the heat exchange tube to its lowest position.
Troubleshooting steps for when the pilot flame fails to ignite.
Troubleshooting steps for when the main burner fails to ignite.
Resolving issues with flame quality such as being lazy, yellow-tipped, or floating.
| Type | Patio Heater |
|---|---|
| Fuel Type | Propane |
| Material | Steel |
| Height | 87 inches |
| Weight | 40 lbs |
| Color | Stainless Steel |
| Burn Time | Up to 10 hours |
| Ignition Type | Piezo |
| Ignition | Piezo ignition |