12 13
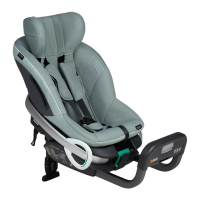
Components
Preparing the child seat for installation
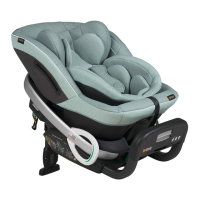
1. The front brace is delivered as a separate part and must be mounted to
the seat before using the seat in a vehicle. Once installed, the front brace
can only be taken o with the correct tools.
2. To mount the front brace: Keep the front brace handle pushed in while
sliding both tubes into the openings in the seat base on both sides. Slide
them all the way in. (2)
3. Decide with how much leg space you want to install the seat by adjusting
the position of the front brace. To do so, push the front brace handle in
and slide the front brace in or out and let it click into place. (2)
4. Tip: It’s easiest to adjust the front brace position already outside the
vehicle.
Headrest
Shoulder pads (2x)
Shoulder belts (2x)
Hip belts (2x)
Harness buckle
Central adjuster button
Central adjuster strap
Front brace
Front brace handle
User manual pocket
SIP+
Belt guider (2x)
Floor support
Floor support adjuster
Floor support indicator
Lower tether (2x)
Lower tether release button (2x)
Lower tether strap (2x)
Lower tether hook (2x)
Recline handle
Tensioner lock-o
Back cushion
Bottom cushion
Headrest handle
Tensioner knob
Lower tether anchorage points in the vehicle
(1a)
(1b)
(1c)
(1d)
(1e)
(1f)
(1g)
(1h)
(1i)
(1j)
(1k)
(1l)
(1m)
(1n)
(1o)
(1p)
(1q)
(1r)
(1s)
(1t)
(1u)
(1v)
(1w)
(1x)
(1y)
(1z)
Preparing the vehicle for installation on the back seat
Preparing the vehicle for installation on the
passenger seat
1. Bring the backrest of the back seat into upright position (if applicable to
your car).
2. To give yourself space for the installation, move the front seat forward as
far as possible and put it into upright position if needed.
3. If your vehicle is equipped with lower tether anchorage points, you don’t
need further preparations and can start with installing the child seat.
Check your vehicle manual to ensure that the anchorages are allowed to
be used with lower tethers. (3)
1. Adjust the backrest of the front seat into an upright position.
2. ALWAYS deactivate the front airbag. If this is not possible in your vehicle,
you cannot install this seat on the front seat.
3. Move the front seat and/or adjust the front brace position, so that the
back of the child seat will be in contact with the dashboard. If having
contact is not possible, then you should move the front seat as far back
as possible, so that you have a preferable minimum distance of 25 cm
between child seat and dashboard.
4. If your vehicle is equipped with lower tether anchorage points, you don’t
need further preparations and can start with installing the child seat.
Check your vehicle manual to ensure that the anchorages are allowed to
be used with lower tethers.
5. Move the floor support away from the seat and upwards until it locks into
the usage position and does not dangle anymore. (5)
6. For an easier installation once in the car, bring the seat into the most
upright position with the recline handle, and keep the floor support in the
shortest position.