BEST ACCESS SYSTEMS
a Division of Stanley Security Solutions, Inc
Overview
1 Mark centerlines
Caution: If you use hollow metal doors, decide whether the
doors are reinforced enough to support the lock. If the door
reinforcement is not adequate, consult the door manufacturer
about proper reinforcement.
Note: Prepare the door according to ANSI A115.1 before using these
instructions.
1 Mark the horizontal centerline of the lock on both sides of the door
and on the door’s edge.
Note: BEST suggests a 38" height as measured from floor to lock center-
line.
2 Mark the vertical centerline of the lock on the door edge.
3 Mark the vertical centerline of the lock on both sides of the door as
measured from the vertical centerline on the door’s edge.
4 Mark the horizontal centerline of the strike on the door jamb in line
with the centerline of the lock.
2 Mark drill points
1 Cut the H18 template along the dotted line and align the horizontal
and vertical arrows to the marked centerlines on the door.
2 Tape the template onto the door.
3 Install strike
1 Using the H18 template, mortise the jamb and install the strike and
strike box. See Installation Specifications, Template H17 for dimen
-
sions.
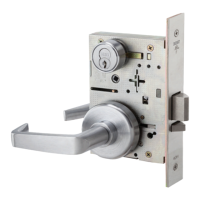
Figure 1 48H and 49H Mortise Lock overview diagram
Figure 2 Marking the centerlines on the door
Mortise lock
49H inside trim
Faceplate
48H Trim
49H Cylinder face
49H Cylinder
49H Ring
49H Outside
escutcheon
Centerline
of strike
Door to jamb gap: 1/16” to 3/16”
2 3/4” backset
Vertical center-
Horizontal center-
of lock
Vertical center-
line of lock
line of door’s edge
Figure 3 Marking the drill points with the template
Figure 4 Installing the strike box and strike
H18 template
Jamb
Strike box
Strike plate
#8–32 combination
screws
Installation Instructions
for 48H & 49H Mortise Locks
T81175/Rev – ER-7991-19 Nov 2005
1