16
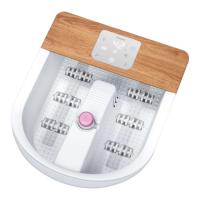
4. DEVICE DESCRIPTION
The associated drawings are shown on page 3.
1
LED touch display
2
Splash protection
3
Fill level mark (max. 5.5 l)
4
Foot rest with massage nodules
5
Bubble bar
6
Massage roller attachments (6 pieces)
7
Pedicure centre
8
Portable pedicure device
9
Brush attachment
10
Massage attachment
11
ON/OFF button
12
“Increase water temperature” /
“Switch water heating on” function button
13
“Decrease water temperature” /
“Switch water heating o” function button
14
“Vibration” function button
15
“Programs” function button
16
“Bubble” function button
17
Water temperature / timer time display
18
“Timer” function button
19
Cable outlet
20
Cord winder
21
Rubber feet
22
Storage / drying bag
5. USE
Initial use
1. Remove the packaging, including the film protecting the display.
2. Check the complete scope of delivery (including packaging) for damage.
3. Before plugging the foot bath in, fill it with cold or warm water up to the fill level mark
3
(approx. 5 cm
high). The foot rest part must be completely submerged under water.
4. Place the foot bath on afirm and level surface.
5. Ensure that the mains cable does not pose atrip hazard.
6.
Insert the mains plug into asuitable socket. The ON/OFF button
11
starts to flash. The foot bath is in
standby mode.
Using the foot bath
1. Sit in acomfortable position. Never use the foot bath standing up.
2.
Place your feet in the foot bath. The rubber feet on the base of the device prevent the foot bath from
slipping.
3.
Press the ON/OFF button
11
to switch the foot bath on. The ON/OFF button
11
lights up and stays lit; the
display
17
shows the current water temperature. The foot bath is now ready for use.
4. The massage is especially eective if you move your feet back and forth over the massage roller attach
-
ments
6
in the foot rest.
 Loading...