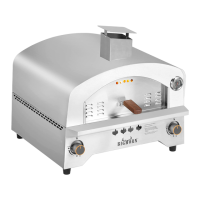
The BIGHORN J-626 Tabletop Gas Pizza Oven, Item# SRGG20001, is a portable outdoor appliance designed for cooking pizzas. It operates on liquid propane (LP) gas and is intended for tabletop use, offering a convenient solution for outdoor cooking enthusiasts.
Function Description:
The BIGHORN J-626 is a gas-fired pizza oven that utilizes LP gas to heat an internal cooking cavity, reaching temperatures suitable for baking pizzas. It features a main burner system controlled by a knob, allowing users to adjust the flame intensity for optimal cooking. The oven is equipped with a pizza stone, which helps achieve a crispy crust by absorbing moisture and distributing heat evenly. A door provides access to the cooking chamber, and a chimney with a lid helps vent exhaust gases. The appliance is designed for quick and efficient pizza preparation in an outdoor setting.
Important Technical Specifications:
- Fuel Type: Liquid Propane (LP) gas only. Conversion to natural gas is dangerous and voids the warranty.
- LP Gas Cylinder Requirements:
- Maximum 20 lb LP gas supply cylinder.
- Dimensions: 18-1/4" (45.6 cm) high, 12-1/4" (32 cm) diameter.
- Must be placed in an upright position for vapor withdrawal.
- Never fill the cylinder beyond 80 percent full.
- Cylinder must be constructed and marked in accordance with U.S. Department of Transportation (DOT) specifications or the Standard for Cylinders, Spheres and Tubes for the Transportation of Dangerous Goods, CAN/CSA-B339.
- Clearances:
- Minimum clearance from sides and back of unit to combustible construction: 24 inches from sides, 24 inches from back.
- Do not use under overhead combustible surfaces.
- Tabletop Height:
- Minimum: 23.6 inches (600 mm).
- Maximum: 39.3 inches (1,000 mm).
- Regulator and Hose Assembly: The appliance must use the gas pressure regulator provided by the manufacturer. Replacement parts must also be specified by the manufacturer.
- Ignition: Electronic igniter (requires one AA battery, not included).
- Assembly Time: Estimated 10 minutes (adult assembly required).
- Tools Needed (Not Included): Philips screwdriver, two wrenches (for regulator connection).
Usage Features:
- Outdoor Use Only: This appliance is strictly for outdoor use and must not be operated in buildings, garages, or any other enclosed areas. It is not intended for installation in boats or recreational vehicles, nor for commercial use.
- Easy Assembly: Most parts are pre-installed, with a simple assembly process involving attaching foot pads, the chimney, and the regulator/hose assembly, and inserting the pizza stone and igniter battery.
- LP Gas Connection: The LP gas cylinder connects to the regulator and hose assembly. Users must ensure the coupling nut is hand-tightened clockwise until it stops, without using tools. The cylinder should be placed to the side of the appliance to avoid hose tension or tripping hazards, and the hose must be kept away from heated surfaces.
- Lighting Instructions:
- Ensure the control knob is in the "OFF" position.
- Open the oven door (6).
- Open the LP gas cylinder valve counterclockwise.
- Push and turn the control knob counterclockwise to the "LITE" position.
- If ignition does not occur within 5 seconds, turn the burner off, wait 5 minutes, and repeat.
- Once lit, continue pushing the control knob for 10-20 seconds.
- Adjust burners to desired cooking settings by turning the control knob from "High" to "Low."
- Match Lighting (Alternative):
- Ensure the control knob is in the "OFF" position.
- Open the oven door (6).
- Open the LP gas cylinder valve counterclockwise.
- Place a long lit grill lighter or match (at least 3 inches long) near the burner ports through the cooking grate.
- Push and turn the control knob counterclockwise to the "LITE" position.
- If ignition does not occur within 5 seconds, turn the burner off, wait 5 minutes, and repeat.
- Once lit, continue pushing the control knob for 10-20 seconds.
- Adjust burners to desired cooking settings by turning the control knob from "High" to "Low."
- Shutdown Procedure:
- Turn the control knob clockwise to the "OFF" position.
- Fully turn off the LP gas cylinder valve clockwise by hand when the appliance is not in use.
- Safety Precautions:
- Do not store a spare LP gas cylinder under or near the appliance.
- Cylinders must be stored outdoors, out of reach of children, and not in a building, garage, or any enclosed area.
- Place a dust cap on the cylinder valve outlet when not in use.
- The appliance will be hot during and after use; insulated oven mitts or gloves are recommended.
- Do not leave the appliance unattended, and keep children and pets away.
- Do not move the appliance when in use.
- This appliance is not intended to be used as a heater.
- The use of alcohol, prescription, or non-prescription drugs may impair the user's ability to operate the appliance safely.
- California Proposition 65 Warning: This product can expose you to chemicals including lead and carbon monoxide, which are known to cause cancer, birth defects, or other reproductive harm.
Maintenance Features:
- Leak Test: A leakage test must be conducted after installation and before each use.
- Prepare a 50/50 mild soap and water solution and a clean paintbrush.
- Turn burner control knobs to "OFF."
- Ensure the regulator is tightly connected to the LP gas cylinder.
- Open the LP gas cylinder valve counterclockwise.
- Brush the soapy solution onto all gas-carrying connections and fittings. If bubbles "grow" or gas is smelled/heard, immediately close the LP gas cylinder valve, retighten connections, and repeat the test. If leaks persist, discontinue use and contact the seller.
- Do not smoke or use an open flame during leak tests. Conduct tests outdoors in a well-ventilated area, away from ignition sources.
- General Cleaning:
- Keep the appliance area clear of combustible materials, gasoline, and flammable vapors.
- Ensure the flow of combustion and ventilation air is not obstructed.
- Clean the drip tray and remove grease from inside the appliance using warm soapy water to reduce the risk of grease fires.
- Wipe down the outside of the appliance with warm soapy water.
- Use a brass-bristled barbecue brush to scrub stainless steel cooking grates (avoid steel-bristled wire brushes).
- Burner/Venturi Tube Cleaning: Regularly check and clean burner/venturi tubes for insects and nests, as a clogged tube can lead to a fire beneath the appliance.
- Flame Inspection: Visually check burner flames; they should be blue with yellow tipping.
- Troubleshooting Guide: The manual provides a troubleshooting section for common issues such as the burner not lighting (possible causes: faulty regulator, obstructions, damaged igniter, empty cylinder) and low flame (possible causes: obstructions in burner or gas orifice). Corrective measures include checking/replacing the regulator, cleaning the burner/orifice, changing the electrode/wire, changing the battery, or using a new LP gas cylinder.
Warranty:
The BIGHORN J-626 comes with a one-year limited warranty from the date of purchase. This warranty covers defects in material and workmanship, providing a free replacement for defective parts. It is valid for the original consumer/purchaser only and excludes industrial, commercial, or business use, as well as damage from shipment, alteration, product abuse, or misuse. The manufacturer is not responsible for labor charges, installation, repair, replacement, or incidental/consequential damages.