EasyManua.ls Logo

bikemate BLR-12 - User Manual

bikemate BLR-12
28 pages
Print Icon
To Next Page IconTo Next Page
Loading...
REAR BIKE CAMERA
WITH LIGHT
USER GUIDE
Question and Answer IconNeed help?

Do you have a question about the bikemate BLR-12 and is the answer not in the manual?

Overview

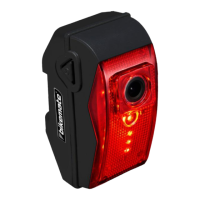
The Bikemate Rear Bike Camera with Light is a quality product designed to enhance cycling safety and convenience. It features a rear-facing camera and an integrated light, offering both recording capabilities and improved visibility for cyclists. The product is backed by a comprehensive 3-year manufacturer's warranty and dedicated after-sales service.

Function Description:

The device serves as a rear-facing camera for bicycles, recording footage of the area behind the cyclist. It also incorporates a rear light with multiple modes and brightness levels to enhance visibility to others on the road. The camera automatically starts recording when turned on, provided a micro SD card is installed. The integrated light also activates automatically with the camera.

Important Technical Specifications:

  • Approx Weight: 140g
  • Approx Dimensions: 87mm x 40mm x 60mm
  • Mains Power: 5V/1A
  • Available Ports: Mini USB
  • IPX Rating: IPX4 (Splash resistant)
  • Battery Type: Internal Li-Ion
  • Battery Capacity: 3000mAh
  • Use Time: Approximately 8 hours on a full charge
  • Sensor Solution: Jieli
  • Sensor Type: CMOS
  • Video Resolution: 1MP
  • Viewing Angle: 135°
  • Minimum Focus Distance: 50mm
  • Maximum Focus Distance: Infinity
  • Video Output Size: 1080P
  • Video Format: AVI
  • Micro SD Card: Max Size: 32GB, Supported Version: FAT32, Class: 10 (A 32GB, Class 10 Micro SD Card is included)
  • Compatibility: Windows 10 Compatible (for accessing footage)

Usage Features:

  • Charging: The camera takes approximately 4 hours to fully charge, providing up to 8 hours of use. It is recommended to fully charge the device before first use. Charging is done via the supplied charge cable connected to a USB power adapter (not included).
  • Mounting: The camera can be mounted to a bicycle seat pole using the included mounting strap and rubber wedge. It supports both standard and aero seat pole mounting. The mounting bracket allows for vertical adjustment to align the camera to the preferred position.
  • Camera Installation/Removal: The camera slides onto the mounting bracket and locks into place with a click. To release, a clip is raised, and the camera slides off the mount. It is advisable to remove the camera when the bicycle is secured.
  • Power On/Off: To turn the camera on or off, press and hold the power button for 3 seconds. Two beeps will sound. When turned on, the camera automatically starts recording (if a micro SD card is installed) and the light turns on. When turned off, recording stops, and the light turns off.
  • Low Power Indication: When the camera reaches 5% power, the recording function is disabled, and only the light can be used.
  • Recording Confirmation: Automatic recording upon power-on is confirmed by a chasing pattern LED around the lens housing square.
  • Rear Light Options: The rear light offers 3 modes: Constant, Flashing, and Multi Strobe. These modes can be cycled through with a quick press of the power button.
  • Brightness Control: The rear light has 4 brightness levels: High, Medium, Low, and Off. These levels can be adjusted with a quick press of the light button.
  • Digital Storage (Micro SD Card): A pre-formatted 32GB Micro SD card is included and pre-installed. The card is installed by raising the dust cover, inserting the card into the slot (data pins towards the lens), and pushing until a click is heard. To remove, press the card until a click is heard, then release to allow it to protrude for removal.
  • Accessing Footage: Footage can be accessed in two ways:
    1. Directly from the card: Insert the micro SD card into a micro SD card adapter, then insert the combined card into an SD card reader connected to a PC or laptop.
    2. Via USB cable: Connect the supplied charge cable to the mini USB port on the camera and the other end to a USB port on a PC or laptop. Once connected, the card's root folder (containing "DCIMA", "SETTIME", and "TIME" files) should automatically display or can be accessed via Windows Explorer. Footage files are located in the "DCIMA" folder and are in AVI format.
  • Repairing the Micro SD Card: If the micro SD card becomes corrupt or doesn't play/record, it can be reformatted. This can be done via a micro USB adapter connected to a PC/laptop or by connecting the camera directly to a PC/laptop. In Windows Explorer, right-click on the USB Drive and select 'Format'. Ensure FAT32 is selected and try 'Quick Format' first. If issues persist, uncheck 'Quick Format' for a full format (which takes longer). After formatting, disconnect the cable and turn the camera off. The card will be updated and ready for use when the camera is turned on again.
  • Setting Date/Time: The date and time are set by editing the 'TIME' text file in the card's root folder. Double-click the 'TIME' file to open it. Modify the first line from '0' to '1' and update the next line to the correct date and time in 'YYYY-MM-DD HH:MM:SS' format. Save the file, then restart the camera by turning it off and on again.

Maintenance Features:

  • Storing: For long-term storage, avoid placing heavy items on top of the camera. Always charge the camera before long-term storage. Check the battery's condition every 6 months and recharge if required to maintain optimum condition. Store the camera in a dry ambient temperature place (0°C – 45°C).
  • Cleaning: Use a damp lint-free cloth to wipe over the housing of the alarm clock. Do not use chemicals or detergents. Do not attempt to clean the terminals in the charge port. Chemicals and detergents can corrode the housing and could damage the product if there is any liquid ingress.
  • Disposal: The packaging is made from widely recycled material and should be disposed of in a council-approved recycle bin. The device contains a 3000mAh Li-ion internal battery and must not be disposed of with domestic waste. It should be taken to a public collection point for waste electrical and electronic equipment (WEEE) and batteries. Never throw batteries into a fire or expose to excessive heat sources. If batteries are swallowed, seek immediate medical attention. Ensure correct +/- battery polarity when installing batteries. Do not recharge non-rechargeable batteries.

bikemate BLR-12 Specifications

General IconGeneral
Brandbikemate
ModelBLR-12
CategoryDash Cameras
LanguageEnglish