Do you have a question about the Bio-Optica WB1770 and is the answer not in the manual?
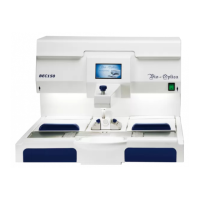
The Bio-Optica Water Bath WB1770 (Code: 40-300-000) is a thermostated bath designed for laboratory use, specifically for collecting and drying histological sample sections. It is intended to be used in conjunction with a laboratory microtome, maintaining the water temperature at a desired level to facilitate optimal floating and spreading of sections. The device is marked with CE and IVD symbols, indicating compliance with European safety and in-vitro diagnostic medical device regulations.
Before using the instrument, it is crucial to read and understand all instructions and warnings in the manual. These provide important information regarding installation, use, and maintenance. Bio-Optica Milano S.p.A. is not responsible for damages resulting from improper or incorrect use, or non-compliance with the manual's prescriptions and safety regulations.
Upon unpacking, ensure the instrument is intact and free from transport damage. Before connecting to the power supply, verify that the instrument's rating matches the electrical distribution network. The WB1770 is designed solely as a water bath for laboratory applications; any other use is considered improper and potentially dangerous. Only authorized and professionally qualified personnel should operate and maintain the instrument. Annual periodic maintenance must be performed by Bio-Optica authorized personnel.
Electrical safety is ensured only when the instrument is correctly connected to an effective earth circuit, as per electrical safety regulations. The instrument is supplied with a 2-wire + earth power cable. Do not remove the chassis or any parts during operation. Always switch off and disconnect the power cable before opening the instrument, an operation reserved for authorized and qualified personnel. To prevent malfunctions, avoid operating the instrument near strong electromagnetic fields or using transmitters like cellular phones nearby. In case of serious malfunction, switch off the instrument and contact Technical Assistance. All waste, including infectious and radioactive materials, must be disposed of according to current regulations. The instrument is marked with the WEEE symbol (2002/96/CE), meaning it should not be disposed of as normal waste but taken to authorized collection centers. The manual's content may change without prior notice, and a declaration of conformity is included.
The instrument's label, located near the power supply socket, includes several graphic symbols:
Dimensional Features:
Electrical Connections:
Structural Features:
Technical Features:
Installation: Place the instrument on a flat, stable workbench and connect it to a 230V~ 50/60Hz electrical outlet using the provided cable. Do not use extension cords or adapters, and do not modify the supplied cable.
Filling the Basin:
Setting Water Bath Temperature:
Changing LAE Thermostat Parameters (Advanced Settings): Operating parameters are preset but can be modified.
Adjustable Parameters:
Note on OS1: The average deviation between the probe's reading and the actual temperature is minimal (±1.5°C). To verify, bring the water to 40°C and measure with a digital thermometer. If the display shows 40°C and the thermometer reads 38°C, subtract 2 from OS1 to zero the deviation. Do not modify Pid, 1IT, 1DT, 1AR, 1CT values to ensure optimal PID control.
Setting Slide-Dryer Plate Temperature: The plate heating starts when the main green switch is pressed. To turn it off, rotate the thermostat knob counter-clockwise to its stop. The instrument is factory-tested and preset to approximately 40°C. To adjust:
Cleaning: Always switch off the instrument and unplug the power cable before cleaning.
Periodic Maintenance: Annual periodic maintenance must be performed by Bio-Optica qualified and authorized personnel. Contact Technical Assistance at 02-21271310 for information.
Opening the Instrument: Switch off the instrument and unplug the power cable. Remove the screws from the lower panel (newer models use TORX screws with a central hole). Place the instrument back on its feet and rotate the upper part to the left.
Replacing Fuses: If the instrument does not turn on, check the power cable connection, power supply, and ensure the two fuses under the power socket are not blown. Replace with fuses of the same value if necessary.
Replacing the Lamp: Switch off and unplug the instrument. Remove the bottom panel by unscrewing the 8 fixing screws. Lift the chassis by rotating it to the left. Rotate the lamp 90° and lift it out. Replace it with an identical model and rotate it 90° back into place. Close the instrument.
Replacing LAE Thermostat: Switch off and unplug the power cable, then open the instrument. The thermostat is secured by clips or locking brackets. The wiring connections are indicated on the label on the upper side of the thermostat.
Instrument doesn't switch on:
Instrument lights up but keys don't respond:
Instrument lights up but thermostat doesn't light up and resistance doesn't heat:
Error signal (e.g., DL1) appears on display:
Basin doesn't heat:
Slide-dryer upper plate doesn't heat:
Lamp doesn't work:
| Brand | Bio-Optica |
|---|---|
| Model | WB1770 |
| Category | Laboratory Equipment |
| Language | English |