Do you have a question about the Biohort WoodStock and is the answer not in the manual?
Use work gloves and a suitable underlay to protect against scratches during assembly.
Ensure storm-proof anchoring and lock doors. Avoid assembly in windy conditions.
Align components accurately using the spirit level symbol as indicated in the manual.
Do not fully tighten screw connections until the very end of the assembly process.
Guidelines for cleaning, storage, and upkeep to ensure product longevity and performance.
Visual guide to identify and select the correct screws for assembly as per scale drawings.
Keep small parts away from children and be cautious of sharp edges during assembly.
Specifications for foundation dimensions and available foundation solutions.
Visual overview of main structural parts for assembly reference.
Identification of items included in the small parts package for assembly.
Connect base and side frame components using specified parts and quantities.
Secure the base frame using screws (D1) as shown in the detailed view.
Slide and secure the side panels (GL, GR) into the frame structure.
Use screws (D1) to firmly attach the side panels to the frame as illustrated.
Secure the back panels using screws (D1) in the indicated locations.
Install corner brackets (KL, KR) and secure them with screws (D1).
Place and secure roof panels (W, X, Y) onto the top frame structure.
Secure the roof panels using screws (D1) and nuts (M4x10) as shown.
Attach the roof edge profile (Z) and secure with screws (D1).
Install the covers (MA, MB) onto the designated positions.
Attach the cross bracing (P) using screws (D1) and nuts (M4x10).
Secure the roof structure using screws (D1) and nuts (M4x10) as shown.
Install the side trim (Q) and secure it with screws (D1).
Tighten all nuts and screw connections securely to complete the assembly.
Anchor the structure to the foundation using brackets and screws (D1).
| Material | Steel |
|---|---|
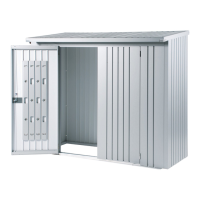
| Product type | Firewood holder |
| Product color | Silver |
| Firewood capacity | 1.8 m³ |
| Depth | 1020 mm |
|---|---|
| Width | 1570 mm |
| Height | 1990 mm |
| Weight | 40000 g |