Do you have a question about the BioLite SolarHome 620 and is the answer not in the manual?
Place Solar Panel high on roof and at an angle for optimal cleaning and performance.
Avoid shadows from trees or buildings to maximize power generation.
Use screws or wires to securely install the Solar Panel onto the roof.
Route the cord from the Solar Panel to the indoor location of the Control Box.
Utilize the Control Box's built-in light to illuminate the installation area.
Mount the Control Box 1.5 meters off the ground for child safety and accessibility.
Install 3 screws or nails into the wall following the Control Box attachment points.
Slide Control Box onto screws, leaving them slightly loose for easy future removal.
Overview of the included Hanging Lights and Security Light with their components.
Connect up to two lights directly to the Control Box and the third via an extension port.
Install lights high and centered, using hooks or cord clips to secure them and prevent cord damage.
Mount the light switch at an accessible height using screws or nails.
Angle the motion sensor light using the hook to detect motion in desired directions.
Attach the security light switch to the inside wall using two screws or nails.
Disconnect the Control Box, connect light and solar panel cords to the rear ports.
Re-mount the Control Box and position the radio antenna securely.
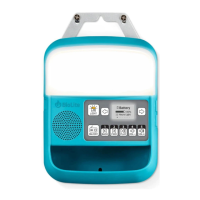
Overview of ports and features: Light, Control Panel, Storage, Speaker, SD Slot, Inputs, Ports.
Guide to navigating the eight screens on the Control Box display using arrow buttons.
Detailed functions of each button on the Control Box interface.
Understanding how weather, season, and time of day affect solar power supply.
Checking battery level and estimated 4-6 hour charging time.
Using the USB port to charge phones and other small electronics.
Adjusting light brightness (Low, Medium, High) using the light switch.
Estimates for light run time based on brightness and number of lights used.
How the motion sensor activates the security light for 30 seconds.
Instructions for setting the system's time and date.
Using the MP3 player with an SD card and operating the radio.
Guidance on checking payment status and entering payment codes.
| Power Output | 6W |
|---|---|
| Solar Panel Type | Monocrystalline |
| USB Charging | Yes |
| Radio | Yes |
| Output Ports | 2 USB ports |
| Weather Resistance | IPX4 (weather resistant) |
| Weight | 1.41 kg (3.1 lbs) |