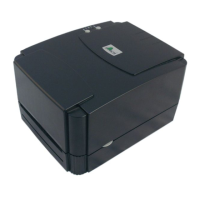
The BIRCH BP-744/BP-744+ is a desktop thermal transfer and direct thermal bar code printer designed for superior performance at an economical price. It is a versatile and user-friendly device suitable for various labeling and tagging applications.
Function Description:
The printer is capable of both thermal transfer and direct thermal printing, offering flexibility for different media types and printing requirements. It is equipped with a 32-bit RISC multi-tasking processor, enabling efficient and fast operation. The printer supports a wide range of media, including continuous, die-cut, and fan-fold labels or tags, for both thermal transfer and direct thermal printing. It provides access to all commonly used bar code formats and offers eight different sizes of alphanumeric fonts, with further size variations possible through font multiplication. Smooth fonts can also be downloaded via software.
A key feature of the BP-744/BP-744+ is its ability to independently execute BASIC programming functions. This includes arithmetic, logical operations, loops, flow-control, and file management, which significantly enhances efficiency in label printing. The printer also provides status and error messages, which can be printed out or viewed on a monitor, facilitating troubleshooting and monitoring.
Important Technical Specifications:
- Printing Method: Thermal Transfer / Direct Thermal
- Processor: 32-bit RISC multi-tasking processor
- Print Speed: Up to 4.0 inches per second
- Media Types: Continuous, die-cut, fan-fold labels or tags
- Bar Code Formats: All frequently used bar code formats are available.
- Fonts: Eight different sizes of alphanumeric fonts, with font multiplication capability. Smooth fonts can be downloaded.
- Programming Capability: Supports BASIC programming functions (arithmetic, logical operation, loop, flow-control, file management).
- Interfaces: RS-232C, USB, Centronics (factory option).
- Memory (BP-744+ Model only / Option): Supports SD Memory Card. Recommended SD card specifications include various capacities (128 MB to 4 GB) and manufacturers (SanDisk, Transcend, Panasonic) across V1.0, V1.1, V2.0 SDHC CLASS 4, and V2.0 SDHC CLASS 6. It supports DOS FAT file system, and folders/files should be in 8.3 filename format. A miniSD/microSD card to SD card slot adapter is required for smaller cards.
- Default Print Settings (after initialization):
- Speed: 50.8 mm/sec (2 ips)
- Density: 8
- Label Width: 4" (101.6 mm)
- Label Height: 4" (101.6 mm)
- Sensor Type: Gap sensor
- Gap Setting: 0.12” (3.0 mm)
- Print Direction: 0
- Reference Point: 0,0 (upper left corner)
- Offset: 0
- Tear Mode: On
- Peel off Mode: Off
- Cutter Mode: Off
- Serial Port Settings: 9600 bps, none parity, 8 data bits, 1 stop bit
- Code Page: 850
- Country Code: 001
- Clear Flash Memory: No
Usage Features:
- Easy Setup: The printer is designed for straightforward setup, including placing it on a flat surface, connecting to a computer via RS-232C or USB, and plugging in the power cord.
- Media Loading:
- Label and Tag Stock: The process involves opening the printer cover, disengaging the printer carriage, sliding the label supply roll spindle through the label roll core, attaching fixing tabs, placing the roll into the mount, feeding the label under the carriage and over the platen, adjusting the label guide, engaging the printer carriage, and winding the label roll taut.
- External Label Roll Mount (Option): This accessory allows for external label roll feeding, with a dedicated label insert opening on the printer's rear.
- Ribbon Loading: The ribbon loading process involves placing an empty paper core on the ribbon rewind spindle, mounting it on the front hubs (ensuring the bigger hub side with 4 ribs faces the right side of the ribbon mechanism), installing a ribbon on the ribbon supply spindle on the rear hubs (again, ensuring the bigger hub side with 4 ribs faces the right side), disengaging the printer carriage, pulling the transparent ribbon leader under the mechanism, attaching it to the empty paper core, and rotating the rewind spindle until the ribbon is tight.
- Buttons and Indicators:
- PWR. (POWER) Indicator: Green, illuminates when the power switch is on.
- ON-LINE Indicator: Green, illuminates when the printer is ready to print. Flashes when the PAUSE button is pressed.
- ERR. Indicator (Error/Paper Empty): Red, illuminates for printer errors (memory, syntax, etc.) or when out of paper/ribbon.
- PAUSE Button: Stops a print job after the current label and holds data in memory, allowing for media/ribbon replacement. A second press restarts printing. Holding for more than 3 seconds resets the printer and clears the current job data.
- FEED Button: Feeds the label to the beginning of the next label.
- Power-on Utilities:
- Self Test Utility: Activated by holding the FEED button while turning on power. It calibrates label length, prints a thermal print head check pattern, prints internal settings, and then enters dump mode.
- Gap Sensor Calibration Utility: Activated by holding the PAUSE button while turning on power. Used to calibrate the sensitivity of the gap sensor, especially when changing media types or initializing the printer. Blank labels are required.
- Printer Initialization: Activated by holding both PAUSE and FEED buttons while turning on power until the three LEDs flash. This resets printer parameters to default values but does not clear downloaded files. Printing method (thermal transfer or direct thermal) is set automatically upon power-on. Sensor calibration is required after initialization.
- Dump Mode: Entered after the self-test. Prints characters sent from the host computer in two columns: ASCII data and corresponding hexadecimal values, useful for debugging.
Maintenance Features:
- Troubleshooting Guide: The manual includes a comprehensive troubleshooting guide for common issues such as ribbon not advancing/rewinding, poor print quality, power indicator not illuminating, and ON-LINE indicator off with ERR. indicator on. Solutions include checking media/ribbon installation, cleaning the print head, adjusting print density, checking power connections, and calibrating the gap sensor.
- Error Indicators: The PWR., ON-LINE, and ERR. indicators provide visual cues for printer status and errors, aiding in quick diagnosis.
- Self-Test Printout: Provides detailed printer information, including model name, firmware version, mileage, checksum, serial port configuration, print speed, print darkness, label size, gap distance, sensor sensitivity, and memory status, which is valuable for diagnostics and maintenance.
- SD Memory Card Installation (BP-744+ Model only / Option): Allows for expanding memory, which can be useful for storing additional fonts, graphics, or programs. Installation involves opening a memory card cover, plugging in the SD memory card module, installing the SD card, and closing the cover. (Caution: Power must be off when installing/removing the cartridge.)
- Cutter Module: Contains hazardous moving parts; keep fingers and other body parts away.
- Lithium Battery: The main board includes a CR2032 lithium battery for the real-time clock feature. Risk of explosion if replaced by an incorrect type. Dispose of used batteries according to manufacturer instructions.