This document is an instruction manual for the Black Diamond BDPM-60 60 Qt. Planetary Mixer, providing comprehensive details on its setup, operation, maintenance, and troubleshooting.
Function Description:
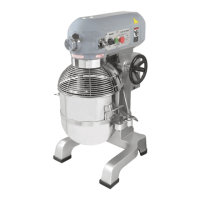
The Black Diamond BDPM-60 is a commercial-grade planetary mixer designed for various food preparation tasks, including mixing dough, batter, mashed potatoes, egg whites, meringue, whipped cream, fondant icing, cake, and pie dough. It utilizes a planetary mixing action where the agitator rotates on its axis while simultaneously orbiting the inside of the mixing bowl, ensuring thorough and consistent mixing of ingredients. The mixer is equipped with multiple speed settings and comes with three standard accessories: a flat beater, a dough hook, and a wire whip, each suited for specific mixing applications. A meat grinder attachment is also mentioned, indicating the mixer's versatility for additional food processing tasks.
Important Technical Specifications:
- Model: BDPM-60
- Capacity: 60 Quarts
- Power Supply: 3 PHASE 220V 60HZ (as indicated in the wiring diagram)
- Net Weight: 661.5 lbs (300 KGS)
- Dimensions: 30.5" x 26" x 52" (770 x 660 x 1315 mm)
- Accessories: Flat Beater, Dough Hook, Wire Whip, Mixing Bowl (standard). Meat Grinder Attachment (optional/additional).
- Speed Settings: The mixer features multiple speed settings, which are controlled by a knob. The manual specifies:
- Slow speed: Middle setting (Dough hook setting with the knob facing forward)
- Medium speed: Bottom setting (Flat beater setting with the knob facing down)
- High speed: Top setting (Wire Whip setting with the knob facing up)
- Capacity Chart (Examples):
- Bread and roll dough (60% AR): 80 lbs (1st speed only)
- Heavy bread dough (55% AR): 70 lbs (1st speed only)
- Pizza dough (40% AR): 40 lbs (1st speed only)
- Mashed potatoes: 40 lbs
- Waffle or Hotcake batter: 24 qts
- Egg whites: 2 qts
- Whipped cream: 12 qts
- Fondant Icing: 36 lbs
- Cake: 60 lbs
- Pie Dough: 50 lbs
- Absorption Ratio (%AR): Water weight divided by flour weight. Capacities are based on flour at room temperature and 70°F water temperature.
- Maximum Mixing Time: 7 minutes for certain doughs.
- Safety Features: Includes a safety cover position switch and a lifting position switch, ensuring the machine operates only when the wire guard is closed and the bowl is fully lifted. A red stop button is provided for immediate cessation of operation.
Usage Features:
- Installation: Requires placement on a flat, secure surface with at least 12 inches of open space around all sides. Must be plugged directly into a 3-hole grounded electrical outlet of appropriate voltage (220V); extension cords are not permitted.
- Agitator Installation: Agitators are installed by raising them into the mixing axle and rotating clockwise until they lock into place. Removal involves raising, rotating counterclockwise, and lowering.
- Bowl Installation: The mixing bowl is inserted into the holder in the down position, aligned on pins, and locked into place with side clips.
- Operation Sequence:
- Plug in the unit.
- Insert and lock the mixing bowl.
- Insert and lock the desired agitator.
- Add ingredients and raise the bowl to its full raised position using the lift handle.
- Adjust the speed setting.
- Set the timer (manual run or timed setting). The machine will not operate without the timer being set.
- Close the wire guard over the bowl.
- Press the green power button to start mixing. The wire guard must be fully closed for operation.
- Press the red stop button to stop the agitator when mixing is complete.
- Open the wire guard and lower the bowl.
- Speed Change: Always stop the machine before changing speeds to prevent damage to the unit's gears.
- Safety Interlocks: The mixer requires the bowl to be fully lifted and the wire guard to be closed for operation.
- Dough Mixing Notes:
- The mixer capacity depends on the moisture content of the dough.
- If high gluten flour is used, reduce batch size by 10%.
- If using chilled flour, water below 70°F, or ice, reduce batch size by 10%.
- The 2nd speed should generally not be used on 60% AR or lower, except for the BDPM-60, which requires a 50% reduction in batch size to mix in speed 2 with 50% AR doughs.
- Meat Grinder Usage: Intended for specific purposes, requires removal of bones, skins, and foreign materials, and meats should be defrosted. Cut meat into smaller pieces. Remove attachment when not in use and avoid running for extended periods.
- Attachments: Do not use attachments on the #12 hub while mixing.
Maintenance Features:
- Daily Cleaning: The mixer should be cleaned daily to maintain cleanliness and extend service life.
- Safety First: Always turn off and unplug the unit before cleaning or moving it.
- Cleaning Procedure:
- Wipe the entire unit with a clean, soft cloth until completely dry.
- Do not immerse the unit in water or any other liquid.
- Avoid abrasive cleaners or scouring pads.
- If soap or chemical cleaners are used, rinse thoroughly with clean water to prevent damage or corrosion.
- Remove and wash the flat beater, dough hook, wire whip, and meat grinder (if applicable) thoroughly in hot, soapy water to prevent bacteria growth.
- Clean the inside of the protective cover and swivel mount. Loosen the screw around the protective cover to access it. Clean with a wet cloth and detergent, then rinse with clean water and dry with a dry cloth.
- Guide Rail Dust Guard Plate Removal:
- Rotate the wheel to lower the bowl to the lowest position.
- Loosen screws on both sides of the guide rail dust guard plate.
- Remove the plate for cleaning and ensure the inside of the hole is cleaned. (Note: Handwheel removal is only necessary if using a power tool for screws).
- Troubleshooting Guide: Provides solutions for common issues such as:
- Axles not working: Check plug in outlet.
- Leaking oil: Replace oil gasket(s).
- Difficult to raise/lower bowl: Clean and oil dried out parts (slideway, lead screw, bevel gear, hand wheel shaft).
- Motor overheating/speed decrease: Check voltage, adjust speed, lighten overloaded bowl.
- Excessive noise/overheating: Add or replace oil.
- Agitator touches bowl: Repair or replace deformed bowl or agitator.
- Mixing bowl out of position: Adjust position.
- Repairs: Never attempt to repair or replace a damaged power cord yourself; contact a professional repair service.
- Warranty: One-year limited warranty covering defects in materials and workmanship, provided the unit is used commercially and maintained properly. Warranty is void if the equipment is improperly installed, maintained, misused, altered, or damaged. Parts diagrams and replacement part lists are included for maintenance and repair purposes.