Do you have a question about the Black Orchid hydro-box light and is the answer not in the manual?
Lists all components included in the package for tent assembly, including poles and fabric.
Assemble the base of the frame using 4 corner joints and specified poles (2 x A poles, 2 x B poles).
Guide for inserting poles into corner joints, ensuring the locking ball mechanism engages securely.
Connect the assembled base frame sections together to form the complete base structure.
Attach 'C' poles (70cm) to the base frame to create the vertical upright supports.
Join the completed base frame to the top frame, forming the main skeleton of the tent.
Install 'D' poles (120cm) and 'E' poles (70cm) to the top of the assembled frame for added support.
Unfold the tent fabric and carefully position the assembled frame structure into the tent's base.
Ensure the bottom portion of the tent fabric is fitted snugly around the frame before proceeding.
Lift the back of the tent over the top frame and zip it closed to fully seal the enclosure.
Place the splash tray into the bottom of the tent once the main assembly and fabric securing is complete.
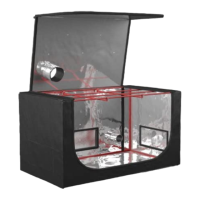
This document provides assembly instructions for the Black Orchid Hydro-Box Light™ grow tent, specifically for the 70cm x 120cm x 70cm model. The manual details the components included and a step-by-step guide for constructing the tent frame and fitting the fabric.
The Black Orchid Hydro-Box Light™ is a grow tent designed to create an enclosed, controlled environment for plant cultivation. Its primary function is to provide an optimal space for hydroponic or soil-based growing, offering features that support plant growth, such as light reflection, ventilation, and containment. The tent's design aims to maximize light efficiency, maintain stable environmental conditions, and simplify the growing process for hobbyists and professional growers alike. The reflective interior ensures that light from grow lights is evenly distributed and utilized by plants, while designated openings allow for the integration of ventilation systems to manage temperature and humidity. The splash tray fabric at the bottom helps contain spills and maintain cleanliness within the growing area.
The Hydro-Box Light™ is designed for ease of assembly and practical use in a growing environment.
While the manual primarily focuses on assembly, general maintenance features for grow tents like the Hydro-Box Light™ typically include:
The Hydro-Box Light™ is presented as a user-friendly and efficient solution for indoor plant cultivation, emphasizing straightforward assembly and practical design elements to support a successful growing environment.
| Brand | Black Orchid |
|---|---|
| Model | hydro-box light |
| Category | Lighting Equipment |
| Language | English |