Do you have a question about the Black Stone THE DASH 1610 and is the answer not in the manual?
Immediate actions if gas odor is detected: shut off gas, extinguish flames, keep away.
Do not store or use gasoline or flammable liquids near the appliance.
Consumer must ensure proper assembly, installation, and maintenance for safety.
Turn off gas, extinguish flames, ventilate, and check for leaks.
Maintain distance from combustibles, never use indoors, proper regulator use.
Appliance is for outdoor use only, not for recreational vehicles or boats.
Avoid use under alcohol or drug influence which impairs assembly/operation.
Do not use water on grease fires; use appropriate extinguisher.
Do not leave unattended; keep children and pets away from the appliance.
This appliance is not intended for and should never be used as a heater.
Appliance will be hot during and after use; use insulated mitts.
USA Support call and email address for help, parts, and questions.
Installation must conform with local codes and relevant national standards.
Not intended for use in or on recreational vehicles and/or boats.
Safety certified for US use only; modifications create a safety hazard.
Must use supplied regulator; replacements must be specified by manufacturer.
Use correct dust cap on cylinder valve outlet to prevent propane leakage.
Appliance shall be used only outdoors, not in buildings or enclosed areas.
Alcohol or drug use may impair safe assembly or operation.
In case of grease fire, do not use water; call fire department.
Do not leave the appliance unattended; keep children and pets away.
This appliance is not intended for and should never be used as a heater.
Appliance will be hot; use insulated mitts for protection from hot surfaces.
Keep appliance area clear of combustibles, flammable vapors, and liquids.
Do not obstruct the flow of combustion and ventilation air.
Keep cylinder enclosure ventilation opening free and clear from debris.
Visually check burner flames for proper operation.
Clean appliance, including special surfaces, with recommended cleaning agents.
Check burner/venturi tube for insects; clogs can lead to fire.
90 days full warranty on parts, workmanship, and finishes.
Retain proof of purchase to validate warranty and for replacement parts.
Excludes paint loss, discoloration, surface rusting from normal use or accident.
Contact for assembly or operation questions after warranty expires.
Warranty void if used for commercial or rental purposes.
Tips for safe operation, handling, and placement of the appliance.
Turn controls and gas source or tank OFF when not in use.
Caution for ignition failure: turn off, wait 5 mins, then repeat procedure.
Check burner flame from high to low position before each use.
Procedure to turn off the appliance by turning the knob to the OFF position.
Check valve by pushing and releasing knob; it should spring back.
Clean interiors, plastic parts, and painted surfaces with appropriate methods.
Use abrasive plastic pad on brushed finish for grease; avoid graphics.
Store in dry location, outdoors if connected, or indoors with cylinder removed.
Clean burner assembly by detaching electrode, lifting burner, and cleaning tubes.
Use stiff wire, bottle brush, or air hose to clean burner tubes.
Use stiff wire or paper clip to clean blocked burner ports.
Check burner for damage or corrosion; replace if cracked or holed.
Replace damaged burners, attach electrode, and secure burners to brackets.
Follow Clean, Separate, Cook, and Chill steps for safe food handling.
Use thermometer for safe internal temperatures; cut to check visual doneness.
Check poultry (165°F/74°C) and meat (160°F/71°C or 145°F/63°C) for safe temps.
Never partially grill meat; cook completely to destroy harmful bacteria.
Reheat takeout or cooked meats to 165°F/64°C or until steaming hot.
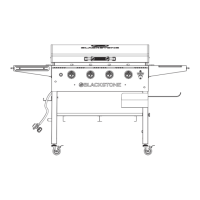
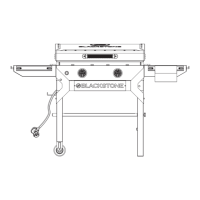
Read instructions, find clean area, refer to parts list and diagram.
Assembly involves large components; advised to have two people.
Ensure all plastic protection is removed before beginning assembly.
Watch video assembly via QR code or website for assistance.
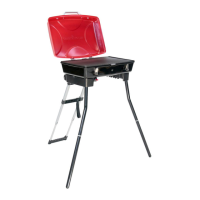
Remove contents, lock hood, place body upside down on a soft surface.
Insert bent leg joint into socket, pressing spring button until aligned.
Screw leg extension into the leg joint by hand until tight.
Repeat leg assembly for the second leg; lift handle into leg position.
Swing locking brace into place; support brace must snap into holding slot.
Lift DASH onto feet; hang grease cup; place grill body with drain spout outward.
Screw in gas regulator, tighten lightly with wrench; it will pivot.
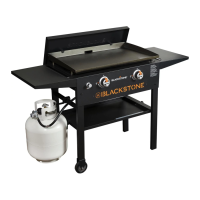
Ensure temp knob OFF; screw in LP tank clockwise; tank hangs vertically.
Wait until cooled, lift, and rotate grill surface to change.
Clean between uses and after storage; ensure cool before cleaning.
Never handle hot parts with unprotected hands.
Cover unit when left outside for extended periods, especially winter.
Annual fitting checks; store in cool dry place; cover burners.
Press ignitor button until gas ignites; adjust temperature to desired level.
Warranty for 90 days on parts, workmanship, and finishes against rust.
Does not cover indirect or consequential damages; purchaser must follow instructions.
Establish warranty period by verifying purchase date with sales receipt.
Product free from defects under normal domestic use, per instructions.
Notify manufacturer of defects within warranty period for repair or replacement.
Excludes liability for safety codes, accident, negligence, alteration, or misuse.
This warranty shall apply only within the boundaries of the United States of America.
| Brand | Black Stone |
|---|---|
| Model | THE DASH 1610 |
| Category | Grill |
| Language | English |