Page 18 Page 19
ENGLISH ENGLISH
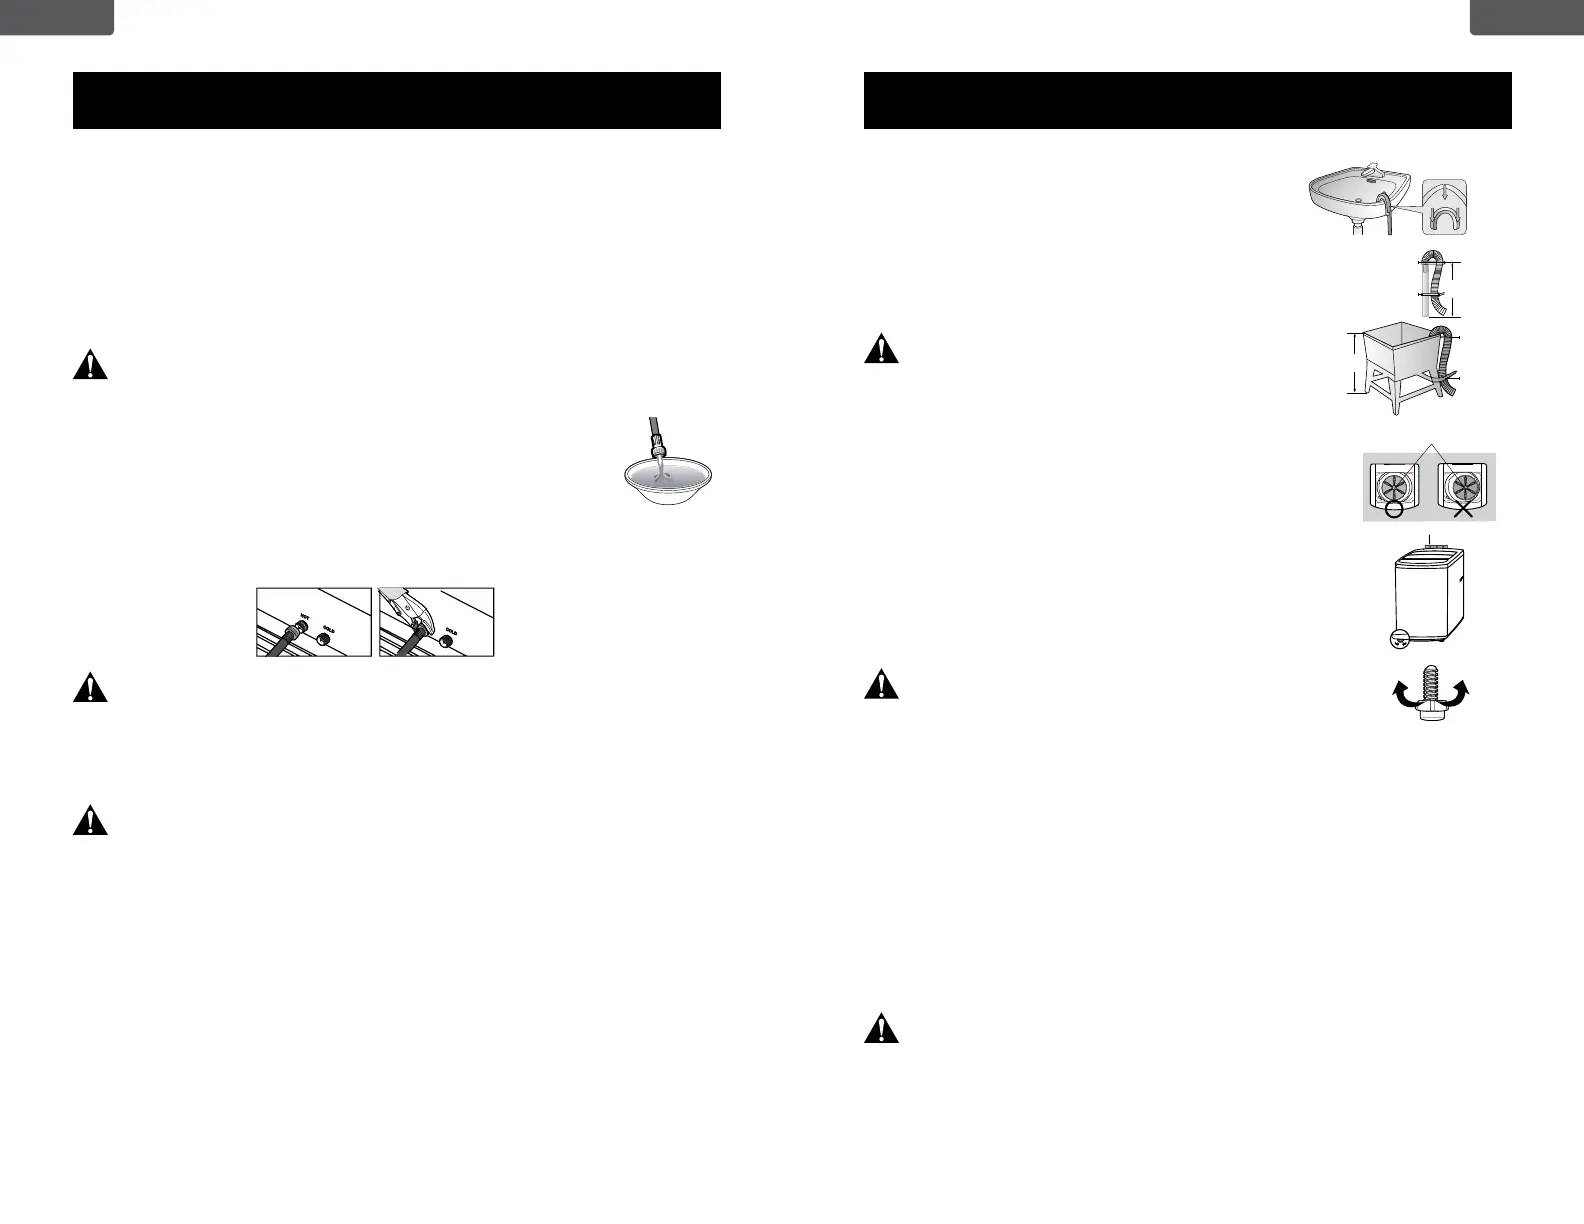
A. Over the edge of a wash basin. Secure the guide
to the side of the basin wall with a hook or to the
tap with a piece of string to prevent the drain
hose from moving.
B. In a standpipe The standpipe must be no shorter
than 32 in. (81cm) and no longer than 39 in. (100cm).
C. In a laundry tub. The laundry tub must be no shorter
than 32 in. (81cm) and no higher than 39 in. (100cm).
Make sure that the connection between the
drain hose and the wash basin, standpipe or
laundry tub is not airtight.
SET UP & USE
PERMANENT CONNECTION
• Connect the ends of the water supply hoses to the HOT and COLD faucets. For
convenience, use the Quick Connection Adapter for connection to the cold water
faucet. See instructions for Quick Connection Adapter use in step 3 (previous
page).
• Tighten the ttings by hand until they are snug, and then tighten them an additional
two-thirds of a turn with a wrench/pliers.
When you fasten the tting, do not fasten it too tightly or apply tape or sealant
to the faucet or water supply inlet. This can damage the tting. After you have
connected the water supply hose to the faucet, ensure that it is connected
securely by pulling the water supply hose downwards.
• Place the unconnected end of the hose into a bucket and open
the faucet connected to the water supply hose for 10 or 15
seconds to remove any foreign substances from the hose. Close
the faucet before continuing.
• Connect the end of the water supply hose to the water supply inlet connection at
the top of the washer.
The water supply hose connected to the HOT faucet must be connected to
the HOT water supply inlet and the water hose connected to the COLD water
source must be connected to the COLD water supply inlet.
• Tighten the tting by hand until it is snug, and then tighten them an additional
two-thirds of a turn with a wrench/pliers.
Conrm that the water supply hoses are not twisted or bent. If the hoses are
twisted or bent, the hoses can leak and cause electric shock due to the water
leakage. To ensure the correct water usage, connect both the HOT and COLD
water faucets. If they are not both connected an error can occur.
If you do not want to use the HOT water supply hose, install the water inlet cap into
the HOT water supply inlet hole In this case, you must select cold water as the wash
temperature choice.
Turn on the HOT and COLD water supplies and check all the water supply inlet
connections and the faucets for water leaks.
Step 4: Connect the drain hose
The drain hose is connected to the bottom side of the unit. The other end of the
hose should be positioned using one of the following methods:
SET UP & USE
Pull down on the white ring
to divide the adaptor into
two parts.
Top part: Faucet fitting
Bottom part: Hose fitting
Rubber gasket
Inner threads for outer threaded faucet.
Outer threads for inner threaded faucet
Cold
loosen lock
Adjustable legs
Leveling gauge
Pulsator
Step 5: Leveling your washer
See if the washer is level by checking the position of the tub
or using a leveling gauge.
1. Slide the washer into position.
2. Open the lid of the washer, and pour the water into the tub
to just below the pulsator level.
3. If the washer is level, the pulsator is positioned at the center
of the washer as shown in the gure above right. If not, level
your washer by turning the front leveling leg clockwise or
counterclockwise as necessary.
There is ONLY ONE adjustable leg as right gure
on this washer.
Step 6: Powering your washer
Plug the power cord into a 3-prong, well grounded 120 volt 60 Hz approved
electrical outlet protected by a 15-amp fuse or comparable circuit breaker. Your
washer is grounded through the third prong of the power cord when plugged into a
3-prong grounded electrical outlet.
Step 7: Running a test cycle
Run a test cycle as follows to check if your washer is properly installed.
1. Press the Power button to turn on your washer.
2. Press the PROCEDURE button repeatedly until the rise and spin cycles are
selected and the corresponding indicator lights are illuminated.
3. Press the Start/Pause button to start the test cycle.
4. The washer should not rock or vibrate excessively when water is supplied or when
washing or spinning, and should drain well during the spin cycle.
If water leaks while water is being supplied or drained, check the water
connections. If the washer rocks and vibrates excessively, level your washer
again.
Step 8: Storing your washer
If you want to store your washer at another location, unplug it, drain any remaining
water from the drain pipe and hook the pipe onto the back of the washer. Disconnect
the water inlet hoses from the faucets and move washer to new location.
39 i n. Max
32 i n. Min
39 i n. Max
32 i n. Min
Standpipe
Hose
retainer
Tie
strap
Laundry tub
Hose
retainer
Tie
strap
 Loading...