Do you have a question about the Black+Decker HHVI315JO and is the answer not in the manual?
| Brand | Black+Decker |
|---|---|
| Model | HHVI315JO |
| Category | Vacuum Cleaner |
| Language | English |
Explains symbols like DANGER, WARNING, CAUTION, and NOTICE for hazard recognition.
Follow basic precautions, use as described, avoid damaged parts, and keep cords away from heat.
Avoid outdoor use, water, use as a toy, flammable liquids, burning items, and blocked openings.
Ensure the switch is off before handling to prevent unintentional starting.
Use specified charger, avoid damaged batteries, and protect from fire/extreme temperatures.
Ensure repairs are done by qualified personnel using identical replacement parts.
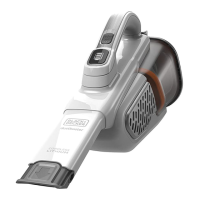
Identifies key components for HHVI320JR/HHVI325JR and HHVI315JO models.
Defines symbols for volts, amperes, Hz, watts, AC/DC current, no load speed, and RPM.
Details how to mount the vacuum on the wall using the provided bracket and hardware.
Charge for 16 hours initially, discharge first use, ensure switch is off, and plug into outlet.
Charger may warm up; charging indefinitely is safe. Avoid charging below 39°F or above 104°F.
Slide the switch to 'I' to turn on and back to 'O' to turn off. Return to charger after use.
Remove nozzle, empty dust bowl, and reassemble. Ensure filter is clean and properly seated.
Remove dust bowl and filter, wash them in soapy water, and allow to dry completely.
Wash filter regularly; replace every 6-9 months or if damaged. Ensure correct filter placement.
Extend the built-in crevice tool by pulling the extension piece until it locks into position.
Flip up brush accessory for use. Rotate nozzle to left/right for better access in tight spots.
Replace filters every 6-9 months or when worn/damaged. Obtain replacements from dealer.
Clean vac with mild soap and damp cloth. Never immerse in liquid. Ensure it's dry before use.
Verify charger connection, cord integrity, outlet function, and switch is in 'OFF' position.
Explains the RBRC seal and the Call 2 Recycle program for battery disposal and environmental protection.