6 7
EN
Instructions for use
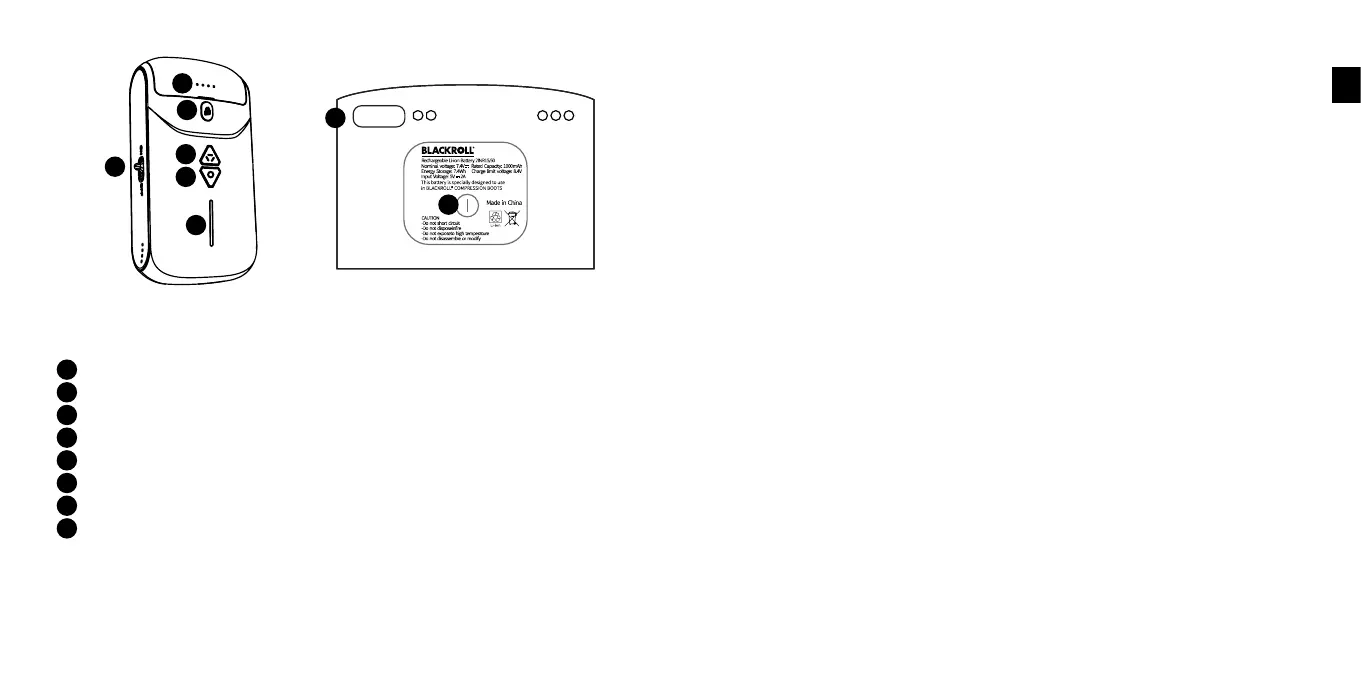
Battery status display
Changing the battery
Massage mode
On/off slider
Power button
Pressure indicator
Charging status
USB-C connection
1. Before operation
a. Check all parts for damage.
A
A
B
C
D
E
F
G
H
B
H
G
C
E
F
D
b. The BLACKROLL® COMPRESSION BOOTS consist of a left and a right boot. Both
boot have their own control unit. Fully charge both batteries before using them
for the first time. To do this, you can detach the batteries from the control unit
by pressing the B button (change battery). There is a USB-C port on the bottom
of the batteries that you can connect with the supplied charging cable. Use a
conventional USB 5V-2A power supply to connect the batteries to the mains and
charge them (charging time: approx. 1.5 h). If use a power supply less than 2A,
the charging time will be longer. The battery is fully charged when all 4 LEDs on
the battery light up continuously. Please use the 5V 2A charger when charging,
please DO NOT use any fast charger.
The battery must be recharged when the first LED flashes during operation. If
you want to check the battery status in between, you can do so by holding down
the G key (charge status). Each lit LED corresponds to 25% battery charge.
2. Start operation
a. Open the zips and put both boots on the legs one after the other. Caution:
During operation, all zips must always be fully closed. Find a comfortable posi-
tion for use, either sitting or lying down. To check the function, the boots can be
inflated once without the legs in them. Afterwards, please always use them with
the legs. Empty inflations reduce the life span of the boots and the pump.
b. Starting the control unit: To start one of the control units, move the on/off slider
(D) on the side of a unit to the on position. When the unit is on, the battery status
indicator (A) and power button (E) will light up. Perform this procedure on both
control units one after the other. The two units will now pair automatically.
Afterwards, operation can be carried out via one of the control units. You can
recognise the control unit that can be used for synchronous operation of both
units after pairing by a slowly flashing power button.
c. Establish pairing manually: If the two units do not find each other automatically,
you can pair them manually. To do this, hold down the power button (E) on a con-
trol unit for at least 5 seconds. You will recognise the start of the pairing process
when the pressure display starts to run up and down. As soon as this state has
been established on one unit, repeat the process on the second. It does not