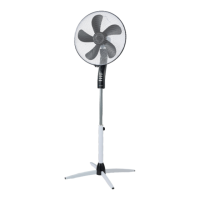
1. Front fan grille
6. Motor shaft stem
4. Back grille fixing nut
2. Fan blade nut
3. Fan blade
5. Back grille
8. Oscillation lock
9. Grille fixing screw
10. Control panel with buttons
11. Base
7. Motor housing
a) Perform the disassembly in the reverse order of the assembly procedure.
1. Before connecting the fan to the power supply, make sure that the button on the control panel is set
to 0. Connect the appliance to the power supply.
g) Install the fan's front grille (1) by fitting the edge into the hooks on the back grille. Then secure by
tightening the grille's fixing screw (9).
c) Screw on the back grille fixing nut (4).
3. Disassembly:
1 - low speed
f ) Tighten the fan blade fixing nut (2)
2. To start the fan, press one of the buttons on the control panel:
3. To turn off the fan, press the 0 button on the control panel.
3 - high speed
4. Oscillation. To enable the fan's oscillation movement, press the oscillation lock. To disable the fan's
oscillation movement, lift the oscillation lock.
5. Vertical tilt adjustment. To change the fan tilt, hold the appliance in position and tilt the motor body.
d) Put on the fan blade (3) paying attention to the notch in the stem (6) and the fan blade opening.
2 - medium speed
FAN OPERATION
b) Put the back grille (5) on the motor base (pay attention to the notches).
1. Make sure the appliance is disconnected from the power source.
APPLIANCE ASSEMBLY AND DISASSEMBLY
2. Assembly:
a) Place the motor body (7) in the base (11).
CLEANING AND MAINTENANCE
Before cleaning and maintenance, make sure that the fan has been disconnected from the power
source.
The fan should be cleaned regularly. Body, posture should be wiped with a dry cloth. The interior
should be blown out with compressed air or vacuumed with a vacuum cleaner.
5
ATF401