Do you have a question about the Blaupunkt Verona CR 31 and is the answer not in the manual?
Procedure for initial setup and code entry for the car radio.
Description of buttons, knobs, and indicators for basic functions.
Operation of eject, fast rewind, and fast forward for cassettes.
Adjusting volume, balance, bass, treble, and fader for audio output.
Methods for finding and selecting radio stations via tuning or presets.
Procedures for storing radio stations using automatic or manual tuning.
Instructions for playing audio cassettes, including auto-reverse.
Guidelines for caring for cassettes and the car radio unit.
Steps for entering, activating, and deactivating the anti-theft code.
Visual warning system for the encoded car radio.
Details on output power and frequency response.
This document provides operation instructions for the Blaupunkt Verona CR 31 car radio, covering its basic functions, radio reception, cassette playback, and anti-theft coding.
The Verona CR 31 is delivered with a factory-set four-digit code for anti-theft protection. Before initial operation or after any power supply interruption (e.g., theft or repair), this code must be entered. To begin, switch on the unit by turning the volume knob. The display will show "Cod." Next, press one of the preset buttons, and the display will change to "000." Use preset buttons 1-4 to enter the secret code found on the enclosed car radio ID card. Button 1 is used for the first digit ("1" or "0"), and buttons 2, 3, and 4 are pressed repeatedly to set the remaining digits. Once the full code is displayed, press the upper part of the search tuning rocker switch. If the code is correct, the unit will operate. An incorrect entry will display "---" for 10 seconds, blocking all functions. After three unsuccessful attempts, a 1-hour waiting period is enforced. After 16 unsuccessful attempts, "OFF" will be displayed, and the radio can only be decoded by authorized service personnel.
The code system can be switched off for convenience, allowing the unit to power on directly after any voltage interruption. To do this, ensure the unit is operational ("Cod" is not displayed). Switch the unit off, then simultaneously press and hold preset buttons 1 and 4 while switching the unit back on. "Cod" will appear briefly, then the last tuned frequency. Enter the secret fixed code and press the upper part of the search tuning rocker switch to disable the code system. The unit will then play the last tuned station. To reactivate the code system, switch the unit off, then press and hold preset buttons 1 and 4 simultaneously while switching it on. "Cod" will appear for a moment, followed by the last tuned frequency, indicating that coding is active. An LED flashes when the car radio and ignition are off, serving as an optical warning of the encoded status, provided the radio is connected correctly. It is crucial to keep the car radio ID card in a safe place to prevent unauthorized access to the code. Forgetting or losing the code will require decoding by a central Blaupunkt service workshop upon presentation of the purchase receipt.
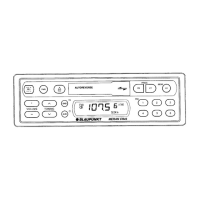
The Verona CR 31 features several controls for audio adjustment and station selection. The balance control (1) adjusts the left/right volume; pull and turn the knob for this. The on/off/volume control (2) manages power and overall volume. The SCAN button (3) allows you to preview radio programs on the active waveband. Pressing it initiates a scan, stopping briefly at each receivable station. Press SCAN again to stop the cycle and listen to the current program. The search tuning rocker switch (4) is used for selecting stations, while the rocker switch for manual tuning (5) allows fine-tuning. The cassette eject button (6) ejects the cassette. The MODE button (7) changes the search tuning sensitivity: "dx" lights up for all receivable stations, or no display for strong local stations only. The cassette compartment (8) is where cassettes are inserted. The track indicator (9) shows whether Track A (1) or Track B (2) is playing, indicating the direction.
For cassette playback, the FR (fast rewind) button (10) initiates fast rewind, stopping when FF is pressed. At the end of the tape, the cassette ejects, and the radio resumes. The PROG buttons (11) act as track selectors, switching between the two sides of the cassette. The FF (fast forward) button (12) initiates fast forward, stopping when FR is pressed. At the end of the tape, the cassette ejects, and the radio resumes. The PS button (Preset Station Scan) (13) previews stored radio stations across all memory banks. Pressing it momentarily previews stations one after another, with indicators (17) and (18) flashing. Press PS again to stop. The frequency display (14) shows the current frequency. The knob for QuickOut bracket (15) is used to remove the unit. The waveband indicator (16) shows the active waveband (U, M, or L). The preset indicator (17) shows which preset button (21) is active. The FM memory bank indicator (18) shows the current FM memory bank (I, II, III, or T for Travelstore). The "Stereo" indicator (19) lights up when stereo reception is active. The dx indicator (20) indicates whether search tuning stops at all receivable stations ("dx" displayed) or only strong local stations (no "dx" displayed). The preset buttons (21) are used to store and recall stations. The rocker switch M-L (22) selects AW or LW stations. The rocker switch 3 U-T (23) switches between FM memory banks (UI-III) and the Travelstore bank (UT). The fader (24) adjusts front/rear volume; pull and turn the knob, then press to lock. The bass control (25) is a rotary knob that is pressed for adjustment. The treble control (26) is a rotary knob that is pulled for adjustment.
To select a station, use the search tuning rocker switch (4). Press it until the desired station is tuned. Holding the button down speeds up tuning. The MODE button (7) adjusts sensitivity: "dx" for all receivable stations, or no display for strong local stations. For stored stations, use the preset buttons (21). First, press the 3 U-T button (23) to select the desired memory bank (I, II, or III), then momentarily press the corresponding preset button.
The Travelstore function allows automatic storage of 5 FM stations with adequate reception quality, especially useful when traveling. Press the 3 U-T button (23) for about 2 seconds to activate Travelstore. During tuning, the unit memorizes the five strongest stations. These can then be recalled using the preset buttons (21).
The SCAN function (3) previews radio programs. Press SCAN to start scanning; it will briefly preview each receivable station. Press SCAN again to stop. The Preset Scan button (13) previews stored stations on the active waveband. Press PS momentarily to preview each stored station. If a preset button has no stored station, it will be skipped.
To store a station using automatic search tuning, select one of the FM memory banks (UI-UIII) with the 3 U-T button (23). Once the desired station is found, press and hold the preset button (21) where you want to store it until the audio returns (about 3 seconds). The program will be muted during storage. The preset indicator (17) will show which button has been pressed. Repeat for other presets.
For manual search tuning, select a memory bank with the 3 U-T rocker switch (23). Press the rocker switch (4) until the desired frequency is shown. Repeated presses tune in small frequency steps (50 kHz). Holding the switch down tunes faster. To store the frequency, press the corresponding preset button (21) until the audio returns. The unit also stores the last tuned station in addition to those on memory banks.
To play a cassette, turn the unit on. Slide the cassette into the compartment (8) with side A or 1 uppermost. The drive mechanism will activate automatically, and the cassette will play in the last selected direction. The track direction indicator (9) will light up. Adjust volume and tone as needed. When the tape reaches its end, the unit automatically switches to the other side (auto-reverse), and the other track direction indicator will light up.
To ensure optimal performance and longevity of your Verona CR 31, regular maintenance is recommended. For the cassette mechanism, use C 60 tapes for best results. Avoid stiff cassettes, as they can alter playback direction prematurely. If this occurs, inspect the tape reel and respool the cassette. Protect cassettes from dirt, dust, and extreme temperatures (above 50°C). In cold weather, allow cassettes to warm up before playing to prevent irregular tape running. Clean the rubber roller pad and tape head with a cotton wool bud dipped in alcohol to remove dirt and dust accumulation. Avoid using hard tools. After extended use, have the unit examined and cleaned by an expert. This maintenance is not covered by the guarantee conditions.
| Type | Cassette Player |
|---|---|
| Brand | Blaupunkt |
| Model | Verona CR 31 |
| Wavebands | FM/AM |
| Power Supply | 12V DC |
| Signal-to-Noise Ratio | 50 dB |
| Fast Forward/Rewind Time | 90 seconds |
| Special Features | Radio, Cassette Playback |