EasyManua.ls Logo

Blue Hawk DU0001 - User Manual

Blue Hawk DU0001
11 pages
Print Icon
To Next Page IconTo Next Page
Loading...
1
®
Blue Hawk & Design is a registered
trademark of LF, LLC. All rights reserved.
®
ITEM #0806320
DUMP CART
MODEL #DU0001
Español p. 12
Questions, problems, missing parts? Before returning to your retailer, call our customer
service department at 1-877-888-8225, 8 a.m. - 8 p.m., EST, Monday - Friday.
AB171020
Question and Answer IconNeed help?

Do you have a question about the Blue Hawk DU0001 and is the answer not in the manual?

Summary

Package Contents

Hardware Contents

Safety and Preparation

Safety Information

General safety warnings for operating the dump cart, including load limits and operational precautions.

Preparation Steps

Instructions on how to prepare before assembly, including checking parts and required tools.

Assembly Instructions

Attach Tailgate Reinforcement Bracket

Attach bracket (G) to bed panel (M) using M6 screws, lock washers, and nuts.

Attach Side Panels to Bed Panel

Attach side panels (N) to bed panel (M) with M6 screws, lock washers, and nuts.

Assembly Caution

Do not leave cart unattended in upright position during assembly.

Attach Tailgate Guides

Attach tailgate guides (A) to side panels (N) using M6 screws, lock washers, and nuts.

Attach Front Panel

Attach front panel (I) to cart bed using M6 screws, lock washers, and nuts.

Attach Corner Caps

Attach corner caps (B) to front and rear ends of cart bed using M6 screws.

Attach Wheel Brackets

Attach wheel brackets (J) to cart bed using M8 screws, lock washers, and nuts.

Attach Tongue Support

Attach tongue support (F) to cart bed using M8 screws, lock washers, and nuts.

Install Release Pedal and Spring

Insert pedal (C) and spring (FF) into tongue (L) using bolt (GG), spacers (CC), and nut (OO).

Install Axle and Tongue

Position tongue (L) into brackets (J), slide axle (K) through, and tighten hardware.

Attach Wheels

Attach wheels (O) to axle (K) with washers (AA) and secure with R clip pins (DD).

Secure for Dumping

Thread R clip pin (DD) through peg on tongue to lock for accidental dumping prevention.

Attach Hitch Brackets and Plate

Attach hitch brackets (D) and plate (E) to tongue (L) using bolts (HH), washers (KK), and nuts (MM).

Install Tailgate

Slide tailgate (H) down through channels on tailgate guides (A).

Operating and Maintenance

Using Your Utility Dump Cart

Instructions on how to properly use the utility dump cart, including load limits and towing.

Care and Maintenance

Guidelines for maintaining the dump cart, including tire pressure, lubrication, and cleaning.

Warranty Information

Replacement Parts List

Exploded View

Overview

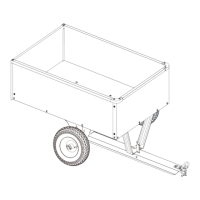
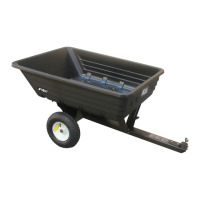
This document describes the Blue Hawk Dump Cart, Model #DU0001, an attachment designed for use with lawn tractors or ATVs. The primary function of the dump cart is to transport and dump various materials, with a focus on ease of use and durability.

Function Description:

The Blue Hawk Dump Cart is a utility attachment designed to be towed by a lawn tractor or ATV for transporting materials. Its main feature is a tilting bed that allows for easy dumping of contents. The cart is assembled from several panels, including a bed panel, side panels, a front panel, and a tailgate, forming a robust cargo area. A release pedal mechanism facilitates the tilting action of the bed, enabling quick and efficient unloading. The cart is equipped with two wheels for mobility and a tongue with a hitch bracket for attachment to a towing vehicle. Tailgate guides ensure smooth operation of the tailgate, which can be slid down through channels for loading and unloading. The design emphasizes stability during transport and ease of dumping, making it suitable for a variety of landscaping and hauling tasks around a property.

Important Technical Specifications:

  • Item Number: #0806320
  • Model Number: #DU0001
  • Rated Capacity: 400 lbs (182 kg)
  • Estimated Assembly Time: 30 minutes
  • Tools Required for Assembly (not included): Phillips Screwdriver, 10 mm and 14 mm Wrenches
  • Helpful Tools for Assembly (included): Spring Assembly Tool
  • Maximum Towing Speed: 10 mph

Usage Features:

  • Dumping Mechanism: The cart features a release pedal (C) that, when stepped on, unlocks the bed to allow for dumping. An R clip pin (DD) is used to lock the bed in place to prevent accidental dumping and can be removed to enable the dumping function.
  • Tailgate: A sliding tailgate (H) allows for easy loading and unloading of materials. It slides down through tailgate guides (A) for convenient access to the cart bed.
  • Towing Compatibility: Designed specifically for use with lawn tractors or ATVs, the cart attaches via a hitch pin (BB) to hitch brackets (D) and a middle plate (E) on the tongue (L).
  • Stability: The assembly instructions emphasize the importance of assembling the cart on a smooth, level surface to ensure stability, especially when the cart is in an upright position.
  • Safety Guidelines:
    • Do NOT exceed the rated capacity of 400 lbs (182 kg).
    • Do NOT tow with the cart bed raised.
    • Always secure and lock the cart to the vehicle hitch before operating.
    • Do NOT overfill the cart, as this can cause loss of traction and skidding.
    • Do NOT carry passengers in the cart.
    • Do NOT allow children to operate the tractor or cart attachment.
    • Do NOT drive too close to a creek or ditch.
    • Do NOT exceed 10 mph when towing.
    • Always slow down before turning.
    • Use caution when backing up; always back up in a straight line to avoid "jack-knifing."
    • Not for highway use.
    • Not recommended to carry full loads on slopes, which can cause loads to shift and damage the cart.
    • Always begin with the transmission in first (low) and gradually increase speed.
    • Ensure the combined weight of the tow vehicle and operator is greater than the load of the cart for proper control.

Maintenance Features:

  • Tire Pressure: Regularly check tire inflation; recommended pressure is approximately 25 PSI. Never over-inflate.
  • Lubrication: Use household grease or oil on the axle and wheel bearing area regularly or as needed.
  • Cleaning: Clean and dry the cart after using it in wet conditions and before long storage periods. Clean material out of the cart bed after each use. Rinse/dry inside and outside of the dump cart after each use.
  • Storage: For long storage periods, it is recommended to cover, keep inside, or store under a covered area.
  • Fastener Tightness: Periodically check all fasteners for tightness.
  • Annual Maintenance: Annually clean and lightly lubricate parts.
  • Load Capacity: Never exceed the 400 lbs (182 kg) load capacity rating, as this will damage the utility dump cart.

Warranty Information:

  • Limited 1-year warranty on the dump cart.
  • Limited 2-year warranty on all parts.
  • Conditions: Applies only to products assembled correctly and operated according to the manual. Excludes commercial use, alteration, misuse, abuse, shipping damage, normal wear and tear, normal adjustments, and normal maintenance.

Replacement Parts:

A comprehensive list of all parts, including their descriptions and quantities, is provided for easy identification and ordering of replacement parts. The customer service department can be contacted for replacement parts.

Blue Hawk DU0001 Specifications

General IconGeneral
BrandBlue Hawk
ModelDU0001
CategoryOutdoor Cart
LanguageEnglish

Related product manuals