- The aluminium housing of the device is not suitable for salt water baths with a high salt content. If the salt content is too high, the aluminium
will oxidise, and this will result in damage to the housing. Always position the device immediately behind the lter.
- This product may only be used according to the guidelines described in this manual.
- If the device is used in combination with Inproxide, always read through the instructions for use for this product rst. Please pay special
attention to the safety regulations.
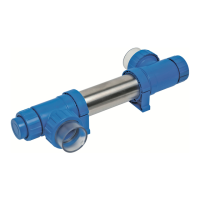
Installation of the UV-C device (Drawing 1)
The ideal place for the installation of the device is immediately behind the lter. Never submerge this device in water. Always install the device
outside of the pool. Ensure that there is always water owing through the unit if the lamp is on.
1 Determine where the device will be installed.
(always install vertically, see Drawing 3).
2 Fit the unit into the circuit using the three-part couplings (F).
3 Connect the end of the cable (D) to the top of the lamp (A).
4 Activate the pump and check the ow and any leakage of the system.
5 Insert the plug of the UV-C device into a wall socket with a safety ground and tted with an residual current circuit-breaker (max 30 mA).
Check that the lamp is on by looking through the transparent components of the device. The unit is switched o by pulling the plug out of the
socket.
Dismantling / Maintenance
Always switch o the power supply while maintaining/dismantling the device.
The device must be cleaned twice a year. If there is an increase in algae and/or scale, the quartz glass tube (B) into which the lamp is tted must
be cleaned. The special lamp (A) must be replaced after 6,000 operating hours (± 1x a year) at the latest. If the lamp has no UV, it will stop
burning. The aluminium interior can be cleaned with a soft brush.
1 Unscrew the three-part couplings (F) and drain the water from the device.
2 Click the black fastening clip (H) from the screw ring (E) using a screw driver, (see Drawing 3).
3 Unscrew the screw ring (E), remove the lamp from the quartz glass and, if necessary, replace the special lamp (A). As these parts are very
fragile, caution is essential.
4 Carefully remove the quartz glass (B) using a large, at screwdriver (see Drawing 2). Never use force!
5 Clean the quartz glass with a suitable agent. Always use a soft cloth to clean the glass and prevent scratches.
6 Pay attention to the correct position of the sealing rings (G) and the at O-ring (I) when replacing the quartz glass in the housing. Never use
force!
7 Carefully replace the lamp in the quartz glass. Screw the screw ring (E) onto the housing again. There is only one way to t the lamp into the
quartz glass!
8 Connect the end of the cable (D) to the top of the lamp (A).
Technical specications UV-C 12W
• UV-C PL-S module TUV 12 Watt
• Voltage 230 V
• UV-C output (W) 3.6 Watt
• UV-C (%) after 6,000 hours 85%
• Max. water volume (l./gal.) 10,000 l
• Max. throughput 5,000 l/h
• Max. pressure 1 bar
• Ø Inlet/outlet 50 mm
Type of UV-C system
Article number: B200011 Blue Lagoon UV-C 10,000 l / 12 Watt (230V; 50Hz)
Replacement lamps
Article number: B212012 UV-C PL-S module 12W (230V; 50Hz)
Replacement cable
Article number: E801205 cable for the Blue Lagoon Spa UV-C 12W 230V
4

 Loading...