Thank you for choosing to grow with Blueprint Controllers! Your
satisfaction and success are important to us. For best results,
carefully read the following instructions before using your
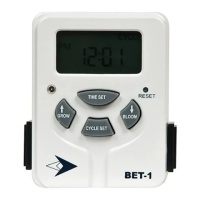
Blueprint EZGrow Timer.
Using the Blueprint EZGrow Timer
Set Current Time of Day:
1. Press the “TIME SET” button once. The hour number will start flashing.
2. Press the buttons with the “up” and “down” arrows to set the hour.
3. Press the “TIME SET” button again. The minute number will start flashing.
4. Press the buttons with the “up” and “down” arrows to set the minutes.
5. Press the “TIME SET” button again. The AM/PM will start flashing.
6. Press the buttons with the “up” and “down” arrows to choose AM or PM.
7. Press the “TIME SET” button one last time to lock in the current time of day.
Set Cycle Start Time:
1. Press the “CYCLE SET” button once. The hour number will start flashing and the word
“CYCLE” will appear on the display to indicate you are setting the cycle start time.
2. Press the buttons with the “up” and “down” arrows to set the hour.
3. Press the “CYCLE SET” button again. The minute number will start flashing.
4. Press the buttons with the “up” and “down” arrows to set the minutes.
5. Press the “CYCLE SET” button again. The AM/PM will start flashing.
6. Press the buttons with the “up” and “down” arrows to choose AM or PM.
7. Press the “CYCLE SET” button one last time to lock in the cycle start time setting.
6/2012
AM
AM
AM
AM
AM
GROW
BLOOM
12/12
18/6
AM
PM
PM
AM
AM
Setting the 18/6 “Grow” or 12/12 “Bloom” Cycles:
1. For an 18ON/6OFF cycle, press the “GROW” button. The “GROW 18/6” icon will appear on
the left side of the time display. This cycle will power on device(s) plugged into the EZGrow
Timer at the programmed cycle start time and run for 18 hours. For the 6 hours thereafter,
device(s) plugged into the EZGrow Timer will not receive power and will turn off.
2. For a 12ON/12OFF cycle, press the “BLOOM” button. The “BLOOM 12/12” icon will appear
on the right side of the time display. This cycle will power on device(s) plugged into the
EZGrow Timer at the programmed cycle start time and run for 12 hours. For the 12 hours
thereafter, device(s) plugged into the EZGrow Timer will not receive power and will turn off.
When the Blueprint EZGrow Timer is in either cycle mode, the power indicator light will illuminate.
Resetting Blueprint EZGrow Timer:
Use a fine-tipped screwdriver or pen tip to press and hold the “RESET” button for two seconds. This will delete all previously programmed settings.
Battery Back-up
The battery back-up retains program settings in the event of a power outage. It will not continue to supply power to device(s) plugged into the
EZGrow Timer.
Features of your Blueprint EZGrow Timer
• LCD display
• Digital 24-hour timer
• Dual outlet capacity
• 125V, 15 amp, 1875 max wattage
• Rechargeable Ni-MH battery included
• 18/6 “Grow” or 12/12 “Bloom” integrated cycles
CYCLE
CYCLE
CYCLE