Do you have a question about the bluu 120 GALLON DECK BOX and is the answer not in the manual?
Instructions to read manual, keep for reference, and contact customer service for any problems or missing parts.
Covers suffocation risk, adherence to assembly, fire safety, tool usage, cleaning advice, storage limits, and lid safety.
Detailed list of all parts required for assembly, including reference images and quantities.
Assemble the bottom panel (B) with the front and back panels (A), ensuring correct orientation and secure connection.
Insert side panels (C) into the assembled base and front/back panels, ensuring hooks are properly secured for leakproofness.
Insert two iron rods (D) into the top of the front and back panels (A) for structural support.
Install the final side panel (C) to the existing structure, ensuring a secure and leakproof fit.
Attach brackets (T) using screws (N) to one iron rod and mount bracket (I) to panel (A), leaving one rod unsecured temporarily.
Place rod (D) onto lid panel (J) and secure with brackets (T) and screws (N).
Insert hinges (E) onto the lid (J) and attach to the main box structure (A) using screws (N) and bracket (G).
Use screws (N) to attach hinges (E) on the lid to the main box panels (A), securing the previously unscrewed rod.
Install pressure bars (H) on each side by using screws (N) to attach them to panels (C) and the lid (J).
The deck box assembly is now completed. Includes information on optional waterproof covers.
Details the warranty period, coverage for structural defects, and exclusions like misuse or acts of nature.
Provides contact details for customer support via email and phone for any inquiries or issues.
This document outlines the assembly, care, safety, and warranty information for a 120-gallon BLUU Deck Box.
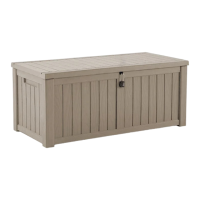
The BLUU Deck Box is a storage solution designed for outdoor use, providing a substantial 120-gallon capacity for various items. Its primary function is to offer secure and weather-resistant storage, helping to keep outdoor spaces tidy and organized. The box is designed to prevent the lid from bending due to sun exposure and temperature variations, ensuring its longevity and structural integrity.
While specific material details are not explicitly listed, the assembly instructions indicate the use of polypropylene for certain components, as evidenced by the warning regarding extinguishing burning polypropylene with water. The box features a robust construction that requires some strength during assembly to ensure sturdiness and leakproofness. It includes various parts such as front and back panels (Part A), a bottom panel (Part B), side panels (Part C), a top panel (Part J), iron rods (Part D), pressure bars (Part H), and multiple screws (Part N) and brackets (Parts E, G, I, T) for secure assembly. The total capacity is 120 gallons.
The deck box is designed for straightforward assembly, though it explicitly states that the entire installation process requires at least two people to ensure safety and sturdiness. Key assembly steps involve clicking panels together securely, inserting iron rods for structural support, and screwing various components into place. The design incorporates features to prevent the lid from bending, enhancing its durability in outdoor conditions. The box is suitable for storing a variety of outdoor items, but users are cautioned against storing hot items (such as recently used grills or blowtorches) or flammable/corrosive substances. A waterproof cover is also available, which can be inquired about by texting "MORE" to a provided number.
The manual provides clear care and safety guidelines to ensure the longevity and safe use of the deck box. Users are advised to read the instructions carefully and keep them for future reference. For cleaning, it is recommended to avoid using a stiff brush or abrasive cleaner, as these can damage the box. In case of fire, users are warned not to attempt to extinguish burning polypropylene with water. Regular maintenance involves ensuring all parts are assembled according to directions to maintain sturdiness and leakproofness. The product comes with a limited 1-year warranty covering structural defects, faulty workmanship, or fading of color from the initial date of purchase. This warranty, however, does not cover damage from abuse, accidents, alterations, improper installation, lack of reasonable care, or acts of nature (e.g., hurricanes, floods). It also excludes damage to contents, normal wear and tear, and third-party labor or installation fees. Customers are responsible for zoning issues and permits if required.
Several safety precautions are highlighted:
The BLUU Deck Box comes with a Limited 1-Year Warranty, valid from the date of purchase, provided a dated proof of purchase is presented upon request. This warranty covers structural defects, faulty workmanship, or fading of color for a one-year period.
The warranty explicitly excludes:
For any questions or missing parts, customers are encouraged to contact professional customer support via email at HELP@BLUU-US.COM or by text message at (888) 927-6009 (text only).
| Brand | bluu |
|---|---|
| Model | 120 GALLON DECK BOX |
| Category | Outdoor Storage |
| Language | English |