Do you have a question about the Body Rider BRD 3788 and is the answer not in the manual?
Safety guidelines for using the Body Rider, including precautions for children and proper usage.
Guidelines for storing the Body Rider in clean, dry conditions to prevent corrosion.
Details the product warranty period, conditions, and exclusions for the Body Rider.
Information on where to get help if parts are missing or for assembly questions.
Contact details and hours for customer support for the Body Rider.
Lists all bolts used in the assembly of the Body Rider.
Lists all washers used in the assembly of the Body Rider.
Lists all nuts used in the assembly of the Body Rider.
Lists miscellaneous hardware components for the Body Rider assembly.
Lists the tools required for assembling the Body Rider.
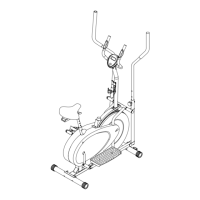
Attaching front and rear stabilizers to the main frame.
Inserting the handlebar axle and attaching coupler bars.
Attaching pedal connection joints to pedal tubes and crankshafts.
Attaching pedals to pedal tubes using hex bolts and nylon nuts.
Attaching the seat and seat post to the main frame.
Inserting handlebars into coupler bars and securing them.
Securing the center post and attaching the water bottle holder.
Attaching the electronic monitor and inner handlebars.
Explains how forward and backward pedaling target different leg muscles.
Identifies and explains the function marks on the computer display.
Provides instructions for installing and replacing batteries in the computer monitor.
Explains how to use the computer functions like Auto Scan, Speed, Distance, Time, etc.
Details on viewing calorie burn, heart rate, and resetting computer functions.
Technical specifications for the computer monitor, including speed, distance, and battery.
Solutions for problems with the hand pulse sensor not detecting or giving inaccurate readings.
Troubleshooting steps for when CALORIES/DISTANCE/TIME functions are not displayed correctly.
Steps to resolve issues where the computer display is blank or shows no data.
Instructions for performing a groin stretch to prepare for exercise.
Guide to stretching the hamstring muscles before and after workouts.
How to perform a trunk twisting stretch for flexibility.
Instructions for stretching the hip flexors and muscles.
Steps for performing a quadriceps stretch to improve leg flexibility.
How to perform a prone trunk flexion stretch for the back.
Instructions for stretching the shoulder and upper back muscles.
Guide to performing a calf stretch against a wall for flexibility.
| Resistance Levels | 8 |
|---|---|
| Display | LCD |
| Maximum User Weight | 250 lbs |
| Resistance Type | Magnetic |
| Stride Length | 13 inches |
| Display Type | LCD |
| Handlebars | Dual-action |
| Display Functions | Time, Speed, Distance, Calories, Heart Rate |
| Drive System | Front |