x
x
x
x
x
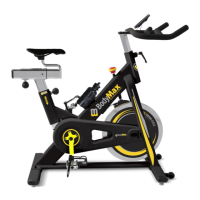
12
2.3 Assembly
࣑ ATTENTION
Please remove the brake stop from the brake handle before you start assembling
the indoor cycle.
Before assembly, take a close look at the individual assembly steps shown and carry out the assembly
in the order given.
L NOTICE
First loosely screw all parts together and check that they t properly. Tighten the screws using
the tool only when you are instructed to do so.
Step 1: Assembly of the rear and front stabilizer and the pedals
1. Attach the front and rear stabilizer (1 & 12) to the main frame (81) with four screws (9), four spring
washers (10), and four washers (11) and tighten with the allen wrench (A).
L NOTICE
The pedals (27L/R) are marked with “L” and “R” for left and right. Be sure to attach the correct
pedal to the appropriate crank.
2. Attach the left pedal (40L) to the left crank (39L) by turning the left pedal (40L) counterclockwise by
hand until it is rmly seated, then use the spanner (B) to tighten it.
3. Attach the right pedal
(40R) to the right crank
(39R) by turning the right
pedal (40R) clockwise
by hand until it is rmly
seated, and then use the
spanner (B) to tighten it.