2
Please check that all parts are working correctly. Enter the factory preset code as on the code card (part no.14), ro-
tate the turn on the keypad one turn clockwise, re-enter the code and turn the knob anti-clockwise ensuring that the
follower on the back of the keypad rotates each time. The knob should return easily under its spring pressure. If you
intend to change the code please refer to ‘how to change your code number’ instructions (page no.7) prior to tting.
Make sure that the Inside handle device rotates freely and returns under its spring pressure.
Check that the latch bolt on the tubular latch (part no. 4) moves freely by pressing the bolt head at the end, and
also turning the spindle (part no. 9 or 10) in the hour glassed shaped follower on the locking device.
Determining the hand of the door
Many of the installation instructions refer to the handing
of the door. The hand of the door is determined with the
door in its closed position from the exterior or keypad
side of the door.
A) Right hand door – door opens inward (push), hinged
on the right side.
B) Left hand door – door opens inward (push), hinged
on the left side.
C) Right hand inward opening – door opens outward
(pull), hinged on the right side.
D) Left hand inward opening – door opens outward
(pull), hinged on the left side
Inside
Outside
A B
C
D
V2
Preparation
Fitting the Latch Support Post
Fit the latch support post (part no.7) in hole A for a right hand hung door or
B for a left hand hung door. Please refer to the ‘determining the hand of the
door’ if you are unsure what hand of door you have.
How To Change Your Code Number
Changing the Handing of the Unit
If the unit is being tted to a right hand hung door as per the ‘determining
the hand of the door’ nothing will need to be changed on the unit.
If the unit is being tted to a left hand hung door there are three parts
that would need to be changed. Firstly the blue handing screw on the
back of the inside handle will need to be moved from point A to point B
as per the diagram.
Finally both handles will need to be swapped around so that they are fac-
ing the opposite way. This is done by removing the rubber grommet from
the stem of the handle to reveal the grub screw. Using the allen key (part
no.15) remove the grub screw, this will allow the handle to come off from
its holder and be rotated the opposite way. Once the handles are facing
the correct way reinsert the grub screw and replace the rubber grommet.
A
B
1. Remove the lock from the door, which is done by removing the two screws at the very top and bottom of the inside handle.
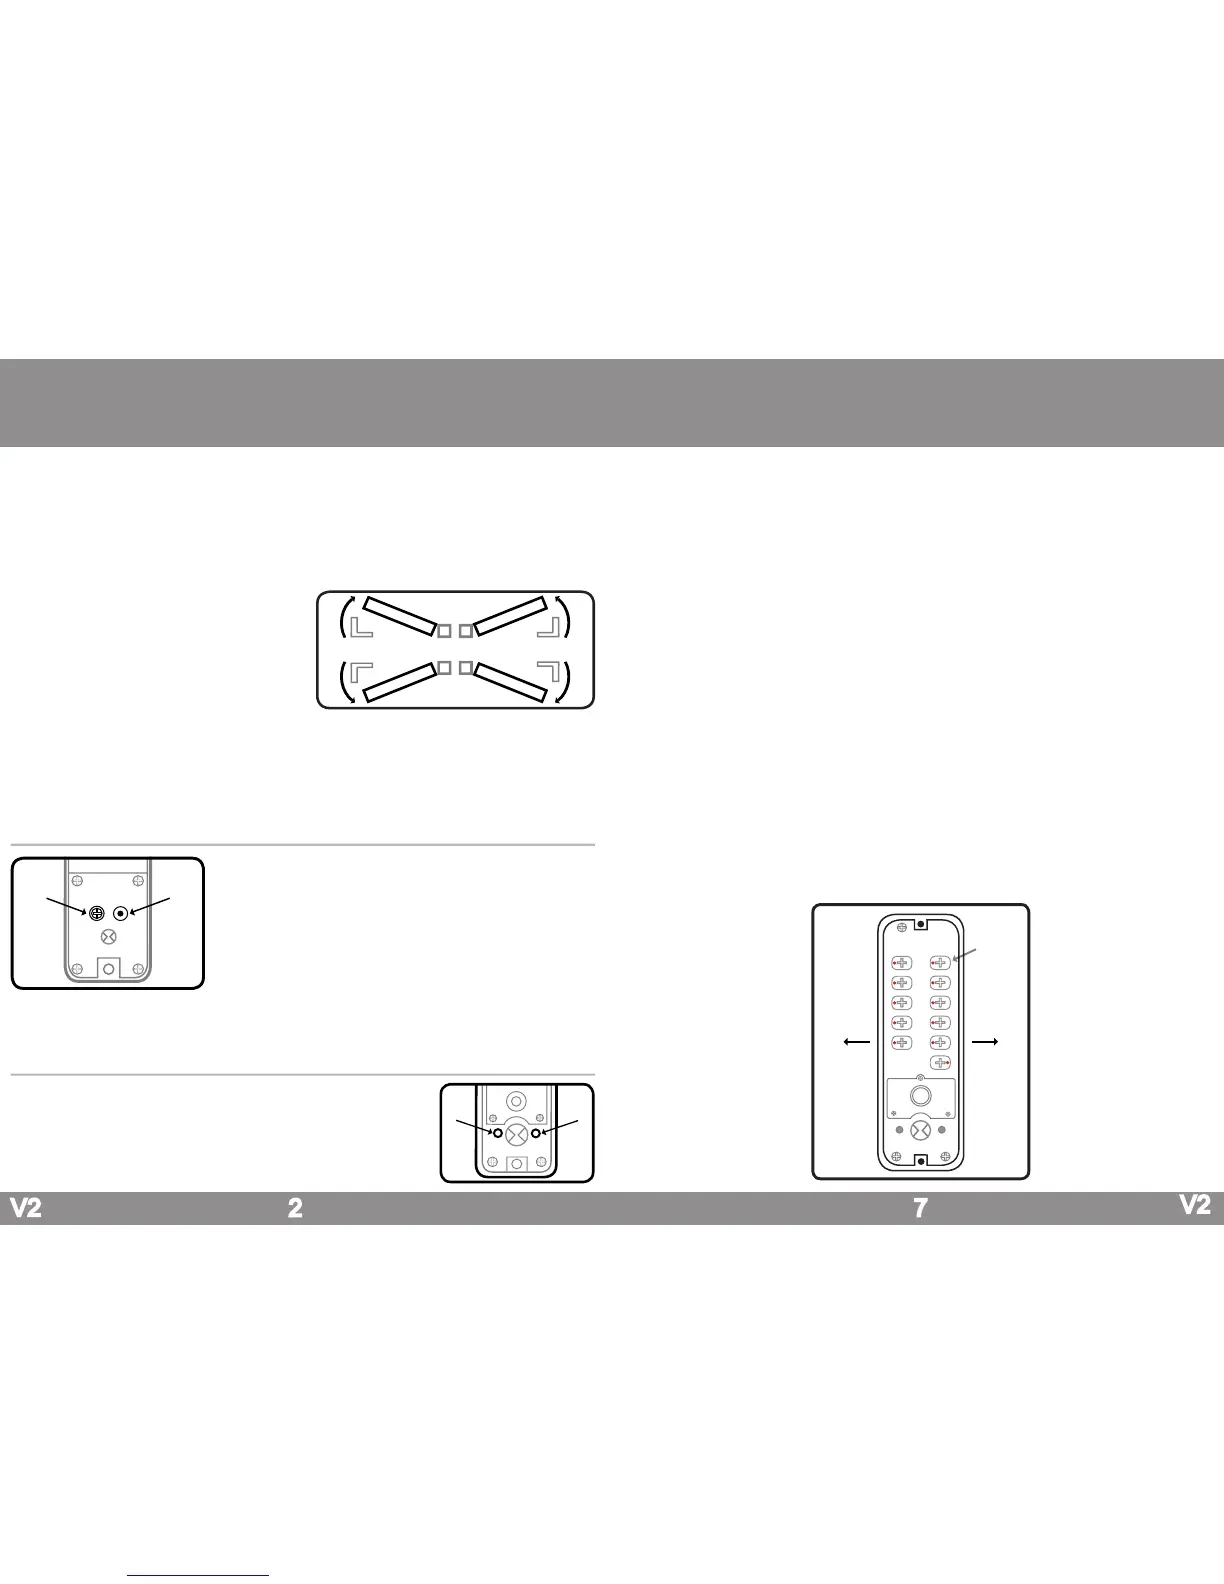
2. Turn the keypad over so that you are able to see the code change dials on the reverse (as shown in the diagram below).
3. Press the ‘C’ button to ensure that no digits have been pressed.
4. Using the code change tool (part no.16) press and turn all of the code change dials outwards so that all of the red markers
on all of the code change dials are facing outwards.
Under no circumstances should any tool other than the code change tool (part no.16) to be used to turn the code
change dials.
5. To ensure that no digits have been entered, press the ‘C’ button and turn the knob on the keypad.
If the knob does not turn freely without having to enter any code, turn the keypad over and check that all of the red
markers on the code change dials are facing outwards.
6. To set a button as a coded digit the code change dial will need to be pressed and rotated using the code change tool (part
no.15) so that the red marker is facing towards the number or letter down the centre of the lock.
As you will see in the diagram below it has been coded to 1, 2, 3, 4, 5 as all of the red markers on the code change
dials are facing towards the numbers down the centre of the keypad and the remaining non coded digits are facing
outwards.
7. Ensure that all the remaining digits that are not in the code are facing outwards. As you will see from the diagram below the
digits that are not in the code 6, 7, 8, 9, 0 and Y have the red marker facing outwards and all of the coded digits red markers
are facing inwards towards the number down the centre of the keypad.
Please note that the code is not sequential and if for instance the unit was coded to 1, 2, 3, 4, 5 the code can be en-
tered 5, 4, 3, 2, 1 or any sequence as long as all of the digits in the code have been pressed. It is recommended that
the ‘C’ button is pressed before each use to clear the coding chamber of any buttons that may have been pressed.
8. With the lock coded and a note made of the new code; enter the code and rotate the knob 3 - 4 times to check that the unit
has been recoded successfully before retting it to the door. Once tted to the door check the code once more before closing.
7
A B
6
7
8
9
0
C
1
2
3
4
5
Y
OutwardsOutwards
Code
Change Dial
V2
 Loading...