Robert Bosch Hausgeräte GmbH 35
The Instructions for Use refer to several models.
Differences are identified.
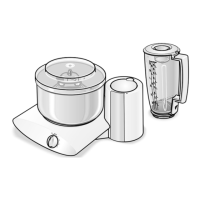
Overview
Please fold out the illustrated pages!
Fig. A
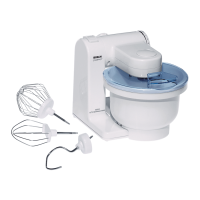
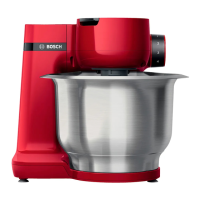
1 Base unit
2 Rotary switch
3 Drive for bowl/tools
4 Drive for blender
5 Protective cover for blender drive
6 Cord store
Bowl:
7a Stirring bowl
made of plastic or stainless steel
(depending on model)
7b Lid rim
7c Lid
Tools:
8a Double whisk (some models)
e.g. for whipping cream and mixing light
doughs
8b Kneading hook
e.g. for kneading heavy dough
8c Dough blade
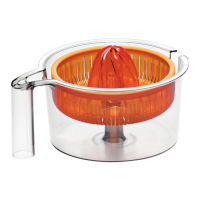
Blender (some models) *:
9a Blender jug
9b Lid with feed tube
9c Funnel
9d Blade insert
* If an accessory is not included in the product
package, it can be purchased via the trade
or customer service.
Operating the appliance
z Before operating the appliance and
accessories for the first time, clean
thoroughly; see “Cleaning and servicing”.
Preparation
z Place the base unit on a smooth and clean
worktop.
z Pull out the power cord.
z Insert the mains plug.
Selecting the setting
z Rotate the switch to the required setting.
0/off = Stop/Off
M = Pulse switch
Hold rotary switch. The drive operates
at maximum speed.
Settings 1–4 = Operating speed
(1 = slow, 4 = fast)
Working with the bowl and the
tools
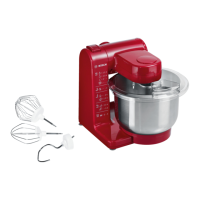
Double whisk (some models)
for whisking egg whites, cream
and light dough, e.g. sponge
mixture.
Kneading hook
for kneading heavy dough and
mixing-in ingredients that ought
not be cut (e.g. raisins and
chocolate chips).
If using the kneading hook, first insert the dough
blade.
Note:
The function and use of stainless steel
and plastic bowls (depending on model) are the
same and are therefore not differentiated in the
diagrams.
`~ìíáçå>
aç=åçí=çéÉê~íÉ=íÜÉ=~ééäá~åÅÉ=ïáíÜçìí=
~å=~ÅÅÉëëçêóLíççä=áå íÜÉ çéÉê~íáåÖ=
éçëáíáçåK=
aç=åçí=çéÉê~íÉ=íÜÉ=~ééäá~åÅÉ=ÉãéíóK=
aç=åçí=ÉñéçëÉ=~ééäá~åÅÉ=
çê ~ÅÅÉëëçêáÉë=íç=ÜÉ~í=ëçìêÅÉëK
Important information
If the protective cover is placed on
the blender drive, the appliance
can be operated with the mixing
bowl only.
If using the blender drive, place
the protective cover on the unused
drive for the bowl.
oáëâ=çÑ=áåàìêó=Ñêçã=êçí~íáåÖ=íççäë
tÜáäÉ=íÜÉ=~ééäá~åÅÉ=áë=çéÉê~íáåÖI=
âÉÉé=ÑáåÖÉêë=ÅäÉ~ê=çÑ=íÜÉ=ãáñáåÖ=ÄçïäK
aç=åçí=ÅÜ~åÖÉ=íççäë=ìåíáä=íÜÉ=ÇêáîÉ=
Ü~ë=ÅçãÉ=íç=~=ëí~åÇëíáää=Ó=ïÜÉå=íÜÉ=
~ééäá~åÅÉ=áë=ëïáíÅÜÉÇ=çÑÑI=íÜÉ=ÇêáîÉ=
ÅçåíáåìÉë=êìååáåÖ=ÄêáÉÑäóK
36 Robert Bosch Hausgeräte GmbH
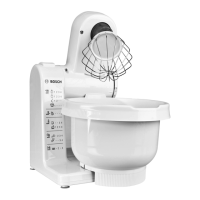
Figure B
z Attach the mixing bowl and rotate all
the way in an anti-clockwise direction.
z Insert required tool pair:
Double whisk:
– Attach the double whisk to the drive
shaft in the bowl.
– Ensure that the gearing meshes fully;
if required rotate slightly and press on.
Kneading hook:
– First place the dough blade on the
drive shaft in the bowl, then
– attach the kneading hook to the drive
shaft in the bowl.
Use the recommended tools for the
recipes.
z Attach the lid rim and rotate it all the way
in an anti-clockwise direction.
z Put the ingredients to be processed
into the bowl.
z Attach the cover.
z Set the rotary switch to the desired setting.
Our recommendation:
– whisking at setting 3–4,
– mixing in at setting 1–2.
– Kneading hook:
first stir in at setting 1, knead
at setting 3.
Adding more ingredients
z Switch off the appliance with the rotary
switch.
z Remove the cover.
z Add ingredients.
After using the appliance
z Switch off the appliance with the rotary
switch.
z Pull out the mains plug.
z Remove the lid and lid rim by rotating them
in a clockwise direction.
z Take the tool out of the bowl.
z Remove the bowl by rotating
it in a clockwise direction.
z Clean all parts, see “Cleaning and
servicing”.
Blender
(some models)
Figure C
z Remove protective cover from the blender
drive.
To do this, press the back of the protective
cover and remove the cover.
z Place the protective cover on the drive
for bowl/tools.
z Attach the blender and rotate all the way
in an anti-clockwise direction.
Ensure that the marks on the blender and
appliance are in alignment!
z Add ingredients.
– Maximum amount of liquid
ingredients = 1.25 litres;
– Maximum amount of frothing or
hot liquids = 0.5 litres;
– Optimum processing amount of solid
ingredients = 100 grams.
z Attach the cover and as far as possible
in a clockwise direction.
The lug on the blender cover must be fully
located in the slot in the blender handle!
Blender will not work unless the cover has
been attached and locked.
en
oáëâ=çÑ=áåàìêó=Ñêçã=ëÜ~êé=Ää~ÇÉëL
êçí~íáåÖ=ÇêáîÉ
kÉîÉê=éä~ÅÉ=ÑáåÖÉêë=áå=íÜÉ=~íí~ÅÜÉÇ=
ÄäÉåÇÉê>=aç=åçí=êÉãçîÉL~íí~ÅÜ=
íÜÉ ÄäÉåÇÉê=ìåíáä=íÜÉ=ÇêáîÉ=áë=~í=
~ ëí~åÇëíáää>
kÉîÉê=çéÉê~íÉ=íÜÉ=ÄäÉåÇÉê=ÉãéíóK=
_äÉåÇÉê ïáää=åçí=ïçêâ=ìåäÉëë=íÜÉ=ÅçîÉê=
Ü~ë=ÄÉÉå=~íí~ÅÜÉÇ=~åÇ=äçÅâÉÇK
oáëâ=çÑ=ëÅ~äÇáåÖ
fÑ=éêçÅÉëëáåÖ=Üçí=äáèìáÇëI=ëíÉ~ã=
ÉëÅ~éÉë=íÜêçìÖÜ=íÜÉ=ÑìååÉä=áå=íÜÉ äáÇK=
^ÇÇ=~=ã~ñK =MKR=äáíêÉë=çÑ=Üçí=çê ÑêçíÜáåÖ=
äáèìáÇK
`~ìíáçå>
mçëëáÄäÉ=Ç~ã~ÖÉ=íç=ÄäÉåÇÉê>
aç=åçí=éìí=ÇÉÉéJÑêçòÉå=Ñêìáí=~åÇ=
îÉÖÉí~ÄäÉë=áåíç=íÜÉ=ÄäÉåÇÉêK
39
en

 Loading...