2
Getting Ready . . . . . . . . . . . . . . . . . . . . . . . 3
Connecting the Equipment . . . . . . . . . . 3
Connecting the Equipment . . . . . . . . . . 4
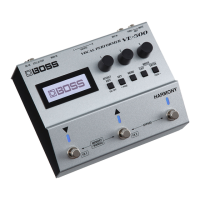
Top Panel . . . . . . . . . . . . . . . . . . . . . . . . . . 5
Screen Structure . . . . . . . . . . . . . . . . . . . 6
Operation of the [1]–[3] Knobs . . . . . . . 7
Switching Pages . . . . . . . . . . . . . . . . . . . . 7
Turning On/O the Power . . . . . . . . . . . 8
Tuning (Tuner) . . . . . . . . . . . . . . . . . . . . . 8
Playing . . . . . . . . . . . . . . . . . . . . . . . . . . . . . . 9
Mic Settings . . . . . . . . . . . . . . . . . . . . . . . 9
Adjusting the Mic Sensitivity . . . 9
Phantom Power Settings . . . . . . . 9
Patch Structure . . . . . . . . . . . . . . . . . . . . . 9
Switching Between Memory and
Manual Modes . . . . . . . . . . . . . . . . . . . . . 9
Switching Patches . . . . . . . . . . . . . . . . . . 10
Adding a Harmony Eect . . . . . . . . . . . . 10
About the Play Screen . . . . . . . . . . . . . . . 10
Editing a Patch . . . . . . . . . . . . . . . . . . . . . . . 11
Basic Operation . . . . . . . . . . . . . . . . . . . . 11
Changing the Eect Connections 12
Changing the CTL & ASSIGN
Settings . . . . . . . . . . . . . . . . . . . . . . 13
Matching the Harmony to the
Key of the Song . . . . . . . . . . . . . . . 14
Saving a Patch (Write) . . . . . . . . . . . . . . . 15
Exchanging Patches . . . . . . . . . . . 15
Initializing a Patch . . . . . . . . . . . . . 15
System Settings (MENU) . . . . . . . . . . . . . 16
Basic Operation . . . . . . . . . . . . . . . . . . . . 16
Adjusting the Display Contrast . . . . . . . 17
Enabling/Disabling the Auto-O
Function . . . . . . . . . . . . . . . . . . . . . . . . . . 17
Returning to the Factory Settings
(Factory Reset) . . . . . . . . . . . . . . . . . . . . . 17
Synchronizing with a DAW or
External MIDI Device
. . . . . . . . . . . . . . . . 18
Installing the USB Driver . . . . . . . . . . . . . 18
Installing the Dedicated Software . . . . 18
Appendix . . . . . . . . . . . . . . . . . . . . . . . . . . . . 19
Error Messages . . . . . . . . . . . . . . . . . . . . . 19
Attaching the Rubber Feet . . . . . . . . . . . 19
Main Specications . . . . . . . . . . . . . . . . . 19
USING THE UNIT SAFELY . . . . . . . . . . . . . 20
IMPORTANT NOTES . . . . . . . . . . . . . . . . . . 20
* To prevent malfunction and equipment failure, always turn down the volume, and turn o all the units before
making any connections.
* The power to this unit will be turned o automatically after a predetermined amount of time has passed since it
was last used for playing music, or its buttons or controls were operated (Auto O function).If you do not want
the power to be turned o automatically, disengage the Auto O function (“Enabling/Disabling the Auto-O
Function” (p. 17)).
5 Any settings that you are in the process of editing will be lost when the power is turned o. If you have any
settings that you want to keep, you should save them beforehand.
5 To restore power, turn the power on again (p. 8).
Contents