EasyManua.ls Logo

Bresser BR-CR1 - User Manual

Bresser BR-CR1
4 pages
Print Icon
To Next Page IconTo Next Page
Loading...
GB
INSTRUCTION MANUAL
BR-CR1
Ceiling rail system
with pantographs
Art. No. F000224
GENERAL SAFETY INSTRUCTIONS
ATTENTION!
The assembly must be carried out by a qualied tter! It is
recommended that two people carry out the assembly.
The ceiling rail system may only be attached to ceilings with an
appropriate load-bearing capacity!
The structure of the ceiling must be suitably solid and suitable for
the subsequent total weight (including attached pantographs and
accessories). Never mount the ceiling rail system on a wooden ceiling
or an unstable or suspended ceiling!
Always ensure that the mounting screws are properly anchored!
Note: Information on the weight of the ceiling rail system can be
found in the chapter "Technical data". The weight specications for
other possible add-on parts can be found in the operating instructions
supplied with these parts.
DANGER FROM FALLING OR DROOPING PARTS!
Make sure that the ceiling rail system is securely and stably mounted
before attaching other device accessories* to it.
Secure all devices/accessories* mounted on the pantographs using
safety wire rope.
Lay the voltage and connection cables in such a way that they cannot
be damaged by the trolleys or cause strangulation to persons!
Only use accessories that meet the required specications. Find
more information in the chapter "Technical data".
• The maximum total load capacity of the ceiling rail system must
not be exceeded. At the maximum total load capacity, both the total
system weight and the weights of the mounted accessories/devices*
must be taken into account. Find detailed information on weights
under "Technical data" as well as in the manual of the mounted
accessory.
DANGER OF CRUSHING!
Do not touch the guide rails during assembly, cleaning, operation
and when changing the position or moving the current collectors!
Do not insert ngers into the lifting mechanism of the pantograph!
PARTS OVERVIEW (Fig. 1)
Single slide rails Double slide rails Ceiling brackets Double carriage roller Single carriage roller (with integrated spigot connection)
Pantograph Spigot adapter Rail stopper Safety wire rope  Knob screw
SCOPE OF DELIVERY (Fig. 2)
2x single slide rails 2x double slide rails Ceiling bracket (4x) Double carriage roller (4x) Single carriage roller (4x) Pantographs (4x)
Spigot adapter(4x) Rail stopper (12x) Safety wire rope (4x)
ADDITIONALLY REQUIRED*
Phillips screwdriver, 8 pcs. mounting screws (type M6) and, if necessary, suitable dowels/ceiling anchors for mounting the ceiling brackets
*not included with the purchase
Fig. 1 Fig. 2


Question and Answer IconNeed help?

Do you have a question about the Bresser BR-CR1 and is the answer not in the manual?

Summary

General Safety Instructions

General Assembly and Usage Safety

Covers assembly by qualified fitters, ceiling load capacity, solid structure requirements, and cable management.

Dangers from Falling Parts

Ensures secure mounting of the system and all accessories to prevent falling.

Crushing Hazard Prevention

Warns against touching guide rails during operation and inserting fingers into the lifting mechanism.

Mounting the Ceiling Rail System

Step-by-Step Assembly

Detailed instructions for fixing ceiling brackets, mounting slide rails, rollers, and pantographs.

Attachment of Accessories;Devices

Securing Mounted Devices

Guides on how to attach accessories to the pantograph and secure them with safety wire rope.

Technical Data

Overview

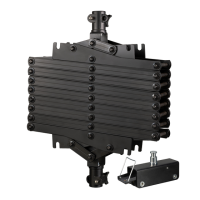
The BRESSER BR-CR1 is a ceiling rail system designed for professional studio environments, offering a flexible and space-saving solution for mounting and positioning lighting equipment and other accessories. This system allows users to move their equipment freely across a ceiling-mounted grid, eliminating the need for floor stands and providing a cleaner, more organized workspace.

Function Description:

The core function of the BR-CR1 ceiling rail system is to provide a dynamic overhead mounting platform for studio equipment. It consists of a network of single and double slide rails that form a cross-like basic structure on the ceiling. Equipment is attached to pantographs, which are then connected to carriage rollers that run along these rails. This setup enables smooth and precise positioning of lights, softboxes, and other accessories anywhere within the rail grid.

The system is designed to maximize studio floor space, preventing clutter and trip hazards associated with traditional light stands. The pantographs offer adjustable vertical extension, allowing users to raise or lower their equipment to the desired height. This flexibility is crucial for achieving various lighting angles and effects without constantly repositioning heavy floor-based stands. The rail stoppers at the ends of the rails ensure that the carriage rollers and attached equipment remain securely within the system.

Safety is a paramount consideration, with explicit instructions for secure mounting and the use of safety wire ropes for all attached devices. This prevents accidental falls of equipment, which could cause damage or injury. The system also emphasizes proper cable management to avoid damage to cables by trolleys or strangulation hazards.

Important Technical Specifications:

  • Model: F000224 (BR-CR1)
  • Type: Ceiling rail system
  • Ceiling Rails/Length: 4 pieces, 2 meters each
  • System's Tare Weight (incl. mounting material and pantographs): Approximately 32.5 kg
  • Pantographs/Maximum Load Capacity: 4 pieces, each with a maximum load of 5 kg
  • Pantograph Extract (Vertical Extension): Approximately 40-200 cm
  • Material: Aluminium, black

Usage Features:

The BR-CR1 system offers several key usage features that enhance its functionality and user experience:

  • Flexible Positioning: The cross-like rail structure allows for movement in two perpendicular directions, providing extensive coverage within the studio space. This enables precise placement of lights for various shooting scenarios.
  • Adjustable Height: The pantographs offer a significant vertical extension range (40-200 cm), allowing for versatile lighting angles from high overhead to closer to the subject. This adjustability is crucial for controlling light spread and shadow quality.
  • Space Optimization: By moving equipment off the floor and onto the ceiling, the system frees up valuable studio space, making the workspace safer, more organized, and easier to navigate.
  • Easy Attachment of Accessories: The spigot adapters on the pantographs provide a standard mounting point for a wide range of studio accessories, ensuring compatibility with existing equipment. Knob screws allow for hand-tightening, securing accessories firmly.
  • Smooth Movement: The double and single carriage rollers are designed for smooth travel along the aluminum rails, enabling effortless repositioning of equipment.
  • Modular Design: The system's components, such as single and double slide rails, ceiling brackets, and carriage rollers, suggest a modular design that could potentially be expanded or reconfigured to suit different studio sizes and needs.
  • Safety Features: Rail stoppers prevent accidental dislodgment of rollers, and the mandatory use of safety wire ropes for all attached devices provides a critical secondary safety measure against falling equipment.

Maintenance Features:

While the manual does not explicitly detail maintenance features, certain aspects can be inferred:

  • Durable Construction: The use of aluminum for the rails and black finish suggests a robust and durable system designed for long-term use in a professional environment. Aluminum is resistant to corrosion and wear.
  • Cleaning: Although not specified, regular cleaning of the rails and rollers would likely be necessary to ensure smooth operation and prevent dust or debris from impeding movement. The "DANGER OF CRUSHING!" warning during cleaning implies that components are accessible for maintenance.
  • Inspection: The emphasis on secure mounting and proper anchoring suggests that periodic inspection of mounting screws, rail connections, and pantograph mechanisms would be a crucial maintenance step to ensure continued safety and functionality.
  • Component Replacement: As a modular system, it is likely that individual components like rollers or stoppers could be replaced if they wear out or become damaged, extending the overall lifespan of the system.
  • Cable Management: The instruction to lay cables in a way that prevents damage implies that the system is designed to allow for organized cable routing, which contributes to easier maintenance and troubleshooting of electrical connections.

In summary, the BRESSER BR-CR1 ceiling rail system is a professional-grade solution for studio lighting, offering unparalleled flexibility, space efficiency, and safety through its robust design and thoughtful features. Its ability to precisely position equipment overhead makes it an invaluable tool for photographers and videographers seeking to optimize their workflow and creative control.

Bresser BR-CR1 Specifications

General IconGeneral
BrandBresser
ModelBR-CR1
CategoryIndustrial Equipment
LanguageEnglish