This document is an instruction manual for the Bresser Goto-Kit for equatorial EQ-5 Mounts, identified by Art.-Nr. 49-51750. It details the assembly, operation, and maintenance of the telescope mount and its associated handbox control system.
The Bresser Goto-Kit is designed to enhance equatorial EQ-5 mounts by providing automated tracking and Go-To capabilities for astronomical observation. The system comprises a mount, a handbox, and motor drive systems for both Right Ascension (R.A.) and Declination (Dec.) axes.
Mount Components and Functions:
The mount features several key components:
- Dec. Lock (1): Controls manual movement along the Dec. axis. Counter-clockwise rotation unlocks for free manual movement, while clockwise rotation (to a firm feel) tightens the lock and engages the Dec. motor drive for handbox operations.
- Polar VF Cap (2): A removable cap for accessing the polar viewfinder.
- Dec. Setting Circle (3): Used for setting declination.
- Counterweight Shaft Base (4): Threads to the mount and supports the counterweight shaft.
- Counterweight and Counterweight Lock Knob (5): Counterbalances the optical tube's weight and adds stability. The lock knob secures the counterweight on the shaft.
- Counterweight Shaft (6): The shaft onto which the counterweight slides.
- Counterweight Safety Cap (7): Prevents the counterweight from accidentally slipping off the shaft.
- Computer Control Panel (8): This panel (Fig. 1b) is the central hub for motor control. It includes:
- Handbox (HBX) Port: For connecting the handbox coil cord.
- 12V DC Power Connector: An optional power input (Art. No. 49-30000 or 04-55121).
- LED: Illuminates when power is supplied to the handbox and motors.
- ON/OFF Switch: Powers the control panel and handbox.
- ST-4 Autoguider Port: Compatible with ST-4 autoguider systems for astrophotography.
- Dec Port: Connects the Dec. motor assembly to the handbox for motor control.
- Right Ascension (R.A.) Motor Drive Assembly (9): Controls movement along the R.A. axis via the handbox. The R.A. Lock (17) must be tightened for motor operation.
- Latitude Adjustment T-Handles (10): Used to set the observing location's latitude. These T-handle screws operate in a "push-pull" manner.
- Azimuth Control Knobs (11): Fine-tune side-to-side movement for centering Polaris or other objects.
- Latitude Dial (12): Displays the set latitude.
- Polar Alignment Viewfinder (13): Facilitates precise polar alignment.
- Polar Alignment Viewfinder Reticle and LED Knob (14): Rotates to switch the reticle illumination on/off.
- R.A. Setting Circle (15): Used for setting right ascension.
- R.A. Setting Circle Lock Knob (16): Locks the R.A. Setting Circle.
- R.A. Lock (17): Controls manual movement along the R.A. axis. Counter-clockwise unlocks for free manual movement, while clockwise (to a firm feel) tightens the lock and engages the R.A. motor drive.
- Dec. Motor Drive Assembly (18): Controls movement along the Dec. axis via the handbox. The Dec. Lock (1) must be tightened for motor operation.
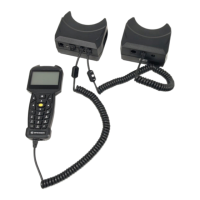
Handbox Features and Usage:
The handbox (Fig. 2) is the primary interface for controlling the telescope.
- LCD-Display (1): An eight-line display (36 x 63mm, 8 lines with 21 characters each) showing values, information, and menu options.
- ENTER Key (2): Navigates to the next menu level or confirms selections.
- MODE Key (3): Returns to the previous menu level.
- + Key (4): Recalls recently tracked objects.
- Arrow Keys (5): Slew the telescope in specific directions (up, down, left, right) at nine different speeds. Also used for data entry (scrolling through letters/digits) and moving the cursor. For RA/Dec alignment, "right"/"left" swivel the telescope in the hour axis, and "up"/"down" move it in declination.
- Number Keys (6): Input digits 0-9. Also used to change slew speeds (1 slowest, 9 fastest). Key "0" toggles the red utility light.
- Stop Key (7): Interrupts driven telescope movement. Pressing again resumes the last executed function.
- Help Key (8): Accesses the help function.
- Coil Cord Port (9) & Coil Cord (10): Connects the handbox to the computer control panel.
- Key for the Utility Light (11) & Utility Light (12): Turns on the built-in red utility light in two brightness levels.
- RS-232-Interface (13): An ASCOM compatible serial PC interface (driver available from www.bresser.de and www.ascom-standards.org). Requires optional Bresser PC-connecting set (part No. 07-45910).
Key Operational Features:
- Telescope Setup and Balancing: Essential for stable and smooth movement. Involves unlocking R.A. and Dec. locks, sliding counterweights, and adjusting the optical tube until the telescope remains balanced on both axes.
- Automatic Tracking: Compensates for Earth's rotation, allowing the telescope to track celestial objects at sidereal speed.
- Setting the Polar Home Position: Involves leveling the mount, aligning the counterweight shaft and optical tube to North (or South in the Southern Hemisphere), and setting the latitude using the T-handle screws and latitude dial. Precise polar alignment using the polar viewfinder is recommended for optimal Go-To functionality.
- Manual Observation: Loosen R.A. and Dec. locks to move the telescope freely. Use the viewfinder to sight objects and then re-tighten locks. Focus with the focusing mechanism.
- Activating Arrow Keys and Slew Speeds: After power-on and initial setup (date, time, observing site), the arrow keys become active. Nine slew speeds are available (0.25 arc-min/sec to 120 arc-min/sec), adjustable via number keys, for fine centering or coarse movement.
- Go-To Capabilities: Allows automatic movement to over 30,000 objects in the object library. Requires learning menu navigation, initializing the computer control, placing the telescope in polar home position, and performing a "One-Star Align."
- Initialization: A one-time procedure (or after a Reset) to input date, time, and observing location (country/city or custom site coordinates). This data is used for precise celestial object calculations.
- One-Star Alignment: The fastest alignment method, performed at night. Involves bringing the telescope to Polar Home position, selecting an alignment star from the handbox, and centering it in the eyepiece.
- Two and Three-Star Alignment: Improves positioning precision by repeating the alignment process with multiple stars.
- Synchronization: Further increases positioning precision by equilibrating the object's position with the database, allowing closer approach to celestial objects.
- RA + DEC Backlash Compensation: A calibration procedure to improve accuracy by training the gear backlash for both axes. Requires a reticle eyepiece and involves approaching a high-contrast object, briefly pressing a direction button, then holding the opposite direction button until the object returns to the home position.
- Navigation to Target Objects: Allows selection of celestial objects (e.g., planets from the Solar System menu) or custom objects (by inputting coordinates) for automatic Go-To.
- Utility Menu: Provides additional functions:
- Current Objects: Displays visible planets with calculated rise/set times and culmination.
- Rise and Setting Time: Calculates rise/set times and culmination for desired objects.
- Lunar Phase: Graphically displays moon phases for selected months/years.
- Timer: Sets a signal tone for a specified duration (e.g., for astrophotography exposure times).
- Alarm: Sets a signal tone for a specific time (e.g., for celestial events).
- Eyepiece FOV: Calculates the field of view for a particular eyepiece based on telescope and eyepiece focal lengths.
- Eyepiece Magnification: Calculates magnification based on telescope and eyepiece focal lengths.
- LCD Illumination: Adjusts screen brightness.
- Park Scope: Moves the telescope to a park (starting) position.
- Date and Time: Enter current date (year-month-day) and time (hour-minute-second).
- Daylight Saving: Enable/disable daylight saving.
- Site Setting: Set current location by selecting country/city or entering custom GPS coordinates.
- Sky/Land: Switch between sky and land target observation modes.
- AZ / EQ: Switch between Azimuthal and equatorial mounting types.
- Telescope Mount: Configure mount settings (not available in software version 2.2).
- Tracking Rate: Adjust automatic tracking speed (Sidereal, Solar, Moon, Customize, Guiding). Guiding speed adjusts reaction speed for autoguiding via ST-4 interface (1000 for aggressive, lower values for sluggish response).
- Language: Select preferred language (English, German, French, Italian, Spanish).
- Telescope Model: Not available in software version 2.2.
- Reset: Resets telescope control to factory settings, requiring re-initialization and re-entry of all user data.
Technical Specifications:
- Article Description: Bresser Goto Set
- Article Number: 49-51750
- Suitable Mountings: Bresser EXOS II and EQ-5 compatible model series
- Required Ratio of the Worm Gear: 144:1
- Number of Stored Objects: < 100,000
- Max. Speed of the Drive: 2° / second
- Auto-Guider Port: Yes / ST-4 compatible
- LCD Display: 36 x 63mm; 8 lines with 21 characters each
- Drives: DC servo motors with rotary encoders
- Operating Voltage: 12V DC
- Connection Power Supply: DC-plug 5.5/2.5mm, pin inside + / plug shaft unit –
- Battery Compartment: Yes / 8 x D-cell / LR20 (batteries not included)
Maintenance and Safety:
- WARNING: Never use a telescope to look at the Sun, as it can cause instant and irreversible eye damage. Do not point the telescope or viewfinder at or near the Sun.
- Children: Always require adult supervision when observing.
- Alignment: Once aligned, avoid opening telescopic clamps or manually adjusting the base to prevent loss of alignment.
- Polar Finder Scope Illumination: Available separately.
- PC Connection: Use only the optional Bresser PC-connecting set (part No. 07-45910) for the RS-232 interface to prevent serious damage to electronics.
- Reticle Illumination: Remember to switch off the reticle illumination after use.
- Data Accuracy: Ensure correctness of date, time, and location data for precise calculations and object positioning.
The manual also includes sections on finding the polar star, distances in space, and possible observation targets (Moon, Orion Nebula, Ring Nebula, Dumbbell Nebula), providing guidance for astronomical exploration with the Bresser Goto-Kit.