Do you have a question about the Brightz Hoop Brightz and is the answer not in the manual?
Guidelines for installing batteries, mixing, and precautions against explosion or leakage.
Cleaning the backboard and attaching the light string with fasteners.
Determining wire paths, cleaning the pole, and using mounting ties for secure wire management.
Attaching the battery pack to the hoop pole using the provided silicon strap.
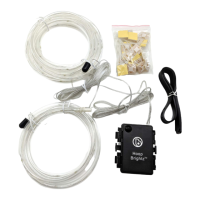
The Hoop Brightz™ is an illuminated accessory designed to enhance basketball hoops with vibrant lighting, making them suitable for play in low-light conditions or simply for aesthetic appeal. This product involves the installation of two distinct light strings: one for the basketball rim and another for the backboard, both powered by a single battery pack.
The primary function of the Hoop Brightz™ is to provide illumination for a basketball hoop, allowing for extended play into the evening or night. It transforms a standard basketball setup into an eye-catching, glowing display. The system consists of LED light strings that are strategically attached to the rim and backboard, creating a clear outline of the playing area. The battery pack, which houses the power source, is discreetly mounted on the basketball pole, ensuring a clean and integrated look. The design emphasizes ease of installation and durability, making it a practical addition for both casual players and those looking to add a unique flair to their outdoor space.
The installation of the Hoop Brightz™ is divided into several steps, ensuring a systematic and secure setup.
The device requires three fresh AA batteries. To install them, users must open the latches on the side of the battery pack. It is crucial to observe correct polarity (+/-) during insertion. Once the batteries are in place, the battery pack should be closed, ensuring the latches snap shut securely.
Several important guidelines are provided for battery usage to ensure safety and optimal performance:
The smaller of the two light strings is designated for the basketball rim. Users are instructed to weave this string into the net holder hooks. For basketball hoops where weaving is not feasible, mounting ties can be used as an alternative. A critical aspect of this step is to ensure that the end of the light string with the battery wire ends up close to the backboard, facilitating connection to the main power source.
Before installing the backboard string light, the surface area of the backboard must be cleaned. Adhesive-backed fasteners are then placed on the sides of the backboard, with approximately four fasteners on each side, pressed firmly into place. The longer of the two light strings is used to "outline" the backboard. This string is secured to the backboard using mounting ties at each fastener. It is important to ensure that the final position of the battery wire for the backboard light is close to the basketball pole, again to facilitate connection.
This step involves organizing and securing the wiring. Users need to determine the optimal routing of wires from both the backboard and the rim to the battery pack. The area on the basketball pole where fasteners will be placed must be cleaned before firmly pressing adhesive-backed fasteners onto the pole. Mounting ties are then inserted into the fastener openings. Finally, battery cords are gathered, looped with the mounting ties, and the ties are tightened to secure the wires neatly along the pole.
The recommended location for the battery pack is on the back or side of the basketball pole. The installation involves a silicon strap. One end hole of the silicon strap is looped over a T-hook on the side of the battery pack. The battery pack is then placed against the hoop pole, and the silicon strap is pulled around the pole and secured on the other T-hook, firmly attaching the battery pack to the pole.
The Hoop Brightz™ is designed to be a user-friendly and visually appealing enhancement for any basketball hoop, providing extended enjoyment and a striking visual effect. Its robust installation process ensures that the lighting system remains securely attached and functional during use.
| Category | Sports & Outdoors |
|---|---|
| Power Source | Battery Powered |
| Battery Type | AA |
| Batteries Included | Yes |
| Light Modes | Multiple |
| Material | Plastic |
| Glow in the Dark | No |
| Type | LED Hoop Light |
| Features | Weather Resistant |
| Compatibility | Hoops |
| Color | Multicolor |