EasyManua.ls Logo

Brinsea Mini Eco - User Manual

Brinsea Mini Eco
9 pages
Print Icon
To Next Page IconTo Next Page
Loading...
A015 GB Issue 05
1
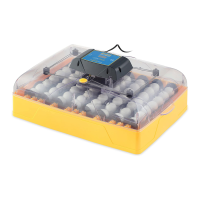
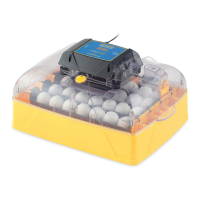
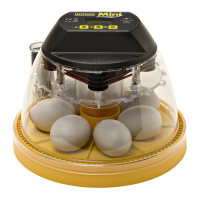
Mini Eco high performance egg incubator
User instructions
Contents
Section Subject Page
1 Introduction 2
2 Unpacking 3
3 Location and Installation 3
4 Storage of eggs 4
5 Temperature 4
6 Humidity and Ventilation 5
7 Egg setting 5
8 Egg turning 6
9 Hatching 6
10 Cleaning up 6
11 Servicing 7
12 Troubleshooting 7
13 Specification 8
Read the instructions before use!
Damaged appliances shall not be used.
The appliance and its supply cord must be placed in an indoor area not subject to splashes
of water or wet conditions and protected from or out of reach of animals.
Repairs shall be carried out only by a suitably qualified person.
This appliance shall not be used, cleaned or maintained by children or persons with reduced
physical, sensory or mental capabilities or lack of experience and knowledge without
supervision. Children shall not play with the appliance.
Disconnect the incubator from the mains power supply during cleaning. Ensure that all
electrical parts are kept dry.
This appliance is only to be used with the power supply unit provided with the appliance.
Record your appliance serial number here: __________________

Questions and Answers

  • L
    Lori YoungJul 27, 2025
    What to do if no chicks hatch using Brinsea Mini Eco?
    • C
      christopherjimenezJul 27, 2025
      If no chicks are hatching with your Brinsea Accessories, several factors could be at play. It could be due to infertility, infection, drastically incorrect incubation settings, or ill health of the parent birds. Check the egg viability, disinfect the incubator, and double-check your incubator settings and procedures, especially the temperature.
  • O
    olsonscottJul 31, 2025
    Why do chicks hatch late using Brinsea Mini Eco Accessories?
    • C
      Christian RichardsonAug 1, 2025
      If chicks are hatching later than expected when using Brinsea Accessories, it's likely that the incubation temperature is too low. To resolve this, try raising the incubation temperature slightly by 0.5°C (1°F).
  • R
    Raymond BrownAug 5, 2025
    Why am I getting generally poor results with my Brinsea Mini Eco Accessories?
    • W
      Wesley WilliamsAug 6, 2025
      If you're experiencing generally poor results with your Brinsea Accessories, it could stem from a few factors. First, review your incubation settings to ensure they are correct. Second, consider the health of your parent birds. Improving their health can positively impact your results. Also, analyze egg weight loss to confirm humidity is at the correct level, and verify that the egg turning mechanism is functioning correctly.
  • M
    mitchell40Aug 11, 2025
    Why do chicks hatch early with deformities using Brinsea Mini Eco Accessories?
    • L
      Logan LawsonAug 11, 2025
      If your chicks are hatching earlier than expected and showing deformities when using Brinsea Accessories, the incubation temperature is likely too high. A slight reduction of about 0.5°C (1°F) should help correct this issue.
  • N
    Nathaniel RogersAug 16, 2025
    What to do if I see late stage ‘death in shell’ using Brinsea Mini Eco?
    • P
      Philip RileyAug 16, 2025
      If you observe late-stage 'death in shell' with your Brinsea Accessories, the humidity is likely too high. Consider reducing average humidity levels to address this issue.
  • D
    Donna BlackAug 21, 2025
    Why are hatch dates widely spread with Brinsea Mini Eco?
    • A
      andrew18Aug 21, 2025
      Widely spread hatch dates when using Brinsea Accessories can be attributed to different rates of development, which may stem from varying egg storage times or fluctuations in incubation temperature. To mitigate this, limit egg storage times and check for any incubation temperature variation caused by sunlight or large room temperature changes.

Summary

Location and Installation

Optimal Room Conditions

Place incubator in a draft-free room with stable temperature (20-25°C) and good ventilation.

Power Supply Unit

Only use the power supply unit supplied with the product to avoid hazards.

Temperature Control

Factory Settings

Incubator is factory set for most species (37.4-37.6°C); check and adjust as needed.

Temperature Adjustment

Use a small screwdriver to adjust screw on rear housing; turn clockwise to increase.

Adjustment Precision

Make small adjustments (1/4 turn ≈ 2°C) and allow time for stabilization.

Temperature Sensitivity

Embryos tolerate short drops but high temperatures can seriously harm hatch rates.

Humidity and Ventilation

Hatching Humidity

Ensure water is above divider for last two days; high humidity prevents membrane drying.

Hatching Process

Hatching Humidity Levels

Ensure high humidity and full water pots during hatching.

Cleaning Up

Safety Precautions

Disconnect power and keep electrical parts dry; do not immerse the incubator top.

Washing Instructions

Wash parts in liquid below 50°C; never use a dishwasher.

Servicing

Initial Troubleshooting Steps

Check power supply engagement in socket and lead connection.

Troubleshooting

Hatching Results Analysis

Record incubation data and candle eggs to analyze poor hatching results.

Common Hatching Issues

Guides on diagnosing issues like 'No chicks hatch' or 'Late stage death in shell'.

Brinsea Mini Eco Specifications

General IconGeneral
Temperature ControlManual
TypeEgg Incubator
MaterialPlastic
Capacity7 hen eggs (or similar sized eggs)
Power SourceMains electricity
Humidity ControlManual

Related product manuals